Pebble floor in the bathroom: an overview of 3 ways to lay an unusual coating
When designing a bathroom, marine style is especially popular. And this is entirely predictable. Water procedures, high humidity - all these attributes of the bathroom in themselves set up thoughts of relaxation and a warm sea. Moreover, immersion in the marine theme can be enhanced by the appropriate design of the room. An effective design technique is the use of sea or river pebbles for flooring. Even a small piece of pebbled floor will look unusual and add originality to the overall bathroom interior. Let's talk about how a pebble floor can be and how to make it yourself.
Pebbles are small stones found on the shores of seas and rivers. Under the influence of water, they undergo a natural “faceting” that smooths corners. Therefore, the shape of pebbles is always round and this allows you to use it in the cladding without additional processing. But the benefits do not end there. Here is a list of other advantages of pebbles:
- Moisture resistance, low porosity. This makes it possible to spread pebbles in rooms with high humidity, without fear of damage to the material.
- A wide range of shades. Thanks to this, you can create various options for cladding. Natural colors of pebbles - white, beige, gray, black, brown, burgundy, blue, green.
- Pebble floor has a massage effect on the feet.
- Pebbles can be combined with other facing materials (tiles, wood, mosaics), creating original compositions.
- Low price.
- Easy to install.
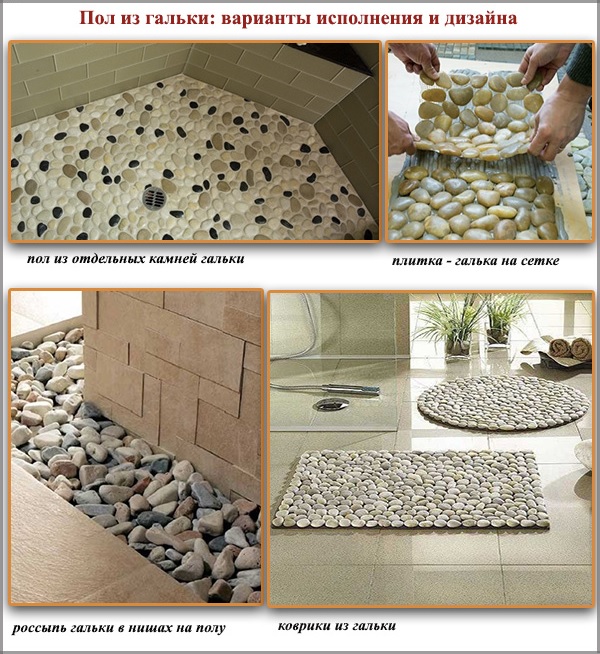
Pebble flooring can be performed in different ways:
- From a separate pebble. At the same time, stones matching in color and size are selected, glued to tile glue, the seams are overwritten.
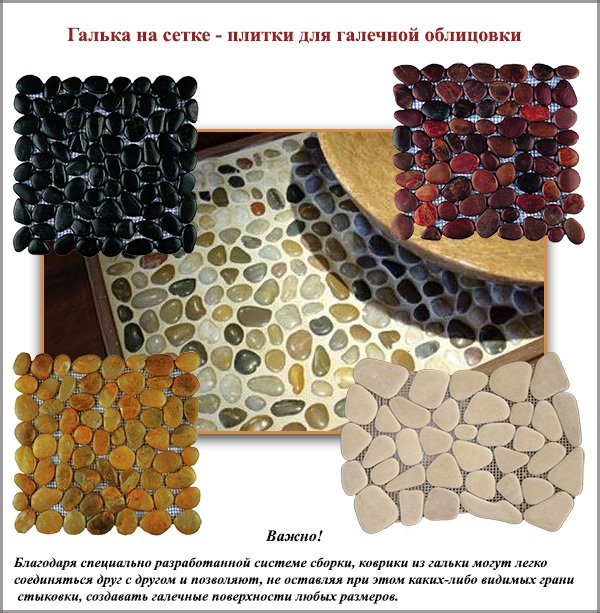
- From pebble mosaic tiles. In this embodiment, pebbles are initially glued to the squares of the fiberglass mesh. Designers have already selected a combination of stones in size and color. It is enough to glue the tiles on the floor using ordinary tile glue.
- In the form of a pebble rug. Pebbles glued to a fabric or rubber can be used as a mobile rug located anywhere in the bathroom.
- In the form of a mound. In large bathrooms, pebbles, as a decor, are poured into open niches near the walls. If desired, the stones can be fixed with glue or used without fixing.
Let's consider the most common options for creating a do-it-yourself pebble floor.
Content
Option 1. Pebble mosaic floor
The easiest way to create pebble floors is to use special tiles. It is a grid squares (most often - 30x30cm) with glued pebbles. Each tile holds about 60 pebbles. Due to the fact that its basis is a transparent grid, and the arrangement of stones is wave-like, the joints between the tiles are almost invisible. As a result of laying such tiles, a continuous mosaic canvas is formed without visible seams.This greatly facilitates the work of a self-taught master who decided to independently make a floor from pebbles.
So that under the lining and in the technological seams water does not fall and mold does not develop with fungi, it is necessary to waterproof the bathroom. Read about how to do this and what materials are used in this article:https://floor.expertexpro.com/en/ustroistvo-rmnt/gidroizolyaciya-vannoj-komnaty-svoimi-rukami.html.
Necessary materials:
- pebbles on a grid (tiles);
- tile glue;
- grout;
- primer;
- water repellent, varnish, impregnation for a "wet" effect - optional;
- wide brush or roller;
- notched trowel;
- rubber spatula;
- sponge;
- knife (for cutting a grid of tiles).
The following describes the progress.
Stage 1 - surface preparation
Lay pebble tiles on a previously prepared surface. The horizontalness of the floor is evaluated using a level. Minor irregularities will subsequently be leveled with a layer of tile glue, so they do not pay attention to them. Large potholes, cracks, irregularities close up with cement screed or self-leveling mortar.
A primer is applied to the leveled surface (with a short-haired roller or brush). It will enhance the adhesion of tile adhesive to the surface. The primer is selected deeply penetrating, with a moisture protective effect, without solvents.
If pebble cladding is carried out on the shower floor, leakage must be prevented. To do this, the floor is waterproofed. To date, the most convenient to use are waterproofing mastics, which are applied to the surface with a brush or roller. Another option is the use of roll waterproofing. Cloths of material are glued to the floor, leading edges to the walls by about 5 cm.
Stage 2 - laying the tiles “on dry”
It is advisable to fix them “dry” before fixing the tiles on the floor. This will allow faster glue laying and prevent possible mating errors. If necessary, at this stage, the tiles are cut with a knife. A preliminary layout allows you to see and evaluate the final result before starting direct laying.
Stage 3 - tile installation
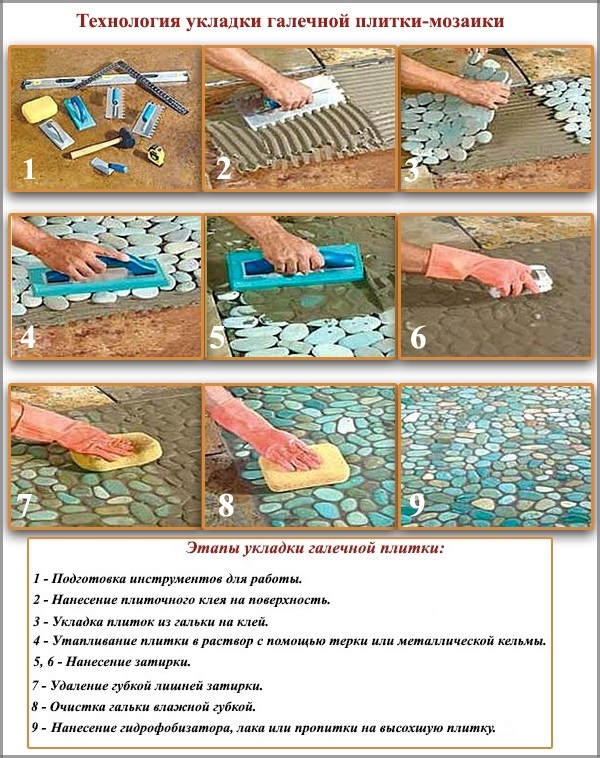
Tile glue is used for laying tiles, it is better to prefer a mixture for porcelain stoneware, natural stone or low-absorbing tiles. The glue is shut with water and mixed well until a thick, creamy mass is formed.
Laying begins with the walls of the room farthest from the entrance. The glue is applied with a notched trowel to a floor area of several tiles. The glue layer should not exceed 1-1.5 cm, otherwise its excess will protrude beyond the edges of the pebbles.
A mesh with pebbles is laid on the glue, they are leveled and pressed with the help of palms, a piece of plywood or a metal trowel. The next tile is combined with the previous one, connecting the decorative bends of the grid. Thus lay out all the elements. At the end of the installation, bald spots and voids inevitably appear at the junction of the tiles. The defect is covered with separate stones, which are separated from the grid and installed in empty places on the glue.
Stage 4 - grouting and impregnation
The glue dries for about 1-2 days. Then proceed to grouting. To do this, use the usual jointing mixture (puffer) for the tile, add color if desired. The mixture is applied by rubbing it into the cracks between the pebbles with a rubber spatula. After 20-30 minutes, when the grout has set, but has not yet hardened, with a damp sponge, remove all excess from the stones.
The next day, pebbles are again wiped with a sponge to wash away the coating from the grout. Then a water repellent is applied to the pebbles - impregnation to protect the stones from moisture. To give the pebble surface more decorative, you can apply 1-2 layers of varnish on top of the water repellent. It will make the pebbles shiny and emphasize its natural beauty. Instead of varnish, a “wet” effect can give a stone a sealant enhancer.
More information on how to make the floor in the bathroom with your own hands is described on the website:https://floor.expertexpro.com/en/ustroistvo-rmnt/kak-sdelat-pol-v-vannoj-komnate.html.
Option # 2. Floor of single pebble stones
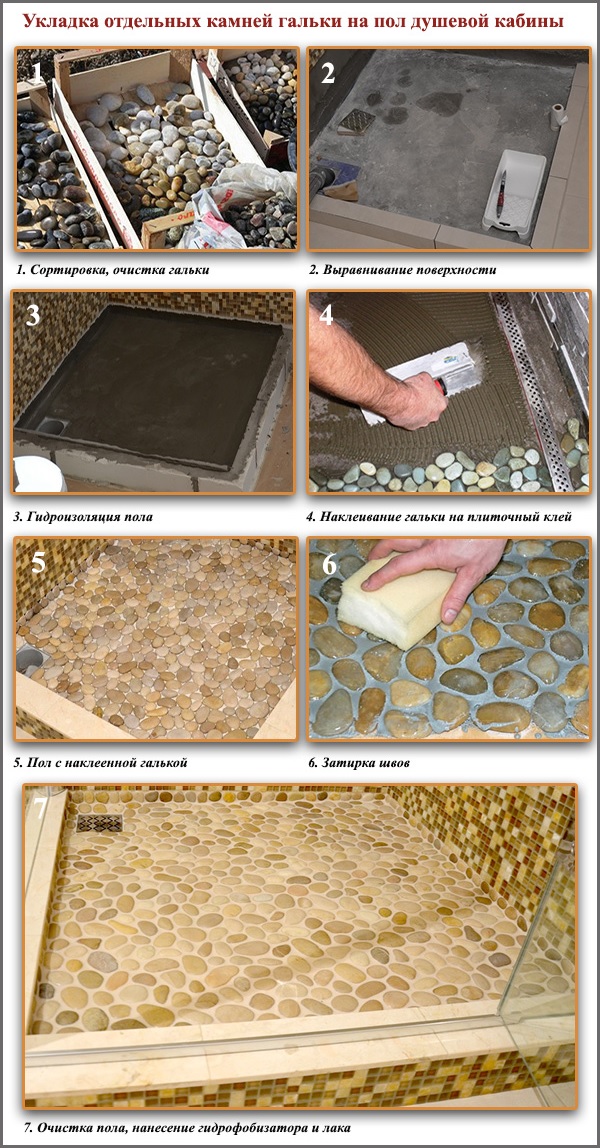
In this case, unprepared whole pebbles are used for flooring, which can be bought in bulk at the store or assembled on the beach with your own hands. This option, in comparison with the previous one, requires more painstaking work. Combine the stones in size, shape and color will have to do it yourself.
Necessary materials:
- pebbles;
- tile glue;
- grout;
- varnish;
- notched trowel;
- sponge;
- tassel.
Progress is described below.
Stage 1 - surface preparation
The surface under the pebble cladding is prepared in the same way as in the previous version. Preparation activities include floor leveling, priming and, if necessary, waterproofing.
Stones of approximately the same shape and size are selected for the mosaic. Color sorting is also performed to obtain the desired decorative effect. Since stones collected or bought in bulk are usually not cleaned or processed, it is recommended to put them in order before starting work. To clean dirt with a metal brush, wash with soapy water.
Stage 2 - laying pebbles
Tile glue 1-1.5 cm thick is applied to a small area of the floor. This is done with a notched trowel. Each stone is laid out on glue and recessed by about a third. The denser and more evenly the stones are distributed, the more durable the lining will be.
It will take several days for the pebbles to firmly fix on the surface. Then proceed to grout with a rubber spatula. Without waiting for the grout to dry completely, they wipe the surface with a wet sponge. At the same time, the surface of the seams is leveled and excess surplus mixture is removed. After 1-2 days, the lining can be washed with water, completely cleaning the pebbles from the remnants of the grout.
Stage 3 - Application of varnish (impregnation)
Water-repellent, varnish or impregnation is applied to clean pebbles with a brush for a “wet” effect. After drying the coating (6-12 hours, on average), you can walk on the floor.
Do you know that in the bathroom you can lay a laminate? If you are interested in how this can be done, then read about it in the material:https://floor.expertexpro.com/en/pol-pokritiya/mozhno-li-klast-laminat-v-vannuyu-komnatu.html.
Option # 3. Pebble rug
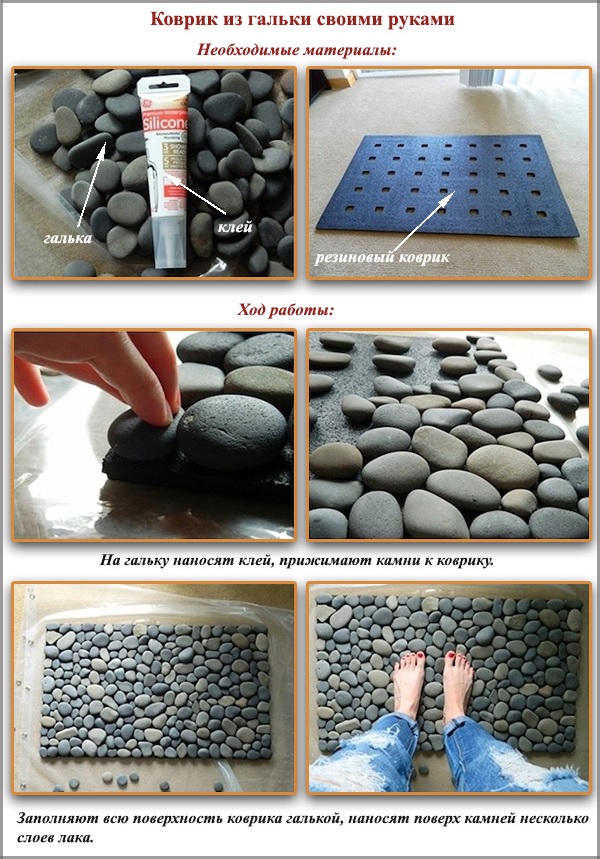
If pebbles are glued to a suitable moisture-resistant base, then you get a wonderful portable rug - a piece of pebble beach at your home!
Necessary materials:
- thin flat pebbles;
- rubber mat;
- transparent waterproof glue.
We read the course of work further.
Stage 1 - preparing the floor and sorting the pebbles
The stones are washed, dried, sorted by color, shape and size.
As a basis, a ready-made rubber mat of round, square, rectangular or any other shape is used. If necessary, you can give the desired shape to the product yourself, using scissors or a knife.
Stage 2 - gluing pebbles
Stones are laid “dry” on a rubber base. You can create both a plain surface and decorated with inscriptions, ornaments, patterns (using multi-colored pebbles).
Raising each stone individually, glue is applied to its base and glued to a rubber mat.
Stage 3 - applying varnish
The finishing touch will be the application of 1-2 layers of varnish on a pebble rug.
How to care for such a coating?
Care for any pebble coating is the same as for ordinary ceramic tiles. It is enough to wash it with warm water and mild detergents. If no varnish is applied to the surface, then pebbles can be rubbed with wax 1-2 times a month as an additional care. This will give the surface a shine and enhance water repellent properties.


7 comments