The technology of laying linoleum: an overview of the main methods of flooring
Linoleum is a floor covering that remains popular no matter what. What attracts the buyer in us? First of all, a harmonious combination of price and quality. Many are happy to note the practicality and frugality of such a choice. Another significant plus - laying linoleum feasible for a simple layman. But do not rush to rejoice: "feasible" - does not mean at all that the operation can be performed through the sleeves. In this article we will try to figure out exactly what knowledge, skills, as well as materials and tools you will need to “curb” linoleum.
Although this is obvious, we recall that the installation should begin after the completion of the full range of finishing work. Do not let the room temperature fall below +15. It is also worth paying attention to the moisture indicator of the rough floor. For concrete, it should be no more than 5%, for wood or chipboard substrates - no more than 10%. Before starting work, prepare all the necessary tools and glue / mastic (if the linoleum laying technology you have chosen involves their use).
Content
Stage # 1 - preparing styling tools
So you will need:
- level;
- high-quality sharpened knife;
- notched / metal / plain wooden spatula;
- rulers short (meter) and long (from two meters);
- adhesive tape (double-sided);
- joint welding fluid.
For cutting and pruning linoleum, it is recommended to use special scissors with interchangeable blades. The hook-shaped blade is used for final trimming, and the trapezoidal marking is carried out.

Stage # 2 - attention to the foundation
In order to lay linoleum with your own hands brought an exclusively positive experience, you should carefully prepare the foundation for future coverage. First of all, it should be dry, even and hard. The evenness of the base is checked by level. Clearance should not exceed 3 mm. All influxes, cracks, bulges, protruding screws and nails should be eliminated.
The thinner the linoleum, the more thorough preparatory work with the base will have to be done. Remember! The roughness of the subfloor is not just striking - they accelerate the wear of the finish material. The complex of preparatory work depends on the type of source foundation.
Carpet
Morally obsolete carpeting must be removed, surface cleaned, and problem areas additionally leveled.
Wooden floor or parquet
It is necessary to check the condition of the parquet (boards), to strengthen the shaky elements, to replace the extremely problematic "zones". Chips and cracks should be cleaned and putty.
The surface that cannot be repaired is covered with chipboard or plywood. All nail caps are thoroughly deepened.
Ceramic tile
Loose tiles need to be re-glued. The surface is leveled, as a rule, using a special leveling mixture or a floating floor system from Knauf.
Linoleum
An old thin coating in satisfactory condition can serve the basis for the new linoleum. It should only be thoroughly degreased.
Concrete base
Laying linoleum on concrete screed is the simplest and most importantly preferred option. But it is very important that the concrete base is smooth and even. After all, even small protrusions will be felt and bring moral and physical discomfort. It is worth remembering that a new screed will take a month to dry. Correction of minor differences with self-leveling mixtures will allow you to start laying linoleum in a few days.
You can read more about floor preparation in the article. Preparing the floor for laying linoleum: rules for working with various substrates.
Stage # 3 - cut linoleum
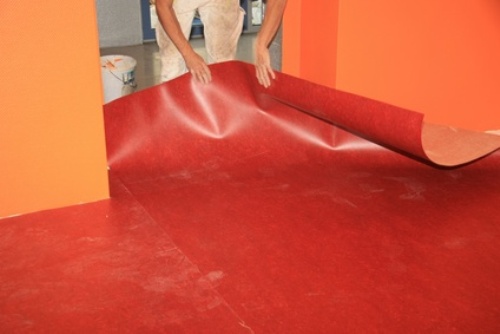
Linoleum must be rolled out in the room and let it lie down - so it will smooth out, and the characteristic smell will disappear. Minus temperatures affect linoleum extremely negatively, make it brittle, so the material acquired in the winter season should not be deployed immediately.
Linoleum acclimatized in the room can be cut. When cutting, it is necessary to take into account the following points:
- plain canvases are recommended to be placed in the direction of light. Stacked in this way, they will take the form of a "monolithic" finish;
- linoleum canvases with a pattern must be placed parallel to the outer wall, observing the strict coincidence of the picture;
- it is not necessary to dock the cover in the center of the room - you can lay the whole strip in the middle, and cover the remaining space with small canvases. Yes, you get two joints - but there will be no obvious "equator" in the room. This is an excellent reception for the kitchen and the hall: here the “side” seams will easily hide furniture;
- water supply, heating pipes, protruding corners will have to be bypassed. To simplify the work of cutting in these places, wait until the material is fully acclimatized. Where cutouts are needed, linoleum is simply bent outward and angled to give the “desired shape” to the coating. Cardboard patterns will help you make this operation quick and hassle-free.

Now you can lay out pieces of linoleum on the floor in accordance with the cutting. Fix the joints with massive objects. If the canvas abuts against the walls, they should be trimmed. Without doing this, in the summertime you risk seeing “waves” under your feet — the result of linoleum expansion (a consequence of heating). Linoleum scraps should not be thrown away - they can be useful for local repair of the coating.
Stage # 4 - directly laying
Sticking on mastic
First of all, it is necessary to prime the floor and the back of the paintings. If butter-chalky mastic is to be used, then drying oil should be used as a primer, if bituminous - then a solution of drying oil and gasoline (1: 3 ratio).

A day or two after priming the surfaces, you can finally completely plunge into the laying process.
Put the mastic on the base and directly on the linoleum, transfer the canvas to the place allotted to it and carefully press it. Smooth the surface with a roller or clean rags, thereby removing air. Watch for a layer of mastic - an excessively large one will leave tubercles under the linoleum. The mastic protruding from beneath the edges indicates that you are clearly “overloaded”.
Dry flooring
This method should be used with a reasonable degree of caution. The entire canvas should be glued around the perimeter with double-sided adhesive tape, fixed to the base. It is very important to smooth out all irregularities without gaps. Otherwise, you probably have to redo it.
Glue laying
The glue should be kept indoors for a day (or more) before use. It is necessary to distribute it first in one half of the base area, then in the other.To do this, the edges of the canvas are alternately turned off to the glue application border.
Linoleum is pressed. To quickly level the coating, you can use a mop or a large roller. Smooth the surface from the center, tending to the edges. Do not forget to smooth linoleum against the walls. This can be done with a spatula. With the second canvas, similar manipulations are carried out. Its sticking is carried out with an overlap on the first (three centimeters will be enough). Absolute surface strength will come in three days. Until this time, the floor can not be exploited.

Edges are trimmed at the same time. Soldering joints is done with a special composition after the glue dries. Along the perimeter, linoleum is covered with a plinth - plastic or wooden.
Please note that if the premises are non-residential, then its area does not matter - linoleum should be “planted” exclusively on an adhesive basis.
Video recommendations from professionals
Summarizing the foregoing, we can say with firm confidence that laying linoleum is a process that does not endure rush. Follow the manufacturers instructions, observe the optimum temperature regime, do not neglect the thorough preparation of the base. Working with linoleum fixes the golden rule in the head that it is better to “measure seven times” before shredding something. After all, only one miscalculation can “provide” you with a trip to the store for a new roll.
Linoleum, with all its mediocrity, is the ideal material to test the talent of a novice master who seeks to fill his monastery with comfort and coziness.