
How to put linoleum: a comparative review of 4 ways to fix linoleum to the floor
Against the backdrop of an impressive number of flooring, linoleum gives a significant advantage: it can be laid without difficulty without resorting to the services of finishers. The straightforward stacking process has several significant nuances that the future stacker should know about. Information on technological methods will help to figure out how to put linoleum, how and what is more preferable to fix this material on a rough surface. Below we provide a comparison of 4 options for attaching linoleum to the floor.
First of all, you need to determine the period during which the coverage is supposed to serve. If it is laid temporarily, and even in a small room (less than 20 m²), do not unnecessarily firmly fasten the material to the rough base. If you want to change the decor of the interior, and at the same time linoleum, it will be quite difficult to dismantle it. Temporary coating in such situations is usually fixed with adhesive tape.

It is possible not to fix linoleum at all, but it is not recommended, since when moving furniture, for example, deformation waves can result. In these places, the material will wear out faster, the crests of the waves will interfere with movement.
Content
Preparatory measures before laying
There are really unimaginable quantities of linoleum grades on the market right now. A practical aesthetic floor covering is produced with an insulating substrate and without a fleecy back surface. A lot of colorful, structural, textural variations are proposed, but the choice of owners is more convincing than other arguments is the democratic prices. However, for those who asked the finishers “how much it costs to put linoleum,” enthusiasm for some reason fades out a bit. Prices sometimes exceed the cost of the material itself (300-450 rubles).
Conclusion: it is better to put it on your own, because this does not require professional knowledge, any practical experience, and ultrahigh physical effort is not required. The main thing is to catch the idea, tune in to work, study the preferred technology and be sure to prepare a rough floor.
Preparing a rough surface
It is recommended that before laying linoleum, remove the old worn floor, in the cracks and pores of which there is probably too much dust and places favorable for the resettlement of fungal colonies. However, technological requirements are not prohibited to lay this material on an old floor covering. Again, the owner to decide what is more important for him.

If the "battered" predecessor is still removed from the floor plane, installation will be carried out:
- on top of a wooden floor, each element of which must be checked for reliability, fixed or replaced if necessary;
- on the concrete base repaired and, if possible, aligned with a screed.
Dust, fine, especially large debris must be carefully removed, remove traces of grease and other types of pollution. Before finishing with linoleum without a fleecy base, a substrate of foamed polyvinyl chloride is installed on the rough base. The seams of the substrate are glued with masking tape. Sometimes the floor is plywood before the linoleum flooring. All surfaces in contact with the material to be laid are treated with soil.

Separately, I would like to highlight a video with useful tips:
Preparation of material and conditions
Here are some things to keep in mind:
- Humidity of the equipped room should not exceed the technological limit of 60%. Two days before installation and the same number of days after fixing the material in the room, it is necessary to maintain an optimum temperature level of 18º C.
- Before cutting, vertically placed linoleum rolls should just stand in the room intended for the arrangement.
- Cut material should lie on the floor before fastening in order to “straighten out”. On places that cannot be spontaneously smoothed out, you need to put some heavy objects as a press.
After that, you need to study the information about the different ways of fixing the material and decide which laying technology you will use.
Following the rules of the preferred method, it will be possible to implement the planned work without any problems.
Methods for laying linoleum
The choice of linoleum laying technology depends on the goals pursued by the owner, more precisely on two defining categories: “temporarily” or “for a long time”. If you know thoroughly how to put linoleum correctly, he will fulfill his mission with dignity in both cases.
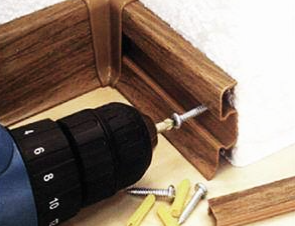
Fastening with nails or screws
With the advent of easy-to-apply adhesives and special adhesive tapes on the market, fastening with screws or nails is extremely rare. However, there is such an option, for the implementation of which it is necessary:
- drill holes in the concrete floor, hammer wooden plugs into the cavities that are equal in length to the screws installed in them;
- To the wooden base, lay down the deposited coating simply with nails every 50 mm.
Consumption of fasteners will certainly be significant. It is more economical to use adhesive tape, it is also suitable for arranging small rooms as described method.
Fixing linoleum with adhesive tape
The technology of laying on adhesive tape is used to equip premises with an area of more than 20 m², but with low traffic.
- The tape intended for fastening of finishing materials is laid around the perimeter, near the door and at the location of the butt joints, without removing the top layer. In order to avoid swelling of the material in the central parts of the canvas, segments of the adhesive tape material are arbitrarily applied over the entire area of the room.
- Linoleum is cut, observing the report of the drawing, if there is one on its surface, after which time is allocated to it for spontaneous smoothing. When cutting, it must be taken into account that allowances (approximately 10 cm) should be left along the perimeter of a whole or connected from separate strips of fabric. This technology requirement should not be forgotten before purchase.
- The allowances are cut off.
- Then each linoleum strip is fastened. First, the part of the extreme strip located near the wall is attached. Then they lift the canvas fixed on one side and, successively removing the protective layer, completely glue it to the floor. Further, everything is done by analogy.
Tape fasteners can first be applied to linoleum, then sequentially rolling a roll with pieces of duct tape, attach the coating to the subfloor.


Learned how to lay linoleum with adhesive tape? Feel free to get down to business.
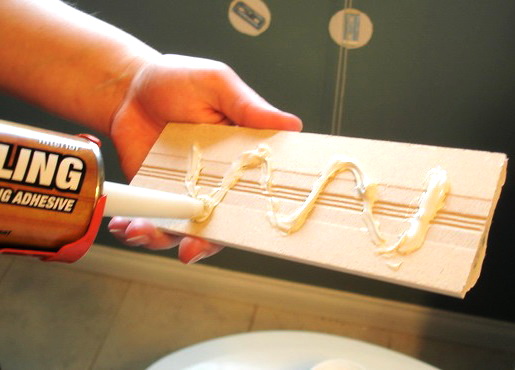
Laying and fixing linoleum paintings with glue
Before applying glue to the finished base with pre-applied primer, strips of linoleum are laid out. After the material has recovered, the period laid out for straightening the bends and waves is done, do the following:
- roll back the edge of one web and cover the base with adhesive, then fix linoleum on the treated area and perform all the same actions from the opposite edge;
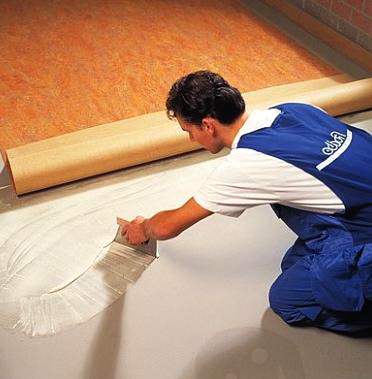
- carefully smooth the glued sector, expelling air from under it, which is more convenient and reliable to make with a special roller or ordinary spatula;
- tightly apply a rule or a ruler of metal to the wall and cut off the allowances left around the perimeter.
Even a sharp clerical knife is suitable for working with linoleum, but it is advisable to stock up with a special construction knife with a hook-shaped blade. The blade needs to be changed.

You can not glue the entire surface with glue, if you have a dream in the near future to replace the laid material with an expensive coating. It is enough to glue only the perimeter, the entrance area and the seams between the sheets. There is a video on how to sew glue on the seams and how to lay linoleum: the video will help to visualize the unpretentious process.
In the end, it is not necessary, but it is better to process the joints with a specific transparent glue for joining linoleum paintings. This work is done one day after gluing.
Laying linoleum without fasteners and fixtures
It is not recommended to fix the canvas at all, even in very small rooms it is not recommended. It is better to lay at least at the entrance and in places of maximum load several strips of adhesive tape. Along the perimeter, standard indentations for linoleum flooring of 8-10 cm should be left. They are left at each wall, near the doors and around all available architectural elements.
With allowances tucked up with the approach to the wall, the linoleum should lie down. Then the edges abutting against the walls are cut off. Before trimming the edges of the linoleum strips near the walls, the corners are incised diagonally. Finish the work by installing the baseboard.

Summary in conclusion
The budget price of the material is the main priority of linoleum, but the cost of professional styling often disappoints and suspends those who wish. So, it is worth recalling the second, no less important advantage: the possibility of self-installation. Video materials and a description of different technologies will help to get answers to questions of potential stackers. Learn and act!
3 comments