
Do-it-yourself laminate laying: rules and an example of step-by-step work
Inexpensive and relatively young type of flooring attracts not only an abundance of colorful and textured options with an accurate imitation of the pattern of noble wood, stone and even reptile skin. A weighty argument in favor of acquiring laminate flooring is considered to be technological priorities, thanks to which the owner himself can fulfill the arrangement of personal property.
To implement the idea does not need experience in the field of construction or decoration. Only strict adherence to the rules is required, thanks to which the laying of the laminate with your own hands will be done perfectly, and the material will last longer than the period guaranteed by the manufacturer.
Content
A decent base for laminate floors
Laying requirements
Laminate is a set of multilayer panels, equipped on all four sides with special locking systems. Click-closing devices speed up and simplify work, but require special care from stackers when preparing a room for construction.
In case of differences in the height of the “relief” over 2 mm on a 2 m² floor area, the locks may become loose and even break during operation. The consequences are rather disappointing: the accumulation of dust and dirt under the coating, creaking, large, gradually increasing cracks and similar troubles.

Assume a uniform slope of the rough floor plane within 4 mm per 2 m². However, it is worth noting that in areas with a slope it is not advisable to arrange furniture.
There will be no stability in furnishings that rely on 4 legs; in cabinets and chests of doors, the doors will stop closing due to distortions.

Leveling is a guarantee of long service life.
Regardless of type rough foundation, it must be aligned in accordance with building regulations:
- The old concrete floor needs to be repaired, expanded and the cracks filled with cement-sand mortar. In the presence of large exfoliated pieces, they are removed, the recesses are filled with a self-leveling mixture. After hardening, its floor is either ground or poured with a finish screed.
- A freshly poured cement screed is primed, for example, with Ceresite ST 17 or 15, so that the upper weak concrete layer does not “dust”, so that sand that has not separated from the concrete body for some reason does not creak under the laminate.
- Old wooden floor is repaired with the replacement of damaged parts. If it is possible to reduce the height of the ceilings, align the plywood.
- Minor irregularities are “cut off” from the new plank flooring and from plywood leveling, having previously sunk the fastener caps into the sweat.
The listed types of rough foundations, as well as new linoleum without waves and departing sections, evenly laid tiles before laying laminated panels, are thoroughly washed and dusted with a vacuum cleaner.
Topic article: How to level the floor under the laminate - all possible options and their description
Substrate and insulation layer
Since impregnated paper, inexpensive coniferous wood or boards created by pressing wood processing wastes are used in the production of the multilayer material, direct contact with moisture-generating surfaces is highly undesirable.
Therefore, home craftsmen who want to arrange the laminate flooring with their own hands should know that between the fresh and old concrete floor, which is able to freely absorb moisture and without any delay to transmit it to structural neighbors, a vapor barrier is required. Its function is perfectly fulfilled by a diffuse membrane or ordinary polyethylene with a thickness of 200 microns.
Insulation is needed only for concrete floors, on a wooden base, plywood, chipboard or parquet polyethylene is not required.

To the category of concrete floors, despite technological differences, we assign all structural elements that have cement in their composition:
- cement-sand screeds;
- concrete floors directly, differing from cement-sand screeds with the power and the presence of gravel or crushed stone in the solution;
- monolithic ceilings and factory slabs with round voids in the body.
The “age” of the concrete base does not matter. Both new and old concrete floors can absorb and release water. Insulation will prevent attempts by water released by concrete to penetrate into the sensitive laminate, which means that moisture will not warp the panel. Stripes lay with 20cm overlap on the previous sheet. At the end of all the manipulations with the construction of the laminated coating, the polyethylene is closed with a plinth.
According to the instructions of the manufacturers and according to the technological rules for laying, the laminate needs a substrate that performs a number of useful functions, such as:
- sound insulation that absorbs the sound of steps;
- protection against abrasion of the lower side in contact with the rough base;
- ensuring the relative staticity of the floating floor;
- alignment of minor base defects;
- protection against moisture, which wooden floors can also emit.
If laminated panels are laid on top of perfectly laid linoleum, then it can successfully fulfill the important role of the substrate.
If there is no previously carefully laid linoleum on the floor, then instead of it you can use sheet or roll EPSP, an air-bubble film with a thickness of 3 mm and a number of specialized composite materials. It is possible and cork, but builders consider it a costly excess for a budget laminate.
Topic article: Laying laminate on linoleum: use old linoleum as a substrate
The thickness of the substrate determines the same size of the panels. Since it is strongly recommended to buy a laminate with a minimum thickness of 9 mm for home improvement, it is advised to lay a 3 mm material under it.

For more “thick” grades, 4 or 5 mm will be required. In the manufacturer's instructions attached to the packs with panels, there are always recommendations for choosing this floor element. You should focus on them.
Laminate floors are mounted according to floating schemes, that is, they are not fastened to the rough base and to the walls, but only connected to each other. Interlayers located under the panels also do not fasten to anything, but lie freely in the form of functional carpets, pressed by the weight of the floor.
The specificity and procedure for the installation of the laminate floor
Choose a layout and make calculations
In order to evenly distribute the load and optimize the reliability of the joints, the laminated plates are displaced in each subsequent row, relative to the panels of the previous row. There should not be cross-shaped joints in the assembled coating.
If you look at the plan, then the picture of the correct laying of the laminate should resemble brickwork with a butt seam strictly above the center of the panels of the previous and next row.
This is done by professionals, in contrast to them, home craftsmen shift the butt seam by the length of the segment remaining after laying the last die in the previous row.It is reasonable and economical, but not too beautiful and less durable.

However, this method has really taken root among the people, although it allows to reduce consumption by 2-3 laminated elements. For the most part, home craftsmen perform styling this way, and manufacturing companies do not advise to philosophize when inventing a bicycle. The main thing is not to forget about clear rules, according to which:
- The length of the bar cut parallel to the end line cannot be shorter than 30 cm.
- The minimum width of the panel cut along the line of the line must not be equal to or less than 5 cm.
- Butt joints in rows are displaced by approximately 1/3 of the length of the laminated element.
- In the case of laying the laminate on the plank floor, the panels are placed “in a cross” to the floorboards.
In order to comply with the above rules, it is reasonable to draw by hand a small and uncomplicated plan with the dimensions of the equipped room. It is advisable to apply all architectural details, protrusions, furnaces, openings, etc. to it at once.
We will take into account that along the perimeter of the room to be finished, it is necessary to leave 1 cm for damper indentation, then we will estimate how many whole panels fit in one row and how many cm will have to be trimmed.
We will postpone the rest from the first trimmed bar in the next row and, by analogy, we will fill in all the space drawn on paper. The longitudinal ridge of the first row is flush-cut before laying. This must be taken into account in the calculations.

We suggest you use our settlement calculator - maybe it will help you:
Tool preparation and pre-planning
Suppose that we will stack according to the simplest economical scheme using a segment of the last panel as the initial element of the next row. The longitudinal seams are located along the stream of natural light entering through the window opening. So the seams are less noticeable. We start laying from the far corner of the left side.
A few tricks of the preliminary planning:
- It is hard to imagine that the first row will be formed only from whole panels, but since it’s so lucky, then you need to saw off a segment from the left end of the first die of the second row, the length of which is equal to the amount of displacement. That is, ½ or 1/3 of the length of the whole panel, depending on the preferred method of laying laminate elements.
- If, as a result of the distribution of whole rows, the width of the last of them will be less than or equal to 5 cm, then not only the comb will need to be sawed off from the panels of the first row. Calculate so that the two extreme rows in the laminate floor are approximately equal in width.
- If the room has interesting architectural elements that attract attention, for example, a large fireplace, or a balcony above the bay window, we will begin to distribute the rows of the laminated floor from their central axis.
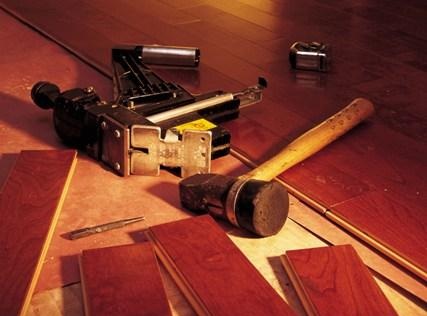
Laminate will have to be cut anyway. For practical and aesthetic cutting you need to stock up with a jigsaw, even better with a miter saw. Use a hacksaw is not worth it, it will damage the outer decorative layer. To obtain a beautiful cut line when sawing with a hand jigsaw, the panel must be pasted with tape.
Topic article: How to cut a laminate: choose the right tool for cutting
Case for small - let's start laying
Before laying, the material must be allowed to mature for 2 days in the room intended for decoration. After the multilayer dies get used to the given conditions, the owner can safely start covering the floor with an adapted laminate with his own hands or with the hands of hired workers.
The method of connecting the elements is indicated on the packaging of the material. The straps can be attached with:
- Lock-locks, for the snapping of which the comb is inserted into the groove of the previous panel either horizontally or vertically;
- Double lock Click-devices, for docking which the panel with the comb is installed at the angle indicated by the manufacturer, then, by applying slight effort and moving the element to the horizontal plane, is brought to a click.
There is also an adhesive method for joining laminated dies, but it is now rarely used. According to the gluing technique, the end and lobes of the panels are glued before joining.

Regardless of the type of castle system of the selected flooring, the laying process of the laminate can be carried out:
- by orderly assembly with the subsequent joining of ready-made rows to a gradually increasing floor;
- by attaching a separate bar through the longitudinal ridge to the previous row and through the end ridge to the previous bar in the stackable row.
The assembly of the floor from individual dies is preferred if no assistants were found and if a fair length of the completely formed strip does not allow. However, many independent stackers believe that it is easier and more convenient to assemble the laminate in rows.
It is impossible to “knock” with a hammer on laminated panels, achieving a tight joint. Only through a block or through a piece of laminate.


Decided on the most comfortable method? Forward:
- We cover the entire area of the rough floor with a substrate. We lay the sheets or strips end-to-end and glue with adhesive tape for the convenience of further work.
- We assemble the first row of panels with a pre-trimmed comb. The cropped side should be directed to the wall, the lock of the slats on the performer. To form the first row, it is not necessary to be located in the vicinity of the wall.
- We assemble and attach to the first row the second strip of laminated panels.
- Then it is already possible to put the initial elements of the future floor against the wall and put spacers or factory spacers around the perimeter. These devices are needed to form a deformation indent. The distance between the wedges is approximately 25 cm, they must ensure a clearance of at least 0.8 cm. The deformation gap should be narrower than the width of the plinth.
- By analogy, we follow to the bitter end, until the entire floor is covered with laminate.
- Under the existing door frame, the coating must be “made” so that there is no gap between the jambs and the floor. To do this, file both racks of the box on the thickness of the laminate from below.
- At the points of intersection of the floor with the pipeline, it will be necessary to make holes with a pen drill or a jigsaw in the board with a diameter larger than the same pipe size min by 1 cm. In general, it is assumed that the radius is increased by 1 cm, that is, an equivalent centimeter indent must be left around the entire pipe . However, practice has shown that the centimeter gap is too ugly and large, and even after masking with sealant significantly spoils the impression. Moreover, it is left to compensate for the thermal shifts of the entire floor. In a small area around the pipes, the coating will not “travel” so intensively, of course.
Trim panels under the radiators, near the pipes and parts brought under the box are connected to the floating floor with glue. To attach the last row or individual panels, a special bracket is used - a clamp.

Usually in packages with a laminate there is a detailed briefing on its installation. The manufacturer's recommendations should be strictly observed. However, there are issues that are not covered in the application or arise even before the acquisition of the material.
Well, if, thanks to our article, the prudent owner understands in advance whether he will be able to equip the property on his own, go into the process, then go to the store for the laminate and lay it with his own hands.
5 comments