
Do-it-yourself tile laying - features and subtleties of work
Tiled flooring is not subject to periodic cosmetic repairs in the room. High-quality material with proper installation will ensure long-term operation of the tiled floor. He is very practical. With self-repair, laying tiles yourself not only captivates with the excitement of creativity, but also significantly reduces the financial costs of arranging the premises. An excellent result will be achieved provided that the work is carried out sequentially with the mandatory implementation of all stages.
Content
Tile-laying works

With this type of finishing work, as ever, the proverb is relevant: “Measure seven times ...”, therefore, special attention is paid to the selection of tools.
To perform the laying of tiles at hand, you must have the following tools:
- Measuring devices: pencil, crayon, tape measure, level, ruler, rail.
- Master OK.
- Plastic crosses for delimiting seams.
- Fixing tile in the desired position.
- Facing manual work cannot be performed without a spatula. It is identical for both wall material and flooring. This does not apply to a toothed tool (in common parlance - a comb): for a floor tile, the size of the spatula tooth is 10 mm, while for wall facing material - 8 mm. In addition to the main one, there is an auxiliary spatula with a width of about 90 mm. It is intended for applying the mixture to the main working tool or for work in hard to reach places.
- Nippers - “nippers” for “biting off” small pieces of tile along a pre-made contour.
- A puncher or drill with a nozzle for preparing a solution of the desired consistency and a volume bucket.
- Milling cutters - cut holes in the tile. Curly holes are made using a template pre-made from cardboard.
 Do-it-yourself tile laying - essential tools

Important! Carefully completed preliminary works guarantee high-quality laying of tiles.
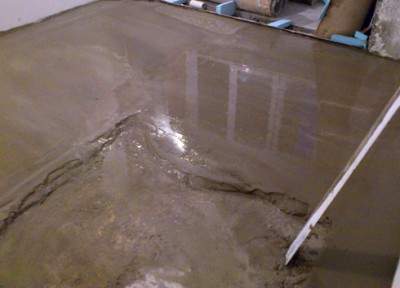
The preparatory stage of laying is given great importance. Speaking thesis, the following works are carried out:
- examination of floors using a long rail or ruler, identification of irregularities and the elimination of roughness if necessary;
- final adjustment with minimal deviations by level.
There is another, more expensive way. Use special mortars, pouring which, leveling the floor surface;
- wooden floors are lined with plywood before the cladding, with a sheet thickness of 12 mm. This provides the conditions required for installation;
- if necessary, the old tiles are knocked down or linoleum is removed;
- cement coating is pre-protected from moisture penetration, so that the tile is not wet. It is with cement that most builders like to work;
- if necessary, preliminary drying of the surface is carried out. The work itself is carried out in a dry room;
- Equally important is the surface structure of the tile, the presence or absence of a pattern on it. Structurally, you need to imagine what kind of art form on the floor facing area you want to achieve by combining individual elements of the tile;
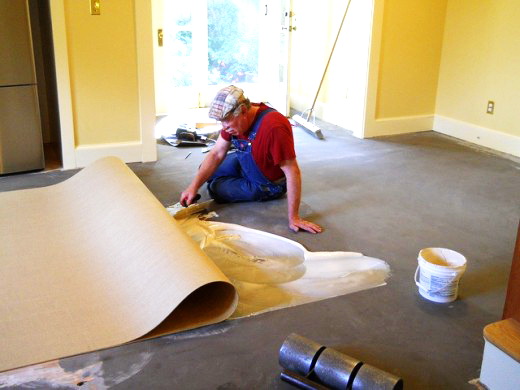
 Do-it-yourself tile laying - check the layout
 - the level determines the place of maximum floor evasion and the highest point. In it, the layer of adhesive mass will be minimal, but not less than 8mm;
- it should be remembered that the floor is equipped only with the field of repair work with the ceiling and walls. Skirtings, door frames and jambs are pre-removed. The floor is primed;
- if the room "does not completely contain" the tile around the perimeter and you have to use pieces of it, you should slightly change the previously made markup, move the laying boundaries so that the edges look beautiful. With a small area, it is better to lay both a whole tile and pieces of it for a preliminary assessment of the direction of work and the location of each tile in the masonry. Immediately you need to determine the width of the seams, significantly affecting the consumption of tiles. This calculates the required amount of material to be stacked. At the same time, the planned 10% loss from the battle should be added to the result.

Methods for laying tiles on the floor
- vertical and horizontal seams-joints coincide (masonry “seam to seam”);
- diagonally: turned relative to the walls by 45˚;
- each subsequent row of tiled elements is shifted relative to the previous one (masonry “into the dressing”).
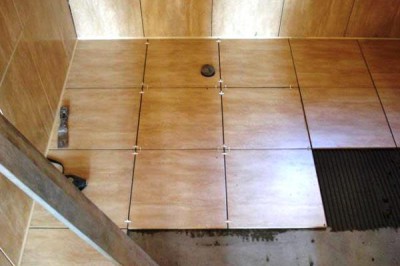
 Do-it-yourself tile laying - start from the corner

Work performed when laying tiles on the floor
The marking shows the location of each coating unit, so it's time to apply an adhesive base. A special cement-based adhesive for tile in powder form is diluted in small parts with water, according to the instructions, to the desired consistency.
The most convenient tool is a spatula. Its working gear surface, installed at an angle of 45 °, allows you to apply the same thickness to the base evenly on the tile. The furrows formed in this case distribute the glue evenly on the surface, creating a stronger adhesion of the tile to the floor.
Work should start from the corner of the room, opposite the door. Treat a small area up to 1 m2 . A quick-drying cement-based adhesive mixture is applied in even strips, tile elements are laid on it according to previously drawn borders. Gently squeeze on top, tap, turning slightly around the axis, to the sides for more complete adhesion with the adhesive solution.

Attention! Tile with adhesive solution can be slightly rotated without moving. Otherwise, the joints will clog. Their processing in the future is not possible.
So the whole pre-processed floor area is filled in turn. Adhesive consumption depends on the type of tile used: the more massive the laying material, the more adhesive mass is required to fix it.
The level should always be at hand to check the thickness of the masonry, the horizontal of each stacked element, as well as maintaining the level on all diagonals. The height of the flooring is regulated by applying a smaller or larger layer of mortar under constant instrumental control. When half the room is ready, work continues on the remaining area.
There is a rule: at first the floor area is filled with a whole tile, and then specially cut pieces are laid against the walls, form corners and thresholds, etc.
Processing trimmed tiles at home
Caution: floor tiles are more durable than wall tiles. Its thickness exceeds the wall counterpart by almost a quarter and is 8 mm or more. Therefore, it is processed worse.
Almost always, not only the whole material is used for masonry, but also its fragments in the form of trimmed stripes. You can make even edges and give the fragment the desired shape at home using a glass cutter. This is a simple, affordable and popular processing method. Its modification is oil glass cutter. A mixture of kerosene and engine or spindle oil during cutting improves work performance. You can cut tiles with a grinder, on a stone-cutting machine, etc. A wet-cut machine not only qualitatively and with high speed performs processing, but also smoothly cuts corners.

By the way: if there is a need to make a gap between the elements of the stacked coating, you can use plastic crosses.
After laying, they are removed and ready for use elsewhere. If the masonry tiles do it yourself the floor is made for the first time, and such a separator is not available, ordinary matches, rods, cardboard strips, etc. are quite suitable for this purpose. And then the entire coating will look equally “scribbled” by such gaps.
The final stage: the joints of the joints are filled with a trowel paste-like polymer grout of the desired color using a small rubber spatula. In its composition, the embroidery material is a complex polymer composition having various properties depending on the purpose of the room. Stitching is performed by plastic, silicone or water-repellent compositions. Excesses are removed using a damp sponge immediately after drying, and the floor covering is washed.

Although laying tiles requires certain skills, patience, accuracy and accuracy, anyone who is "friends" with the technique can master this technology, do their homework with their own hands, carefully study the technology for performing work. Own apartment will become more comfortable and elegant, and, at first glance, unsightly packs of tiles in skilled hands will turn into a skillful panel, will delight the eye with their unique ornament. We tried to easily and easily describe the process of laying tiles, and in order to “fix” the material we suggest watching a training video.
3 comments