
DIY linoleum laying in 5 steps: a phased description of the work process
Of all the existing types of flooring, linoleum is the most affordable, and therefore the most popular. Anyone can do the laying of linoleum with his own hands, since this technology does not require special knowledge and skills. For more than a hundred years, this material has been used by humans in the decoration of residential and industrial premises. It is too early for linoleum to leave the market of finishing materials, because it has not yet invented another, the same functional and easy-to-care floor covering. In addition, the decorative qualities of this material, which imitates any textures and colors, remain at their best and allow you to decorate the interior in different design styles.
Content
Stage # 1 - ground preparation
In the preparation of any foundation, concrete or wood, it is necessary to carry out its careful alignment. At the same time, the visible cracks are putty on concrete, then the surface is ground. If in the old concrete screed there are separate collapsed areas, then local repair of these places is carried out. If there is a large amount of damage, it makes sense to fill in a new concrete screed, dismantling the old one. On top of the screed to create a perfectly flat floor surface, it is recommended to fill in a thin layer of self-leveling mixture.
Alignment of wooden floors is carried out using plywood sheets, the thickness of which should be at least 6 mm. Seams between plywood sheets are sealed with putty. When attaching plywood to the base, make sure that the heads of the screws are recessed into the sheet.
Many are interested in the question, is it possible to lay linoleum on old linoleum? Opinions differ. Some say that this can be done, but at the same time it is necessary to dismantle the skirting boards and pull on the old coating properly. However, experts recommend cleaning the floor surface from all old coatings.
Stage # 2 - preparing materials and tools
In addition to linoleum, the following consumables may be needed in the work:
- putty;
- rails for joints;
- Double-sided tape;
- glue, in the case of choosing the appropriate method of flooring;
- trailing edge;
- screws;
- cold welding;
- nails, in the case of linoleum flooring on chipboard, plywood, boards, etc.
For high-quality linoleum laying, a special tool is needed that will facilitate and speed up all operations. You will need:
- knife for flooring;
- tape measure, ruler, felt-tip pen for marking;
- scissors;
- notched trowel;
- special skating rink;
- wall marker;
- ordinary small spatula;
- hammer;
- equipment for hot welding.
Stage # 3 - calculation and selection of linoleum
After completion of the preparatory work for leveling the base, they proceed to measuring procedures. At the same time, all sides of the room are measured in order to determine the maximum value of its length and width. To minimize the number of seams, they are determined with linoleum width. If you can’t do without seams, then when calculating the footage, the margin for the selection of the figure is taken into account. At the same time, one centimeter is added to each side to compensate for the possible curvature of the walls.
Having drawn a plan of the room for convenient calculation of the required amount of material, proceed to its selection. At the same time, attention is paid to the marking, which divides linoleum for the purpose of use into household, commercial and semi-commercial material. In addition, there is a division of this floor covering according to the intensity of operation.
Important! After delivery of linoleum, you should not immediately begin to unpack it, especially in the winter months. It is necessary to leave the coating in the room for temperature adaptation, which takes about two days.
Next, linoleum is spread in the room and allowed to mature, taking the form of a floor. Then proceed directly to the installation, which can be carried out in several ways.
Stage # 4 - directly laying
- The linoleum is cut, in which the direction of the pattern and the coincidence of its elements on the compatible bands are taken into account.
- The prepared canvases are laid out in the room and left, as mentioned above, for two days for complete straightening. During this time, all dents and creases disappear. In this case, the temperature in the room should be at least 18 degrees. At the same temperature, it is desirable to carry out the remaining work. In residential premises, linoleum is recommended to be glued.
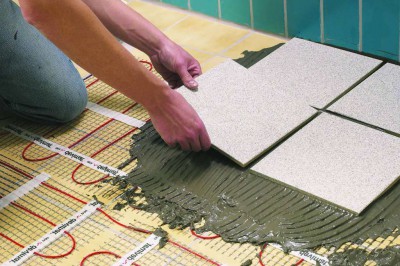
- First, a primer is applied to the surface.
- Next, glue is applied to the prepared, well-cleaned and primed base with a notched trowel. It is given some time in accordance with the instructions for its absorption.
- After this, linoleum is laid and carefully smoothed to the surface with a special smoothing device, which removes air from under the coating.

Also, for laying linoleum use double-sided tape. This method requires great accuracy, as wrinkles may occur with insufficient smoothing. In this case, the entire fabric is glued with double-sided tape around the perimeter, and then attached to the base. In order not to do the work again, you must try to prevent the appearance of tubercles and folds.
Rules to be observed:
- Strictly observe the temperature and humidity conditions when laying linoleum. The humidity level should not exceed 4%. Exceeding this indicator will cause peeling of the coating, as well as decay and subsequent destruction of the base.
- The presence of differences and roughnesses on the surface of the base, the presence of open joints in prefabricated screeds and at the joints of reinforced concrete panels is not allowed.
- Laying linoleum is carried out at the final stage of the repair of the premises.
- In advance, wooden corks are installed in the walls, which are useful for attaching baseboards. To do this, drill nests at a level of 1.5-2 cm from the floor, maintaining a distance between them of 80-120 cm.
- Applying a primer is mandatory. In this case, use dispersion glue (mastic), which is diluted with water. Gasoline and solvents are used when working with glue or mastic made from resins, bitumen and rubbers. Primer the surface with a brush, roller or spray.
- The thickness of the adhesive depends on the characteristics of its composition. Follow the recommendations prescribed by the manufacturer in the instructions.
- At home, the joints of the panels are processed by cold welding, which provides a strong adhesive bond. It is possible to design joints with decorative plates - moldings.
- To get a smooth joint, the sheets are overlapped, and then an incision is made along the construction line with a special knife that cuts both layers at the same time.

Features of laying antistatic linoleum
This coating is available in the form of tiles, which are fastened with glue that retains conductivity when dried. The technology for laying antistatic linoleum differs from the methods described above.The flooring is laid on copper strips that conduct static electricity, which are interconnected with the autonomous grounding system of the house. When performing these works, it is necessary to be guided by building codes and rules, as well as the requirements of electrical safety regulations.
When laying a material with antistatic properties, it should strive to ensure tight contact of the coating with the base. Therefore, to remove air bubbles, a heavy roller is used, the weight of which reaches 68 kg. When trimming, fitting, teething material, try not to damage the copper strip. Joints of tiles are treated by hot welding. It should be understood that hot welding requires professional dexterity, since the air temperature in this case reaches several hundred degrees.
Important! There is a choice of cord, which can be monochrome or multicolor. The selection is made in terms of the selected design. If desired, you can use fluorescent welding cords that have appeared on the market recently.
Stage # 5 - weld seams
To completely isolate the seams resort to butt weldingwhich can be cold or hot. In which case to choose one or another type of welding depends on the type of linoleum and the complexity of the butt weld. Hot welding provides a stronger mechanical joint, so it is used without fail when laying commercial coatings. It is also necessary to weld seams in this way on canvases that will be subjected to intense loads during operation.

When conducting hot welding, a compressor is used that is responsible for pumping air to the heating elements, the welding torch and filler rods, which act as a bonding element. Welding of joints is carried out after the linoleum is firmly fixed to the base, so after laying it is necessary to wait at least a day.
Cold welding does not require any additional equipment, so when laying linoleum with your own hands, it is most suitable. The adhesives used for cold welding are of two types:
- for processing the seams of newly laid linoleum - type A glue;
- for welding seams of a long-laid coating - type C adhesive.
These types of glue differ from each other in consistency, which is much thicker with type C glue. After all, the gap between the old linoleum canvases is usually larger. In this case, the principle of action is the same. It consists in the following: glue, falling into the space of the seam between the canvases, melts their edges. The result is a reliable fixation.
Linoleum does not require special care, however, you still have to follow some rules. To prevent the surface of the floor covering from cracking or fading, avoid cleaning agents with active cleaning agents. To refresh the color, try to give preference to special products developed for the care of linoleum. On the legs of the furniture, it is advisable to wear caps made of soft material to prevent the occurrence of punching and gusts of material.
We hope that this material will help you lay linoleum on your own without any difficulties. Indeed, now many important things will not slip out of your sight. Perhaps you will share your experience with your friends and acquaintances more than once.

2 comments