
Chintz floor - a phased description of the work on creating the original flooring
The modern construction market offers a huge number of flooring suitable for a wide variety of rooms. Tiles with designer painting, self-leveling floors with a 3D effect - which just did not come up. Unfortunately, such a luxury is not affordable for everyone, and everyone wants to create an exclusive interior. We want to offer you to make truly original floors that will surprise all your friends. These floors will be beautiful, durable and inexpensive. And they will be made of ... chintz.
The principle of creating chintz floors
Chintz floors are a chintz canvas stretched across the floor, covered with several layers of varnish. The principle of creating chintz coating resembles the device of bulk floors, only chintz is used instead of graphic drawing, and varnish instead of polyurethane compounds. In principle, it is not necessary to use chintz for such floors, you can also choose another dense fabric (calico, satin, linen), the main thing is that the pattern is clear and you like it.

Stage 1. Surface preparation
Chintz is a thin material, so the base for it should be perfectly even. "Playing" wooden floors or bloated linoleum categorically do not fit. At the slightest defects, the varnished surface of the chintz floor will be covered with a network of cracks, which will not affect either its aesthetics or durability.
In order to level the base and prepare it for gluing with chintz, lay thick plywood, fiberboard or chipboard on the floor. Thoroughly adjust the sheets to each other so that there are no differences in height at the joints. Seal the seams, and then clean with sandpaper. After that, cover the base with drying oil, dry it and sand it again. Make sure that there is no dust or debris left on the base of the chintz sticker on the base - for this, walk along the floor with a vacuum cleaner.
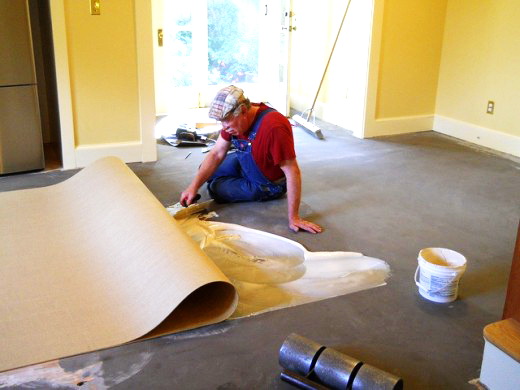
Stage 2. Sticking calico
The chintz cloth is cut into pieces of the required length. To do this, you need an assistant, with whom you can pull the canvas from wall to wall and cut the desired number of pieces.

Apply a thin layer of PVA or Bustilat glue to the base of the floor, along the width of the canvas, and wait until it dries within 10-15 minutes. After this, the edge of the chintz cloth is nailed to the floor with small cloves and begin to glue it, smoothing along the entire length with a roller, brush or kitchen sponge. The movements should be directed from the center to the edges of the canvas in order to “expel” air bubbles.
Cover the glued surface with a cotton cloth and iron with a hot iron with the temperature control set to iron the cotton.
The following parts of the web are glued in exactly the same way, combining the joints and fitting the pattern.
In some cases, for example, in a small room with the correct shape, they resort to a simplified version of the device of calico floors. At the same time, chintz is not glued to the floor, but the fabric is pulled and nailed around the perimeter with small cloves.
Stage 3. Application of a protective layer
After all the chintz is glued and dried, it is necessary to cover it with a protective layer. In principle, you can do without it, by applying varnish directly to chintz. However, in this case, the varnish will impregnate the fabric and it will darken, changing its original appearance.This is not very convenient, especially if you initially selected chintz for the color of the walls or ceiling.
The protective composition is kneaded from 1 part of PVA and 4 parts of water and applied to the chintz base with a wide brush or roller, evenly moistening the fabric. After the glue has completely dried, you can proceed to varnishing.
Stage 4. Application of varnish
The varnishing of the chintz coating refers to the most critical stage, on which the appearance of the floor will depend. For processing, you should choose a quality varnish that forms a transparent film without the effect of yellowness. Alkyd and polyurethane varnishes have worked well on this side. When choosing a varnish, it is also worth paying attention to abrasion resistance so that you do not have to often update the finish layer.
To obtain a durable coating, you will need to apply 5-6 layers of varnish on the chintz. This must be done very carefully with a foam roller. Make sure that no streaks or drops remain on the coating - the application should be as uniform as possible. Each subsequent layer is applied only after the hardening of the previous one. As a rule, this occurs 2-3 days after application. The very last layer dries even longer - 4-5 days. Only after this period can the chintz floor be exploited without fear of dents, cracks, or sag.
Doors and windows should be kept locked for the entire period of time while the paintwork is in progress, as any drafts or temperature changes can cause cracks on the varnish layer.
At the end of the work, skirting boards, painted in tone with chintz and varnished, are nailed around the perimeter of the room.

A chintz floor is sometimes called a “chintz parquet” and this is no accident: in spite of the thin airiness of the chintz, in combination with varnish it forms a rather strong and durable coating. Of course, it is not advisable to arrange it in the bathroom, but in the living room, bedroom or even the kitchen, chintz floor will become an original alternative to ordinary linoleum or laminate.


9 comments