
How to make a floor in the bathroom with your own hands - technological steps
Proper flooring and flawless laying of flooring in the bathroom is a difficult and time-consuming task, the implementation of which homeowners are used to trusting specialized companies. If an expensive event is invested in the family budget, this choice is justified. However, the laying of the coating and preliminary preparation can be handled independently. It is enough to study the information acquainting with how to make a floor in a bathroom, not to forget about the recommendations of the manufacturers of materials chosen for arrangement and to strictly observe the technologies developed in practice.
Content
Future Sex Requirements
The list of requirements for the flooring of the room for hygienic procedures includes such characteristics as:
- insulation, including protection of building structures from moisture, protection of owners from negative noise and heat loss;
- decorative indicators, depending not only on the characteristics laid down by the manufacturer, but also on the skill and diligence of the stacker;
- safety of movement on the floor;
- priority environmental criteria;
- ease of care
- ability to resist a wide range of influences inherent in rooms with frequent temperature fluctuations and differences in moisture content in the air;
- long-term coverage, operated under full load in difficult conditions.

In this case, it is necessary to take into account the likelihood of emergency leaks that threaten the personal property of the owners and the property of neighbors living below the floor.
In principle, the entire list of requirements is based on the observance of two interrelated conditions. This is a competent choice of flooring and careful observance of laying rules.
Material selection for flooring
In the field of design of a sanitary room, the owners' imagination is not limited by any strict framework. It can be a plain light or radically black floor, a bulk version with an abstract pattern or with a specific optical effect, rock tile or a clinker with a geometric pattern. It is important that the design of the plane that is significant for the bathroom is in harmony with the overall decorative solution. Those wishing to lay the floor in the bathroom with their own hands, of course, it is recommended to choose a coating that differs by the least labor-intensive and convenient installation scheme.

As a topcoat for laying the floor in the bathroom is used:
- tiles made of wear-resistant ceramic with or without glazed coating;
- tiles made of agglomerate made by joining an array of crushed mineral raw materials using synthetic binders;
- metal tile on a rubber substrate;
- flooring made of natural wood;
- rubber tile options with a ribbed safe surface;
- natural cork that attracts with its superior insulating qualities and natural origin;
- laminate with water repellent properties;
- bulk polymer floors, convincing by the simplicity of the device, the strength and the absence of butt joints in a monolithic coating;
- budget linoleum, presented on the market by roll products and convenient for independent laying by small square elements such as the same classic tiles.
The pebble floor in the bathroom will look unusual and add originality to the overall interior. Read more about how to make such a coating in the bathroom in the article:https://floor.expertexpro.com/en/ustroistvo-rmnt/pol-iz-galki-v-vannoj-komnate.html.

In the abundant range of materials, the most popular for flooring in the hygienic room are still ceramic products and products made of natural stone in the form of tiles. Bulk floors are not inferior to them in terms of relevance. Often, customers choose a cork floor - in the bathroom it can serve no less than any type of coating made from natural types of wood.
Cork floor is a kind of puff "cake", which includes the main layer of pressed cork, a decorative layer of cork veneer and a protective layer of polyvinyl chloride. Manufacturers offer two types of cork coatings that differ in installation method, so you can prefer a floating view, the elements of which are provided with locking joints with a tenon-groove design or choose products that adhere to the prepared base using specialized adhesives.

Important. If the use of adhesives is required to lay any type of flooring on top of the “warm floor” system, it is preferable to use a composition whose manufacturers have the opportunity to work in conjunction with heating equipment. Such modifications are more flexible and have the ability to compensate for the expansion processes of the base, resulting from temperature exposure.
Future performers choosing a priority coating for the bathroom need to consider the thickness of the material. Cork and wooden floors, which have a fairly significant power, will reduce the height of the room. Liquid polymer floors, tiles and linoleum will least affect the volume parameters of a room. But the last of these types is now rarely used due to low strength and rapid wear.

Not less important. When implementing the idea of a device for draining in the bathroom, you need to consider the location of the pipes and plan the place of the drain before starting work. You will need to calculate the height by which you have to raise the floor to form the angle of inclination necessary for the spontaneous movement of the liquid through the pipes. An acceptable angle of inclination can be obtained by means of a powerful screed.
Technological stages
The entire cycle of work, which means the installation of the floor in the bathroom, is divided into a number of stages common to all schemes, which is justified by the equivalent operating conditions, manufacturers' recommendations and building codes. The generalized scheme includes:
- preparation of the rough foundation;
- applying a waterproofing layer;
- leveling screed;
- laying the topcoat.

The first stage is the preparation of the foundation
In most apartments, concrete screed in the bathrooms is already available. Future stackers can only get rid of linoleum, old tiles, paint, grease stains, materials and dirt that interfere with proper flooring. You can clean the base with a hammer drill. It is necessary to carefully handle the joints of the floor with the walls.Then, it will be necessary to carefully repair the cracks, holes and cracks revealed during cleaning, for which you can use cheap glue for the tiles. Damage repair is necessary to prevent too quick deterioration of the waterproofing and screed, as well as to prevent the irrational consumption of expensive primers, leveling and insulation coatings.

If significant irregularities are found that exceed the limits allowed by the standards, the base should be leveled using mixed finished materials. A primer will help, increasing the adhesion of the subfloor with waterproofing.
The second stage - waterproofing
To help those who want to make the floor in the hygienic room waterproof, the industry offers several types of waterproofing materials that differ in the principle of applying a water-repellent layer to the surface.
- Glue is chosen if waterproofing is required not only on the floor, but also fragmentarily on vertical planes so that the treated surface resembles a bowl with a wall height of more than 15 cm. They are perfectly fixed, do not require professional skills from the performer.
- Bitumen emulsion applied by brush or roller staining. This is the easiest, but short-lived way. Waterproofing will be effective no more than 5 years.
- Lubricants that create impeccable water resistance, represented by finished compounds and dry mixes that require preparation.
Often, apartment owners prefer coating, as the most appropriate, easy to implement and long-term option. In the area of joining the floor with the walls before plastering, it is recommended to lay a special waterproofing tape. A coated waterproof material, in finished form, in consistency reminiscent of sour cream, is put on the floor with a spatula or roller. The walls are also advised to process so that a kind of "trough" with a height of up to 10 cm is obtained. The number of layers and the waiting period between their application are indicated in the manufacturer's briefing. Before carrying out subsequent work, it is necessary to wait at least a day for the complete hardening of the coating composition.
About the optimal methods and schemes of waterproofing in the bathroom is described in our material:https://floor.expertexpro.com/en/ustroistvo-rmnt/gidroizolyaciya-vannoj-komnaty-svoimi-rukami.html.

Important. For waterproofing the floor in houses with wooden floors, an additional safety layer is often used, for the device of which brands of inexpensive linoleum are used. Like the coating compound, linoleum is laid on the floor in the form of a container with five-centimeter wall allowances.
The third stage - high-quality screed
The screed will help to get a perfectly aligned plane and facilitate the further laying process. To perform the screed, you will need to purchase a mixture, the main component of which is non-shrink cement. The following description will help those who wish to learn how to fill the bathroom floor with a leveling solution correctly.
- First, it is necessary to note the level of the planned floor surface using special marks located around the perimeter of the hygiene room. For this, a uniform level of the future horizontal plane is determined by a laser level, a special or home-made measuring device. To make a home-made device, you can take two disposable syringes and connect them with a plastic hose.
- Beacons are installed - slats resembling the letter "T". Between them pull the cord, it is needed to align the profiles vertically.
- The solution prepared according to the manufacturer’s instructions is evenly poured onto the floor surface. It is necessary to fill the entire space to the marks indicated by beacons.
- The leveling of the mixture poured onto the floor is done by the rule or with a simple spatula.
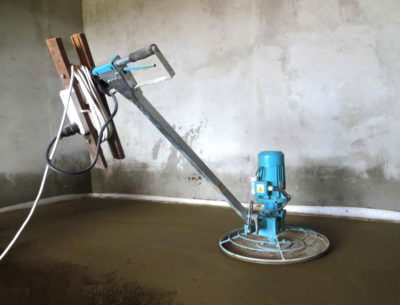
- It is advisable to “walk” over the entire area of the screed with a special device - a roller with needles, which allows you to get rid of air bubbles formed during pouring the solution.

Next, the manufacturer’s requirements should be clearly fulfilled with respect to the time required for the screed to be completely ready for further work, and with regard to the climatic conditions that ensure the screed to set normally.
Important. When leveling a heated floor, a leveling solution is applied in two stages. Moreover, between the layers of screed should be a layer of insulating material.
Tile laying - a classic of the genre
Recommendation. Before laying, the unpacked and checked for defects tile should be laid out on the floor area without gluing. This procedure will help you find the best place to start work and eliminate the location of cut fragments at the entrance..
Any tile on the floor in the bathroom is laid according to a single scheme. The contractor will need a standard set of tools and devices, including a level, a container for adhesive solution, plastic crosses, a trowel and a special spatula equipped with teeth, the size of which depends on the size of the elements and the degree of unevenness of the floor.

In order not to buy surplus tiles and not to buy suddenly finished material in the process, study the rules for calculating the required number of tiles:https://floor.expertexpro.com/en/pol-pokritiya/plitka/skolko-nuzhno-plitki-dlya-vannoj.html.
The technological sequence of the process of laying floor tiles includes:
- determination of the most acceptable direction of the series, the choice of the rational location of the starting point;
- preparation of adhesive solution, performed according to the instructions attached to the material;
Important. After the first batch, the adhesive composition needs to stand for about 10 minutes. Then the secondary kneading is carried out, required to obtain a homogeneous mass. An excessively liquid glue consistency (spreading grooves signal it) is corrected by adding a dry mixture to the solution, followed by kneading.
- applying the adhesive composition to the surface, the adhesive should be evenly distributed over an area of 1 m² with a notched trowel, it is not recommended to apply the adhesive solution to a large area, since the composition hardens quickly;
You should know. The adhesive solution can be directly applied to the tile, if the contractor considers that this method is more convenient and economical.

- for the identity of all butt welds, remote plastic crosses are used, they are placed at the cross intersections of the rows of tiles between the four adjacent elements;
Important. Excess adhesive material must be removed immediately, so that hardened stains and sag do not spoil aesthetic indicators.
- glued trimmed elements are made after laying the main array, they are placed in areas least affected by dynamic loads and in areas "not conspicuous";
- filling the joints with grouting compounds is carried out no earlier than a day after gluing the tiles, grouting rubber spatula.
Important.Before laying tiles on top of the “warm floor” system, the heating equipment must be turned off and not turned on until the consumables used are completely solidified.
Self-filling the floor in the bathroom
The process of pouring a polymer floor will not require effort if the preliminary steps are performed flawlessly. There should be absolutely no complaints about the leveled surface, since the bulk coating will emphasize the presence of the slightest crack or recess. If the machined plane is perfectly aligned, you can proceed with the fill:

- any type of level gauge, preferably a laser device, determines and marks the surface points of the bulk floor with beacons;
- the preparation of the composition is carried out in strict accordance with the briefing attached to the material;
- pouring is carried out on the sites, and not on the entire surface;
Important. The bulk floor in the bathroom is poured parallel to the walls, you need to start pouring in the far corner, finish at the door.

- the floor is leveled with a wide spatula, instead of a spatula it is better to use a squeegee equipped with an adjustable gap;
- the first filling layer, which serves as the base, must fully polymerize, which will take two days;
- the finish coating is applied by analogy with the technology of filling the base layer.
Do not forget. Two weeks is necessary for the bulk polymer floor to completely harden and stop releasing toxins harmful to people.

Strict adherence to technological requirements, strict adherence to manufacturers instructions, accurate preparation will help to arrange the floor in a hygienic room competently. The correct device will ensure long-term operation and superior aesthetic qualities. Armed with patience, the necessary materials and information about the technological procedure for installing the floor, you can save an impressive amount on paying for the work of the pavers.


3 comments