
Tile laying guide - sample work
Ceramic tile is the unconditional choice of those who are not interested in the long-term service of floor coverings in domestic premises. Non-absorbing and moisture-proof floor tile, laid in bathrooms, in the halls, in hallways and in kitchens, facilitates maintenance, protects the lower floors from the damaging effects of water. The mass of options, varying in color, size, pattern, allows you to create an infinite number of unique combinations. Ceramic tiles have only one drawback: expensive laying. However, a novice master can cope with it, armed with patience and reading the manual for installing tiles on the floor.
Content
Recommendations for choosing floor tiles
To install the flooring, you need a special tile, which you can recognize by the special icon in the marking: there should be a print of the sole. Ceramics for floors are more durable and massive than tiles for walls. It is equipped with a special non-slip surface created by introducing abrasive components into the coating composition. The roughness of floor ceramics minimizes the risk of movement even on a wet surface.

Important. You will need to buy a tile for the floor in an amount at least 10% higher than the value calculated by the floor area. When cutting, waste is inevitable.
Heavy-duty materials for flooring in housing are not needed, do not overpay for ceramics designed for flooring in rooms with heavy traffic. But the variety should be given attention. The best choice is ceramic products of the first grade. The second and third grade is not a defect, but in the packaging there may be elements with differences in size and color.
Tip. It will be easier for novice stackers to cope with laying large floor tiles and with the simplest joint-to-joint arrangement of elements.
It is also pointless to buy ceramics with enhanced water-repellent properties and resistance to chemical aggression. It is a material for industrial enterprises and for pools.
At the same time with the tile they buy all the decorative details, the puffer, primer and glue. It is advisable to give preference to ready-mixed building mixtures with a balanced manufacturer composition. Instructions on the dosage and preparation of ready-made mixtures are provided by the manufacturer. It also indicates the compatibility of the composition with a certain type of base and the preferred mode that must be observed during installation.
Preliminary important stage - preparation of the foundation
According to building regulations, the basis for laying any floor covering should not have any differences in surface level, the value of which exceeds the permissible limit of 2 mm, distributed over one meter of area. So, before direct laying of the tiles on the floor, it will be necessary to bring the base to acceptable standards by leveling.

Important. Regardless of the type of substrate, the surface to be finished must be thoroughly cleaned. To eliminate traces of grease and dirt, the use of caustic chemicals is not recommended, as their composition may interfere with the normal operation of glue or cement mortar.
Cement slab preparation
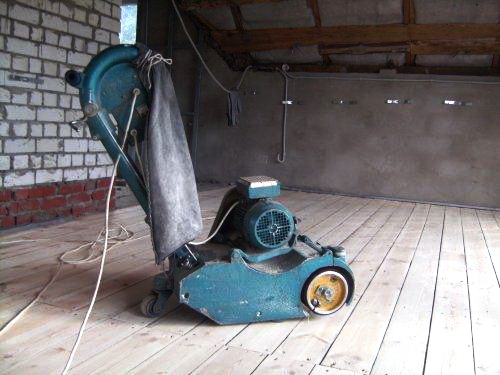
The most common type of foundation - cement slabs are available in most apartments. If it is possible to rent a grinding machine in a construction and repair organization, alignment can be done using this equipment. All cracks and defects must be repaired with a special repair compound, which can be replaced with inexpensive tile adhesive. Cracks need to be repaired in any case, especially before removing bumps using a leveling mixture.
To prepare the cement base for laying tiles, polymer mixtures or cement mortar are used. The synthetic leveling material will harden for at least a week, a cement screed will need 28 days for final hardening. It is impossible to proceed to the installation of tiles without waiting for the full "maturing" of the floor. Before laying the tiles, it is better to treat the entire cement base with soil, it will provide excellent adhesion and prevent cracking of the cement floor under the tile.
We will tell you how to lay tile correctly on the floor in our material:https://floor.expertexpro.com/en/pol-pokritiya/plitka/kak-klast-plitku-video-i-foto.html. The main secrets of the tilers.
The specifics of preparing a wooden base
It is believed that chipboard and plywood are not a strong enough base for laying clinker or tile on the floor. Especially if they are worn out. It is possible to mount a ceramic floor on new sheets of moisture-proof plywood, but it should be noted that the total thickness of the plywood layer and tile should not exceed 28 cm. Plywood sheets are cut into squares with a side of 40 or 50 cm, then laid according to a pattern resembling brick laying. Before installing the floor tiles, the surface of the plywood base is leveled with a grinder.

In bathrooms, hallways and kitchens, tiles on a wooden floor made of boards can be laid by performing thorough preliminary preparation. The boards that have lost their strength are replaced with new lumber, the loosened ones are firmly fixed with self-tapping screws, all cracks and recesses are closed, protruding defects are cut off.
Important. Preparation of the base in the bathroom must necessarily include the step of applying a waterproofing layer. As a waterproofing, foil material, thickened polyethylene or coating compounds are used. Waterproofing will protect building materials from water, and a tiled coating from peeling that occurs due to movement of wood under the influence of moisture and temperature fluctuations.
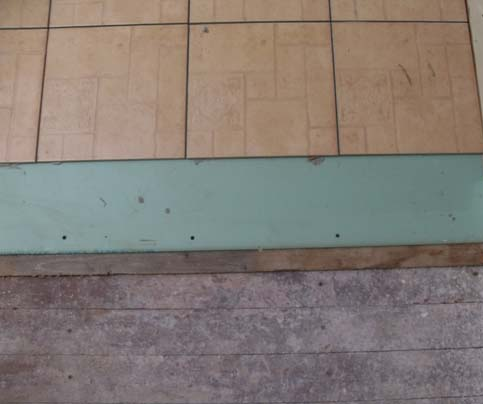
Laying tiles on top of an old ceramic floor
Those who are going to lay the tiles for the kitchen on the floor with the already existing ceramic cladding have two options: chip the previous tile or mount directly on the old floor. They beat off the tile with a puncher or a hammer with a chisel, but if the old floor was laid “in good conscience”, you still have to level the surface.

Not attracted to the laborious dusty beating off ceramics from the floor? You can lay it on an old tile, but be sure to check whether the doors will open freely after gluing another layer. The glue for forming a strong grip will require a special one, and the surface of the old tile will need to be completely treated with sandpaper.
A detailed analysis of the process of laying tiles on the wall can be found here:https://floor.expertexpro.com/en/pol-pokritiya/plitka/kak-klast-plitku-na-stenu-video.html.
Vinyl base
Floor coverings made from vinyl are best removed, and the remaining adhesive must also be wiped thoroughly. If you do not want to get involved in laborious work and with an acceptable state of the vinyl coating, you can make a cement screed on top of it or pour a polymer equalizer.
Floor Tiles
Having completed the preparatory work, you can safely begin to study the briefing, which describes in detail how to lay the tile on the floor, and to the subsequent implementation of the idea.
Tip. Before installing the tile, make a specific “fitting”, lay the tile on the floor without glue, so you can choose the preferred pattern for a symmetrical beautiful installation, determine the optimal starting point, see how decorative elements will look and find the best location for them.

- Markup. If you need to determine the center point in the room, you need to “lay” two diagonals, for which it is easier to use the coated chalked cord. At the intersection of the lines there will be a center, according to the standard rules of geometry, the points located in the middle of each wall are laid off and marked, the remaining auxiliary lines are drawn. To determine the height of the floor will help a laser level or a simple device made of a pair of disposable syringes with risks connected by a flexible hose.
- Application of glue to the surface. This must be done in the selected area of the start of work. With a diagonal layout or the creation of a central decorative element, glue is applied to the central section, if the rectangular tile is placed apart, laying starts from the center of the wall. If no design refinements are expected, glue is applied in the corner of the wall, which first comes into view.
Tip. It is better to start installing the tile on the floor in a corner remote from the entrance, moving towards the door. In a large room, it is advisable to leave the passage against the wall without finishing it with the entire floor. This is required in order not to damage the masonry when moving around the room during the hardening of glue on the finished area. After the composition has hardened, it will be possible to finish the remaining surface.

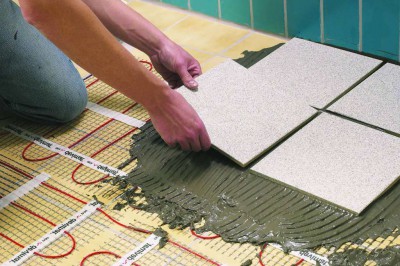
- A small area of no more than a meter is treated with glue. A binder composition is applied to the base using the even edge of the notched trowel. Then the composition is “combed” with the serrated side. The more ceramic elements selected for the floor, the more teeth the tool should have.
Our article will help you choose the right adhesive for the tile and determine its consumption.https://floor.expertexpro.com/en/pol-pokritiya/plitka/vybiraem-klej-dlya-plitki.html.
To install large tiles, you need a spatula with square or U-shaped teeth. The process of "combing", necessary to optimize adhesion, is carried out by holding a spatula at an angle of 75-45 °. The height of the ridges depends on the angle of inclination, for a large tile you need a high relief formed by a large comb.

- Laying the starting tile. It must be positioned in accordance with the marked horizontal floor level. It is necessary to make an effort of your own hands or to tap on the element with a rubber mallet, you can use a wooden mallet or a wooden mallet handle.
Important. If there is not enough binder, the tile needs to be separated and laid again with the addition of glue. There are no other options to replenish the glue volume.
- Technological seams must be formed between the elements of the tiled floor. Smooth and beautiful they will turn out if plastic crosses are placed in the seams. After mounting, the crosses must be removed without waiting for the glue to harden.
- The stacker, which started in the center, can move in any direction along the wall or diagonally if the diagonal layout is carried out. Having started work in a corner, the master moves along the wall to the opposite corner.

Important. In the process of laying, it is necessary to check the horizontal plane. The control instrument will be the spirit level or ordinary bar. It is installed on two, three or four tiles at a time, located in different vector directions.
- Filling free space with cut parts. Read about ways to perform cutting by reading the corresponding article.
Important. The remnants of quickly hardening glue must be removed immediately, without waiting until the composition hardens.

- Butt joint grout. The composition is applied a day after the installation of tiles on the floor. Fill the joints with grout using a plastic rubber spatula.
After reading the guide on how to lay the tiles on the floor, any novice stacker will be able to cope with painstaking, but not too difficult work. The thorough implementation of the recommendations and the observance of the technological sequence will provide an excellent result and save you from the exorbitant costs that accompany the order of decoration.
1 comment