
How to lay tile on the floor: the main secrets of master tilers
Floor tile boasts a thousand-year history, however, it does not give up its position today. This is especially true of its use for flooring in bathrooms, bathrooms, kitchens and other rooms with high humidity and unstable temperatures. Why is ceramic floor tile so popular? Here are just some of its advantages: it is not afraid of moisture and elevated temperatures, is easy to clean, not subject to abrasion, and serves for a long time (for several decades, for sure).
The disadvantage of floor tiles can be called not so complicated, but requiring a painstaking and accurate approach to laying. And this allows facing tilers to set considerable prices for their services. Meanwhile, anyone can master this technology - it’s enough to know some secrets of how to lay tiles on the floor correctly.
Content
The calculation of the number of tiles
If you decide to lay the tiles yourself in the room, then the first thing you will have to do is calculate the required amount of material. Typically, the calculations are carried out in this way: the floor area is divided by the area of the tile. To this figure add 10% for trimming, marriage, possible damage to the tiles during installation.
“Gentleman's set” for styling - what do we need?
So, we counted the number of tiles. However, besides it, for styling, we will need something else, namely:
- tile adhesive
- grout for joints (fugue)
- plastic crosses
- notched trowel
- building level
- rubber mallet
- tile cutter

Laying of ceramic tiles should be done on a solid, flat and not subject to deformation of the base. Wooden floors do not meet these criteria. In order to lay the tiles on the wooden floor, you need to change its characteristics. We will tell you how to do this in a special material:https://floor.expertexpro.com/en/pol-pokritiya/plitka/texnologiya-ukladki-plitki-po-derevyannomu-polu.html.
Glue for a tile and its substitutes
The strength of the tile holding on the surface will depend on the correct choice of glue, so we will draw your attention to it. Glue can be sold in the form of ready-made compounds or dry powder. Ready-made compositions are expensive, but not very practical - you need to use all the contents of the purchased container at a time (most often the finished glue is supplied in plastic buckets). A dry adhesive mixture is a longer-lasting option, however, it will require some additional movements: to obtain a plastic consistency, the dry powder is closed with water in accordance with the instructions on the package (paper bag, bag).
Instead of special glue for laying tiles on the floor, you can use a cement-sand mortar. Just a couple of decades ago, they did just that, and no one complained about the quality of the lined surface. Cement mortar is an excellent replacement for tile adhesive.Firstly, laying is cheaper, and secondly, cement mortar can be applied in a thick layer, which means that the errors in the relief of the floor can be compensated.

Sometimes the adhesive solution is done like this: sand, cement and dry glue are mixed in proportions of 3: 1: 1 and mixed with water. It turns out a mixture of cement mortar with glue, which reliably and quickly adheres the tile to the floor surface. This option also allows you to save the amount of glue and, accordingly, money for its purchase. Try it - a similar composition is often used by professional construction teams in enterprises.
Layout: in straight rows, diagonally or "in a run"?
There are 3 standard tile laying options:
- in straight rows or "seam in seam" - the tile is laid in straight rows, and the seams of the overlying and underlying tiles coincide.
- "In a run" - the seams of the overlying tiles are placed above the middle of the underlying tiles.
- diagonally - tiles are laid not in straight rows, but horizontally. This method is the most complex and uneconomical (a large number of tiles have to be cut), in addition, it requires considerable experience.
If you are just studying do it yourself, then we advise you to stay on the first option - “seam to seam”. This is the easiest way in which the number of errors at the beginning of training will be minimal.

If there is usually no problem with replacing plumbing, then how to lay the tiles in the bathroom can be quite difficult to solve. We will help you make a choice and tell in detail about the various options and types of layout of tiles in the bathroom:https://floor.expertexpro.com/en/pol-pokritiya/plitka/kak-polozhit-plitku-v-vannoj.html.
The order of work
1. Definition of a reference point
After you have decided on the pattern, it is very important to indicate the location of the first tile, from which you will “dance”. Since the trimmed tile does not look aesthetically pleasing, it is advisable to start the first row from the wall, which is in the room in full view. If the floor is completely open and the trim cannot be hidden behind the furniture, you will have to do it differently: beat off the center of the room with the coated cord and lay out the tiles, starting from the center. Thus, the tiles that are extreme on both sides of the floor will be trimmed equally and the installation will be symmetrical.
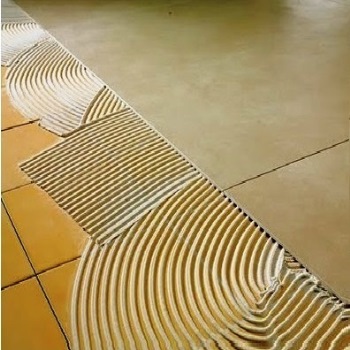
2. Laying a layer of adhesive
It's time to lay the tiles. Prepare the adhesive and apply a thin layer to the floor. Align the adhesive with a notched trowel, leaving the grooves of the same height on the surface of the grooves. According to the rules, glue is applied at a time to 1m2 surface. For inexperienced veneers, this is too large an area - you simply will not have time to lay out all the necessary tiles, and the glue will already dry. Therefore, it is better to apply glue to the surface corresponding to one tile - the one you are going to lay right now.

There is one important detail: if instead of modern tile glue you use cement mortar (or, alternatively, a mixture of cement mortar with glue), then before laying the tile should be soaked in water. This is necessary for good adhesion of the tiles with the mortar.
3. Laying tiles on glue
Lay the tile on the applied adhesive, pressing it to the surface from all sides and aligning it with your hands.

Be sure to check the straightness of the row and the horizontal surface of the tile using the building level. It is unlikely that you will be able to determine by eye the correct position of the tile, most likely some angle will have to be lowered, and some - raised. To lower part of the tile below, just press on it with your palm or tap with a rubber mallet.When the tiles sag, an additional portion of the solution is placed under it.

Between the laid tiles, plastic crosses are inserted, the thickness of the seam will depend on the thickness of which. If for some reason you were not able to get crosses (for example, you forgot about them), then ordinary matches will successfully replace them.
4. The need for pruning
When laying tiles, a situation often arises when the whole tile does not fit in a row and it has to be cut. Then a tile cutter or grinder comes to the rescue. It so happens that these useful tools on the farm do not, how to lay tile in this case? There is a way out: at home, the tile can be cut with a glass cutter or a hacksaw for metal. Of course, this is not so convenient, but it does not require you to buy expensive tools.
In order for the adhesive to finally harden and acquire the necessary strength, it will take 2-3 days. After this, it will be possible to proceed to grouting the seams.
Sometimes it’s easier to align existing walls or make new drywall partitions. We will tell you how to cover such walls with ceramic tiles and analyze the nuances of such work in the article:https://floor.expertexpro.com/en/pol-pokritiya/plitka/ukladka-plitki-na-gipsokarton.html.
Grout for joints - think about beauty
Tile joints that were formed during installation must be filled with a special compound - grout for joints. To do this, remove all the crosses and wipe the seams with a white or colored grout mixture (fugue) using a small rubber spatula. The color of the fugue is most often selected in tone tiles from the existing color palette. Although it is possible to get the right tone by adding color dye to the white grout.
For floor tiles, special grout is not always used, especially when facing floors in corridors, vestibules and other rooms with high traffic. This is due to the fact that in such places the grout will quickly lose its color, it will be jammed. Therefore, liquid cement-sand mortar is often used instead.

Grout for joints dries for about a day. After this period, wipe the surface of the tile with a damp cloth or, if necessary, wash the floors. Now you can use them for their intended purpose!
Video instruction with an example of work
Surely after reading the article, it became clear to you how to lay the tiles on the floor. And if you have any questions? Then you just need to see the process with your own eyes. Watch a short video that we specially selected for you - in it, a specialist lays tiles on the floor, and also explains in detail all the nuances of this method of flooring.


2 comments