How to lay tiles - common mistakes and laying tips
Facing with ceramic tiles is a great way for a couple of decades to deprive oneself of the pleasure of regularly updating shabby, peeling, deprived of external attractiveness interior surfaces. In addition to economic priorities, tiling facilitates care processes, improves the aesthetic and technical qualities of floors, walls, and fragmented areas. The new series of ceramic tiles imitating ancient tiles, expensive varieties of wood, natural minerals, can replace any finishing materials. Instead, they have successfully used wear-resistant tiles, affordable for owners of apartments with any income level. Do-it-yourself tile laying will help reduce almost half the cost of facing.
Tile is traditionally used for decoration of premises with specific operating conditions. It is laid in utility rooms, requiring frequent cleaning, carried out using water and active household chemicals. Tiles are fully or partially laid out in the bathrooms, with its help they finish the halls and kitchens. The material is not sensitive to the action of aggressive media, water, steam, temperature fluctuations. It does not wear out, maintains a colorful saturation throughout the entire operational period.

Convincing the priorities of facing ceramics is pointless, because there is a tile finish in almost every apartment. However, for owners who have never done this job, laying seems like an overwhelming task. The work is really laborious and painstaking, but affordable for the beginning master. It is enough for the future stacker to get acquainted with the technology, after which you can safely begin to implement the idea. In addition to information about the technological rules for tiling, he will need patience, tools and material to decorate his home.
Content
Planning and calculations - a competent start to work
The first step of the contractor will be to measure the area, which does not always closely coincide with the BTI data. With a simple tape measure, you need to measure the axes and diagonals, examine the horizontal and vertical planes, check the angles between the mating surfaces with a triangle in order to identify and plan the upcoming work front.
Important. According to normative documentation, the limit of permissible deviation is 0.2% or two mm per one meter of area. The angles between adjacent walls, as well as between the floor and the wall must be strictly 90 °.
Checking the geometric parameters can be done with the simplest device - a wooden beam. To accurately identify deviations in the verticals, you can use an elementary plumb, made of rope, the length of which is equal to the distance between the ceiling and the floor, with a weight attached to the end. It will be possible to check the horizontal with a homemade level gauge made of two disposable medical syringes with a scale connected by a plastic hose. This device is also needed for marking.
If deviations exceeding the permissible norms are detected, it will be necessary to level the walls with plaster, as well as align the horizontal plane with a bulk polymer layer or cement-sand mixture, depending on the degree of problems found. Often, alignment precedes the standard list of tile laying jobs. They should not be neglected, otherwise puddles will accumulate on the floor in the bathroom or in the kitchen, and the failed segments on the walls will catch the eye and will require rework. So, there are also costs for the purchase of materials for leveling.

Correctly calculate the required number of tiles is not difficult. Read more about how to do this with an example of a bathroom here:https://floor.expertexpro.com/en/pol-pokritiya/plitka/skolko-nuzhno-plitki-dlya-vannoj.html.
Next, a floor plan is drawn and a finishing scheme is developed, which includes only laying tiles on the floor, fully finishing the floor and walls or fragmentary lining of vertical sections around the sanitary equipment, combined with the arrangement of floor tiles. The calculations necessary for the purchase of material should be slightly adjusted upward, because brittle tiles can be damaged during laying. It is necessary to buy it immediately with a stock, since subsequently there may not be similar material (the batch of goods will end in the store or products with the same nomenclature will have a different shade).
The glue must be selected taking into account the conditions in which the tile will subsequently work. For the bathroom and for the kitchen “apron”, compositions that do not respond after hardening to excess moisture will be required. Immediately you need to think about the grout, now available on the market in different colors. Colored grout mix can radically alter the composition. If additional effects are not necessary, you need to buy ordinary grouting material, in the amount specified by the manufacturer.
Do not forget. To improve the adhesion will require a primer, to fix small irregularities putty. When pouring the screed, it will be necessary to lay a layer of waterproofing, which is placed in the form of a thicket with an approach to the walls of about 15 cm. If you plan to buy rolled material for waterproofing, you will also need adhesive tape to fix the joints. It will be necessary to take into account that polyethylene or foil-repellent water-repellent material is laid with an overlap of 10 cm. Also, to align the verticals, you will need to buy a special mesh that increases the strength of the plaster layer.
Please note. We will need tools:
- a construction mixer for kneading binders, leveling and primers, instead of it you can use an electric drill with a nozzle;
- a notched trowel, the dimensions of the “comb” of which depend on the size of the tile (large teeth need large teeth);
- a ten-centimeter spatula for the convenience of imposing the composition on a gear or trowel;
- tile cutter, instead of which you can use glass cutter;
- a small Bulgarian, if you have to cut a lot of tiles to finish a large area;
- “Ballerina”, equipped with a carbide tip, if the future stacker has to make round holes;
- rubber trowel for grouting.

The easiest way for the novice master will be to arrange the elements of the “seam to seam” tile, it is better to master more complex “razbezka” patterns or laying in the diagonal direction, already having some experience. The presence of friezes, borders and other decorative elements must be determined at the preliminary stage and buy the right amount of shaped parts also with a small margin.
Are you afraid to miss something when laying tiles yourself or do not have experience with this type of work? Use our guide and follow the recommendations in the material:https://floor.expertexpro.com/en/pol-pokritiya/plitka/rukovodstvo-po-ukladke-kafelya-na-pol.html.
Preparation of surfaces for laying tiles
An impeccably prepared surface guarantees the strength of the tile and the superiority of decorative qualities.
- All plumbing must be removed in order not to spoil.
- Then you will need to remove the old tile, not forgetting to protect your eyes from dust with glasses, and your hands with gloves. A layer of old paint can be removed with a puncher with a spatula.
- Tapping the whole area freed from the old finish. The detachment of the plaster and the presence of weak areas in the screed is signaled by a dull sound, the identification of which means the need for cleaning to brickwork or to concrete.
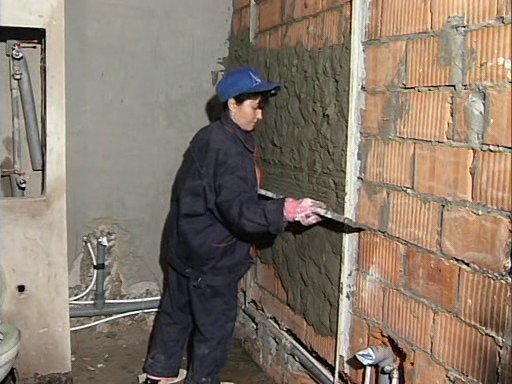
Alignment of vertical and horizontal planes is a separate type of construction and repair work, about which you should read the corresponding article. Suppose that the walls and floor are already perfectly smooth, it remains to rid them of building dirt, grease, soap solutions, primer, figure out how to lay the tiles, and proceed with responsible, painstaking work.
Note. The factory primer can be replaced with clean cement remaining after leveling. It must be diluted to a consistency equivalent to the density of liquid sour cream, and "slap" on the surface with slaps.
The walls in a wooden house before laying tile are upholstered with metal mesh, for mounting which are installed wooden slats. Between the walls of wood, layers of steam and waterproofing are laid. Plaster is applied over the mesh (with a layer of no more than 15 mm), which should not be rubbed to improve adhesion between it and the tile.
Important. Laying tiles on top of old tiles is not recommended. But this is possible if it is required to complete work in a shorter time. The stacker will need to buy a special adhesive composition that can firmly fasten the old cladding layer with a new decorative and protective surface.
Cutting - an inevitable job when laying tiles
Without trimming, it is almost impossible to lay elements of a material with specified geometric parameters. It is best to use a tile cutter for this, but for lack of it you can do with a glass cutter. The process is simple:
- Marking is carried out, it is better to apply it with a felt-tip pen.
- An element with a marking is laid on a table or a special bed.
- The intended cut line is outlined by a solid cutting roller.
- Cut off parts are separated with a “foot” or nippers.

It is recommended not to make several passes with the cutting tool in one line in order to avoid getting a “torn” edge. It is advisable to stick a piece of duct tape on the area around the cut line to form a high-quality cut without memorizing the enamel.
Useful advice. Before laying the floor tiles, you need to make a kind of “fitting” - to decompose the material without gluing, taking into account the dimensions of the butt joints (2-4 mm). The tiles should be placed so that the cut segments are removed from the entrance and, if possible, hidden by household equipment or furniture.new year.

U-shaped and T-shaped sections of the cut make grinder. To make round holes, use a ballerina attached to the drill. The work on cutting should be treated with special scrupulousness and attention, carefully verify the size and set the markup. The slightest flaw leads to damage to the material.
Another tip. An inexperienced handler will probably not be able to cut perfectly. The edge is recommended to be hidden under shaped ceramic parts, under the tile laid on the mating surface, or under cashing.If it is impossible to hide poorly cut parts, the cut can be trimmed with a file, sandpaper or a grinding stone.
Wall cladding with tiles
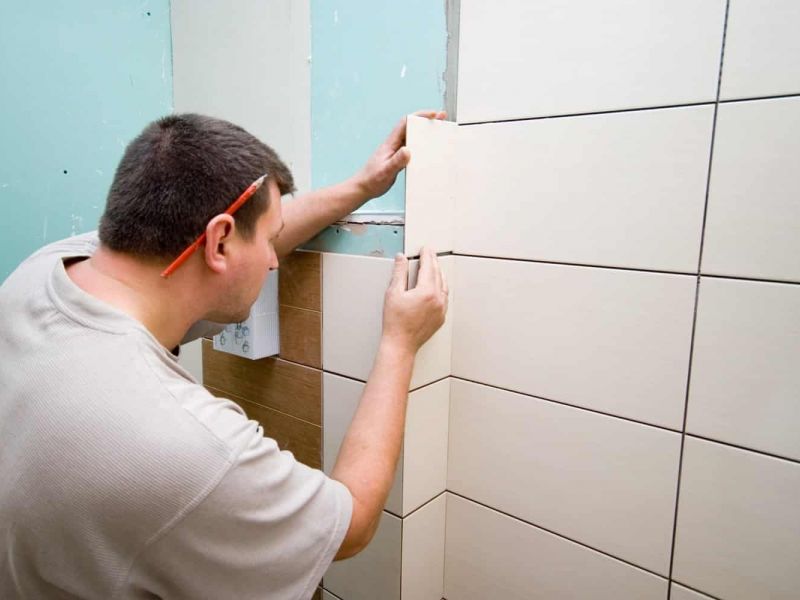
Experienced finishers who know how to lay tiles correctly advise novice performers to start with wall cladding, as tools that have fallen to the floor, flown tiles, spilled mortars can ruin a brand new floor covering.
- The beginning of work is the installation of horizontal landmarks, which are lighthouse tiles “planted” on alabaster. After laying a number of landmark tiles removed, cleaned from the remains of alabaster and installed on a cement or adhesive base. Lighthouses are located at a distance not exceeding 2 m.
Note. To determine and mark the horizontal line, you can use the level and the staff, which will serve as a guide for the beginning of the first row. You can install plumb lines in the corners and stretch a cord between them.
- Laying tiles on the walls starts from the lowest row from the floor, continues up.
- A binder composition is applied to the rear surface of the tile, after which the tile is pressed against the wall with force to fix it at the indicated level. The solution that stands out when you click around the tile must be removed.
Attention. Do not save on a binder. The voids under the tiles will cause the tiles to separate from the surface.

- To form the seams, remote plastic crosses are used. Seams do not have a decorative function, they are needed to prevent cracking of tiles and separation of elements during thermal expansion.
- Upon completion of the surface cladding is performed grouting.
The quality of tile laying must be constantly monitored by checking the horizontalness and verticality of the created surface.

When facing the wall, paired with a sloping floor, the first row of masonry should be composed of solid tiles. After finishing the entire surface, the cut segments of the lower row are laid.
When tiled rooms can not do without cutting tiles. Let's talk about how to do this with a grinder and a tile cutter, in a special article:https://floor.expertexpro.com/en/pol-pokritiya/plitka/kak-rezat-plitku.html.
Technology for laying ceramic tiles on the floor
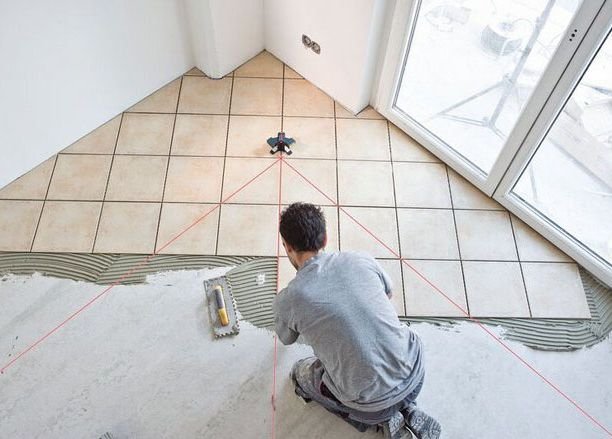
To lay tiles on a horizontal surface in the simplest direct way, you need to select the position of the first row. To lay the cover in a large room, it is recommended to start in the middle, finishing a small area is better to start from the second row.
- By analogy with wall cladding, tile beacons are installed. The presence of minor irregularities on the rough floor is eliminated by applying an increased amount of mortar.
- A binder composition (adhesive or cement mortar) is applied to a small area of approximately 70 x 70 cm, after which it is leveled with a trowel with teeth. For uniform distribution of the adhesive composition, the spatula is held at an angle of approximately 60 °.
Note. Laying floor tiles on a level surface can be done using bitumen mastic, while gluing it provides waterproofing.

Oversized tile elements are laid by applying a binder to the floor and tile
- For elements with dimensions of 20 x 20 cm or more, glue is applied to the subfloor and to the tile. The tile with the solution applied to it is laid on the floor, then tapped with a rubber mallet.
- To comply with the clear dimensions of the seams, distance crosses are inserted between the elements. The larger the tile, the larger the size of the seam should be, but 4 mm is considered the limit.
- With the help of a wooden bar, it is regularly necessary to control the horizontal and vertical. A bar checks two or three tiles in a longitudinal row, then it is installed on two or three elements from the transverse row.
- Upon completion of work, the remnants of glue or cement composition from the surface must be removed, “pull out” the crosses from the seams, without waiting for hardening.
- A daily break is required before grouting.

Attention. No need to walk on freshly laid flooring.
Special attention will need to be paid to the corners of the floor tiles. If they protrude above the plane they must be precipitated to a general level. If the protruding angle is a defect of this element, it is better to lower it slightly below the general level.
That's the whole simple technology of laying tiles, familiarization with which will surely convince a neat performer in real opportunities to save tangibly, without resorting to the services of pavers. Patience, knowledge and diligence guarantee a long service of an excellent wear-resistant floor.