
How to drill tile - procedure
The comfort and appearance of the room is largely dependent on the finish. For the kitchen and bathroom, tiles are often used. After the tiling of these rooms is completed, the question often arises of how to drill tile in order to hang various holders, hangers, mirrors and other necessary items. The fact that the tile is fragile and can be easily cracked by inaccurate mechanical action is known to everyone who came across this finishing material. But there are ways to make a neat hole without damaging the tiles. Let's consider them in more detail.
Tools and materials for drilling tiles
How to drill a tile? In order to successfully drill the tile without damaging it, it is necessary to select the necessary tools, appropriate drills and materials. Would need:
- electric or, in extreme cases, a hand drill;
- lance drill with a spear-shaped tip, especially for tiles;
- core drill;
- adhesive mounting tape (paper tape);
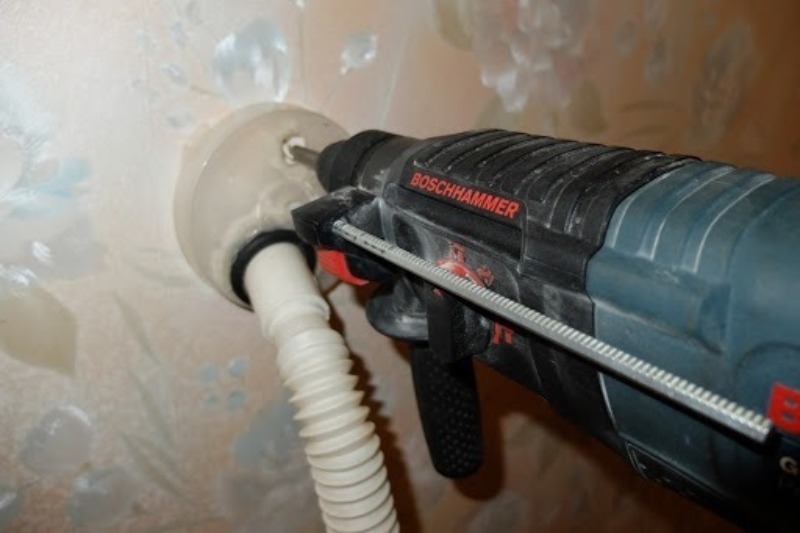
- a vacuum cleaner;
- marker.
If necessary, drill a large diameter hole in the tile for pipes, a mixer or installing a socket, for example, use a circular drill-ballerina or carbide mill.
Drill-ballerina - so in colloquy they call a circular adjustable drill with cutters that are set with an hex key at an equal distance from the center. The drill in this design is used for alignment. Cutters can be moved at different distances. Thanks to this design, it is possible to drill holes of different diameters. It is enough to simply set the desired diameter, make markings, and, holding the tile tightly, drill at low speeds of the drill.

The cost of such a drill is low, you can buy it almost everywhere, the service life is long. There are several modifications of this drill, which one is the most convenient, is detected empirically.
A tungsten carbide router costs a lot more. With its help, you can drill ceramic tiles as well as concrete and stone. When drilling a tile, it is also used, but the main drawback is the fixed diameter, which cannot be adjusted.
If the tile is already on the wall, then it becomes necessary to drill not only the tile, but also the wall behind it. In this case, it is better to use a drill and a perforator. For a drill, it is better to use a carbide lance-shaped drill for tiles and glass, and for a puncher - carbide drill for tiles and concrete.
Tips and Tricks
As in any business, the procedure for drilling tiles has its own nuances, subtleties and small tricks, the knowledge of which will facilitate the task and will give a clear answer to the question of how to drill a hole in the tile without unnecessary trouble.
- The hole should not be made at the edges of the tile, in the crosshairs and in the gaps between adjacent tiles, since the likelihood of chips and cracks in this case is very high.
- During drilling, you can turn off the drill and periodically wet the drill with water to avoid overheating.
- If the necessary drill or cutter was not on sale, and you need to make a hole, you can use "artisanal" methods.
- Sometimes you can use a drill and drill for a perforator. The drill is clamped into the cartridge, first they drill the tile (non-impact mode), then switch the mode and drill the wall. Drilling is carried out at low speeds.
- For drilling tiles at low speeds, a metal drill can also be used. True, enough for him once.
Operating procedure
The drilling method is used in order to obtain a small hole. Before drilling a tile, you need to lightly tap the tile and listen to the sound, if the sound is dull, dense, you can proceed without fear, otherwise there is a high risk that the tile will crack.
Then you need to plan exactly where to drill the hole. Enamel tiles mark with a marker.

It is important to ensure that the drill does not slip on a smooth surface. They solve this problem in several ways:
- At the center of the hole, the enamel is slightly chipped; this can be done using a drill at very low speeds, or a file, for example.
- A masking tape (adhesive tape) or a translucent adhesive plaster is glued at the drilling site, which holds the drill at the initial stage and prevents it from slipping. If the label is poorly visible through the ribbon, you can make a mark directly on it.
- Sometimes a conductor is used to prevent slipping - a thick plate of steel or wood with holes of different diameters. It is applied to the tile in the right place, pressed, and drilled through the hole. This device can be made independently from plywood or a metal plate, in the absence of a store option.
Before drilling a tile, it is necessary to be convinced that the function of the shock mode is disconnected if that is available on a drill. Further, at an angle of ninety degrees, and at minimum speed, they begin to drill. Gradually, the speed can be increased and drilled to the base. In this case, it is very important to immediately remove the dust that forms. To do this, use a vacuum cleaner, which must be installed so that it does not interfere with work, and the dust quickly gets inside. If possible, it is better, of course, to resort to someone else's help.
Having reached the base of the tile, the drill is changed to one that matches the type of material: for wood, concrete, etc., and a hole of the required depth is drilled. It is important to consider that the second drill should not be larger than the first, otherwise tile damage is inevitable.
If you need to drill a tile that is not glued, you need to make sure that it lies on a flat surface.

Under it should be a wooden, concrete, but not metal surface. Since in the latter case, it is easy to spoil the cutter.
In custody
Since tile is quite popular as a material for interior decoration, it is important to know the methods of processing it, including drilling, since in everyday life it is often necessary to hang all kinds of cabinets, shelves, holders, etc. on the wall trimmed with tiles. In this article, we examined both traditional methods of drilling tiles, and alternative, which are used less often. This procedure requires the contractor to be careful and follow safety procedures, but it is not difficult. If desired, it can be done independently.
5 comments