
How to level the floor under linoleum: work with wooden and concrete bases
Linoleum is covered only on a flat surface without flaws. Since it is elastic, all the bends of the base are reflected on it. Over time, the deformed coating becomes unusable and has to be changed. Therefore, before using linoleum as a floor covering, it is necessary to level the base. Let's figure out how to level the floor under linoleum so that the floor covering does not deform.
Leveling the wood base
Method # 1 - surface cycling
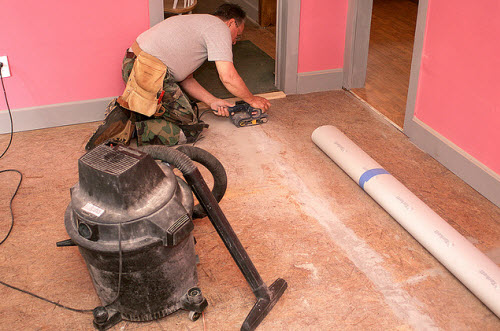
Scraping is the most time-consuming process of leveling a wooden floor. To carry it out manually is possible, but undesirable. It is much faster and more efficient to use a looping machine to level the wooden floor. Before starting work, everything is taken out of the room. The surface of the floor is checked for metal objects. Hats of nails must be besieged with a hammer and hammer, below the floor. Otherwise, they may dull the blade of the machine.

When working with the cycle machine, safety measures must be observed. To protect against wood dust, a respirator must be purchased. And to protect against noise, headphones. The process of cycling begins from the corner of the room, along the far wall and is moved by a "snake".
In the corner itself, the floors are processed manually. After removing the upper dirty layer, close holes and cracks in the floor. After waiting until the putty dries, the process of hitching is repeated. After dust settles, the surface is cleaned with a vacuum cleaner. Next is the processing of wood with antiseptic drugs and varnish. Well, that’s all, the base for laying linoleum is ready.

Method # 2 - putty alignment
To level the wooden floor, putty compounds based on sawdust diluted with glue are used. This kind of floor treatment is significantly cheaper compared to using self-leveling mixtures. Before starting work, the surface is cleaned and sanded. The guide rails are stuffed. The space between them is filled with a mixture of sawdust with glue.

Sawdust is moistened before use. The mixture of sawdust with glue should have a consistency resembling thick sour cream. A layer with a thickness of more than 2 cm is applied in several stages. Each subsequent coat should be applied after the previous one has dried. The flatness of the surface is checked using a level. The disadvantage of this method of leveling the floor is the length of the process.

Method # 3 - leveling with plywood
Before leveling the floor, beacons are installed in increments of 20-30 cm. Self-tapping screws screwed into the floor are used for them. Plywood sheets (120 × 120 cm) are cut into squares with a side of 60 cm. After that, it is necessary to check the ends of the workpieces. They must be intact without delamination and cracks. The next step is laying logs, for which strips of plywood with a width of 0.30-0.35 cm are used.

They are attached to the floor with wood glue or with self-tapping screws. Logs are laid so that the edges of the plywood blanks lie on their middle. Then the plywood is laid on the logs and screwed with screws. Each next row of workpieces is stacked with an offset, as in bricklaying.After finishing work, the surface is ground and coated with protective compounds.
Read more in the article: Aligning the wooden floor with plywood: all about laying plywood on a wooden base
Method # 4 - self-leveling mixtures
Application self-leveling mixtures allows you to get an even base with a thickness of 5 to 20 mm. Before applying the floor should be prepared. Reinforce poorly seated boards, repair all cracks, sand the surface. After drying, the floor is covered with a primer.
The bottom of the walls is glued with insulating tape. A guard rail is screwed onto the door sill with a height not lower than the level of the future floor. Using the level, the height of the bulk floor is set. The reinforced mesh is attached with a construction stapler.

Getting ready self-leveling mixture according to the attached instructions. After thorough mixing, the mixture is left for 10-15 minutes and mixed again. After time, the mixture is poured onto the prepared surface. In the process of pouring, it is necessary to roll along the surface with a needle roller. This will remove air bubbles that degrade the performance of the substrate. The time to completely dry the surface depends on the thickness of the mixture and the room temperature.
Methods for leveling a concrete base
The concrete base on which the linoleum will lie should be smooth and without defects. Otherwise, it will need to be aligned, and defects should be repaired. For these purposes use concrete screeds. Before starting work, prepare the base. They clean the surface of the old peeling screed, various spots, close up cracks and chips. If necessary, a complete repair of the concrete screed is carried out.

Then find the largest bulge on the floor surface. Make a mark on the wall at the same level, and then 2 cm higher. Using the water level, make horizontal lines on the walls, focusing on the applied mark. At such a height, a leveling mixture will be poured. Next, a penetrating primer is applied to the surface. The walls below are glued with waterproofing above the floor level by 15 cm.

The next step is to install lighthouses. Their upper edge should match the level of the future gender. The beacons set the rule. Having prepared the concrete mixture, they begin to flood the floor, starting from the corner farthest from the entrance. The height of the fill is controlled by the rule. After completion of work, the finished screed is watered daily with water for a week. Three days later, you can remove the lighthouses. The resulting voids are primed and poured with a solution. You can lay linoleum only after the surface has completely dried.
Do not neglect the step of leveling the surface before laying linoleum. The life of the flooring depends on this. It’s better to be wasted right away and do everything right. Than then redo several times. Appreciate your time.
2 comments