
Step-by-step laminate installation technology: a detailed installation guide
Laminate is a worthy alternative to wooden floors; the coating has an attractive, most natural appearance and a high degree of wear resistance. A well-made laminate can withstand many years of human “activity”. It is worth noting that the consumer characteristics of this material are really up to par. For residential premises, choose the 31st and 32nd wear resistance classes, for offices, hotels, various institutions - the 33rd, 34th. Externally, the laminate is a sheet (20 cm wide, 7-9 mm thick, a meter long) equipped with grooves and spikes for joining each other. The front side of the coating, as a rule, has a unique texture and color. Laminate flooring is easy to care for. The main thing is to prevent a copious amount of liquid from entering the connections. But before you begin to enjoy the convenience and attractiveness of the material, you need to make the most important event - its laying. Laminate laying technology is an algorithm of actions that you should know by heart for those who decided to decorate square meters under their feet with this flooring.
Content
What to look for when purchasing a laminate?
The process is complex. It is necessary to take into account the thickness of the material, its cutting, the installation method. The large thickness of the laminate will raise the floor level: to solve the issue of opening and closing doors in the room, if any are already installed, should be done in advance. Nesting determines with what stock to acquire material - from a longer and wider board of waste there will be much less.
The most common way to lay the coating is to install along natural light sources (windows, doors). What is the reason for this? The fact is that laying across “provokes” a greater expressiveness of shadows from the joints, which, in turn, undoubtedly spoils the overall appearance of the floor.

A huge range of laminate flooring can cause difficulties in choosing a material. What to look for when buying? Let's talk about the parameters of the panels and help you choose the ones that are suitable in the material:https://floor.expertexpro.com/en/pol-pokritiya/laminat/kak-vybrat-laminat.html.
In rooms where windows are located on several walls (open verandas, etc.), "diagonal" installation is allowed. This installation method is more complicated, in addition, it increases the consumption of the laminate.
A 6% margin is sufficient for "classic" styling; 12% or more is recommended for diagonal styling. And if it is planned to cover with a certain geometric pattern, then the installation costs for such a “masterpiece” may amount to 25%. More accurately, you can calculate using our calculator:
Plastic skirting boards and associated accessories should be purchased immediately, along with the laminate: new floors with finishes look much more impressive and, of course, will last much longer.
Preparatory phase before installation
Of the entire spectrum of flooring, laminate flooring is characterized by extremely simple installation; does not require any “laying down” any special training. Laminate Laying Technology requires minimal dexterity and a set of tools, among which should be present:
- hacksaw for metal / jigsaw - wood saws have heavy teeth that can damage the decorative coating of the laminate;
- metal ruler (preferably massive);
- sharp knife;
- scissors (preferably tailoring);
- nails
- fishing line / twine;
- wooden blocks, wedges;
- sharpened pencil;
- rubber mallet. You can use an ordinary hammer (lightweight), but you will have to hit the ends of the board through a special gasket made of rubber or a wooden block. It is easy to guess that the complexity of the work in this case will increase significantly.
Laminate can be laid on concrete, old wooden coatings, cement screed, linoleum. There should be no cracks in the base; if it is linoleum, then it should fit snugly, but swell. An acceptable floor difference is 3 mm per meter, it all depends on the brand of the laminated board.

The base under the laminate must (!) Be clean, dry. For a number of reasons, the coating cannot be used in baths, saunas, bathrooms and showers, in the kitchen.
Laminate flooring allows you to dispense with "little blood", without the need to fill in a concrete-cement floor. On an existing wooden base, you can stuff sheets of fiberboard or hardboard. If linoleum is swollen or the floor has dried up and such manipulation is bent, unfortunately, it will not “pass” - the coating will have to be torn (dismantled) completely. Otherwise, all costs for laminate flooring and related materials will be useless.
Immediately after delivery, the new flooring should be “aged” in the room (for which it is intended) for a day or two. This recommendation is due to the different thermal conductivity of the laminate layers, the need for acclimatization of floor material. After removing the material from the packaging, it is worth checking each panel to make sure that there are no defects: inspect the front surface (there should be no chips and scratches), locks, their integrity.
If you do not have a flat floor surface, then this can significantly affect the quality of installation of the floor covering. Let's talk about all the possible options for leveling the floor under the laminate in the article:https://floor.expertexpro.com/en/pol-pokritiya/laminat/kak-vyrovnyat-pol-pod-laminat.html.
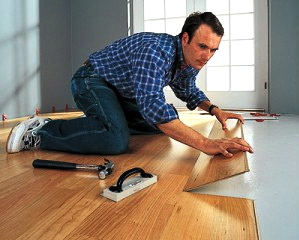
Installation steps in detail
Now, finally, you can proceed directly to the installation. You should adhere to such an algorithm of actions:
- The gap between the laminated panels and the walls (door frames) must be left around the entire perimeter of the room. The width of the compensation gap should be 8 or more millimeters. The gap is required by the technology of operation of the laminate, because such floors are obtained "floating".
- It is extremely important to lay the first row in a quality manner. For example, a bricklayer can easily compensate for all the irregularities of the lower row of bricks with a mortar - it will not be possible to do something similar with a laminate, because all boards are ideally standard and are connected tightly. The first row must be laid out without a substrate and carefully marked out. In order to facilitate the installation of the first row, you can drive a couple of nails into the joint between the floor and the wall and pull the fishing line. Laminate should be laid protrusion to the wall.
- The laying of the last row should be considered already at the beginning of installation. Measure the distance to the wall opposite. The width of the "final" row should be at least 6-7 cm. If after calculations it turns out that this figure will be smaller, you will have to cut the panels of the first row along the entire length.
- Laminate joining technology can be padded and clickable. Pad panels can be mounted alone. The snap-in panels are first joined by the ends, and then the entire “structure” is inserted into the groove of the already installed layer. Laying such a laminate requires an assistant (if the total length of the row exceeds 2.5 m).
- The marked first row should be removed and the substrate made of polystyrene or polyethylene (perpendicular to the panels) laid. In rooms with an area not exceeding 10 square meters, you can lay the film immediately on the entire floor. Equipping a room with a large area with a laminated floor, the substrate must be rolled out as work progresses.
- The first row laid on the substrate is fixed with wedges. The installation of each subsequent row also provides for the installation of wedges between the wall and the ends of the extreme panels. Insert them by hand, do not overdo it.
- It is necessary to saw a laminate strictly at a right angle. Each new row should begin with a sawn off piece - this way there will be significantly less waste. The distance between the seams in adjacent rows should be at least 20 cm. It turns out less? So at the beginning of this particular series you need to install a new panel.
- After laying three or four rows, the process is guaranteed to go faster, since all operations on laminate flooring are quite stereotyped and monotonous. Some difficulties can arise only when installing the latter. Therefore, each of the panels should be carefully measured and accurately sawed off.
- Errors detected after installation are corrected by wedges. They are pulled higher with pliers or, on the contrary, forgotten deeper.
The day after installing a new coating, you can start installing decorative elements (for example, skirting boards). Skirting boards are mounted first along the walls that are in contact with the end faces of the panels. Wedges are, of course, previously removed. The video action algorithm will help illuminate all the details of the process.
The nuances of laying adhesive laminate
Its main advantage is reliable protection of joints from moisture, so that the operational life of such a coating is significantly extended. Minus - difficult styling, additional glue costs. Due to the rigid fastening of the panels to each other, the coating can not subsequently be disassembled for further operation in another room. Glue laminate is not recommended to be laid on the heated floor.

When installing this flooring, glue with water-repellent properties is applied to the ends of the sheets. Sheets are joined according to the principle of "tongue-and-groove".
Do not save on glue - do not use PVA! It is made on a water basis and is likely to provoke a swelling of the laminated coating, violating the integrity of the joints.
Residual glue should be removed with a damp cloth. After laying three or four rows, you need to take a 2-3 hour break. Then we continue the process until the surface is completely laid. When laying the last row, it is worth using a mounting crowbar to connect the rows. But they should work carefully so as not to damage either the panel or the wall. In case the heating pipes cross the floor, it is worth making a paper template that is transferred to the installed sheet. All necessary holes are cut with a jigsaw. Do not forget about the need for gaps between sheets and a wall, sheets and a door.

At the end of the installation, all expansion wedges must be removed, and the gaps “hidden” under the baseboard. The skirting board is attached to the wall, not to the floor.
An important condition for the durability and appearance of the laminate is the proper choice of substrate. Read how to do this in the comparative review:https://floor.expertexpro.com/en/pol-pokritiya/laminat/kakaya-podlozhka-luchshe-pod-laminat.html.
Safety Recommendations
The laminate will serve with a bang, delighting you with all its “beauties”, subject to certain rules. Do not clean the laminate using plenty of water - the rag should be moist only slightly. Fluids accidentally spilled onto the laminate should be thoroughly wiped, and as quickly as possible.Legs and rollers of furniture placed in the room should be made of soft material - felt, plastic, etc. For cleaning the floor, it is undesirable to use abrasive products.

When following these simple recommendations, you can be sure that under your feet there will be a high-quality laminate covering for many years.

7 comments