How to lay a laminate: attention to layout options + step-by-step instructions
The economic benefits of laminate flooring are not only at a very affordable price. Significantly reduce costs can also be due to self-installation. The developers of the finishing material carefully “polished” its design, striving to alleviate the fate of builders and inexperienced performers, and succeeded in achieving the goal. The technology is extremely simple, but requires a number of nuances from the home master. Before proceeding with the flooring, you should find out how to properly lay the laminate, so that your own work will please you with a presentable look and a long service.
Content
Panel layout selection
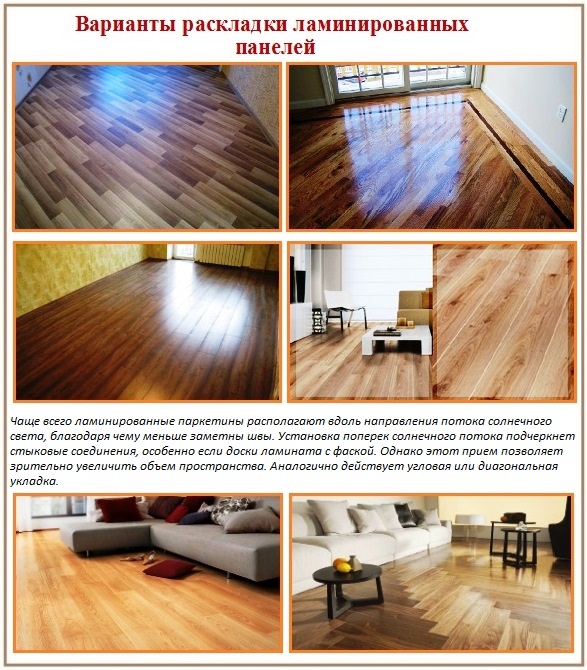
Success at the finish in the field of decoration will provide an important component of any work - design. We are not talking about a professionally designed floor design with meticulous calculations, but about a simple drawing with the dimensions of an equipped room. He will help to present the final picture and choose the optimal layout layout of strips that mimic expensive walnut, birch or oak boards. We will proceed from the location of daylight sources, that is, from the windows, since this factor is considered the main one.
In relation to the window openings, the laminate can be laid:
- perpendicularly, due to which the direction of the long butt joints between the boards will coincide with the direction of sunlight, and the joints will become almost invisible;
- in parallel, emphasizing the presence of seams due to the formed shadow;
- diagonally or at any priority, according to the owners, angle.
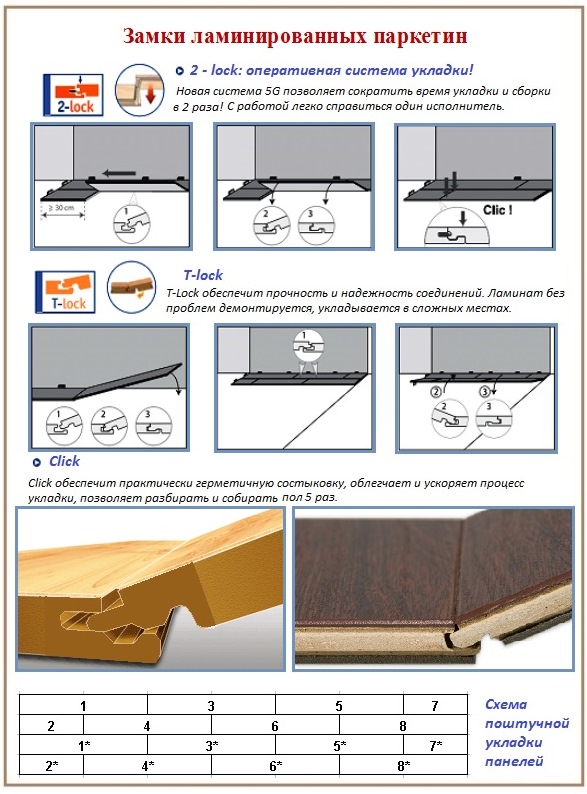
In general, laminated panels can be installed in 50 different ways, if they are edged with universal locks, allowing you to combine the ends of the panels with longitudinal counterparts and vice versa. However, there are doubts that the novice finisher will immediately take up the coating with an impressive cost, and for the development of a rather complicated styling method. Therefore, we consider the most common version of laminated planks with Lock-latches at the ends and Click-locks along shared lines.
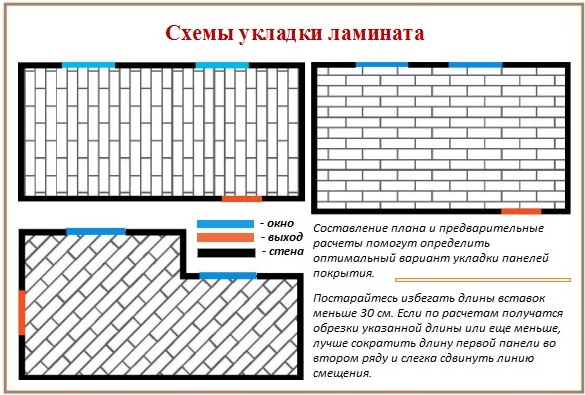
Most buyers of the most popular material prefer the first type of arrangement of laminated panels for obvious reasons. After all, it creates the impression of a monolithic floor without seams. The second type of direction is chosen if there is a desire to visually expand a narrow, elongated room. The third method is used if you want to expand the small dimensions optically. A precondition for diagonal laying can be a non-standard room configuration or the idea of dividing into functional sectors.
It is no coincidence that we started with the location. It depends on it the amount of material required for the arrangement. It is necessary at the start to decide how to lay the laminate in order to acquire:
- for parallel and perpendicular installation of panels 5-7% more material;
- for the diagonal and angled directional option, requiring multiple sawing of laminated boards, with a margin of 15%.
On the pack, the manufacturer indicates the quadrature covered by the planks located in it.Material must be purchased taking into account the pre-calculated room area and with the appropriate margin.
In advance, plan the laying of laminate boards for the following reasons:
- Laminated strips will need to be cut, since the length of the panels in extremely rare cases is a multiple of the size of the room. In addition, it is necessary to offset the end joints so that the result is a kind of brickwork. It is unacceptable that the length of the panel segment used to supplement the row be less than 30 cm. True, there are manufacturers who allow the use of 20 cm as an insert.
- The multiplicity of the width of the panels to the size of the room can also be safely attributed to the category of pleasant but rare accidents. The last row in most cases is composed of sawn along the planks. According to technological requirements, its width cannot be equal to or already 5 cm. However, if a similar situation arises, it will be necessary to increase the width of the last row by reducing the similar size of the first strip. That is, it is necessary to saw along the long edge both extreme stripes of the laminated floor. It is desirable to evenly distribute the covered distance for symmetry.
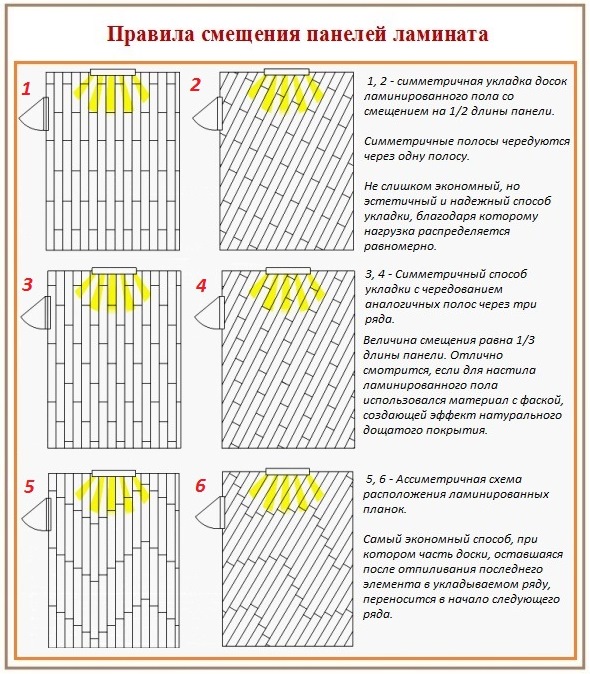
Displacement of butt welds is a prerequisite for a reliable connection. For independent masters, experienced finishers are advised to retreat from the end line of the previous row by at least 1/3 of the length of the board. We managed to find out whether the layout of the panels was “brick” or “checkerboard”, the laminated floor boards would not only have to be cut, but also alternate rows beginning with a full length and divided into parts of the panel.
You can alternate symmetrically and without following these rules of geometry:
- a symmetrical scheme of laying the plates repeats the “pattern” of the floor most often through one, less often through two strips;
- the asymmetric scheme does not force the wizard to adhere to any sequence at all, the offset is formed spontaneously by setting the last crop in the first row of the board to the beginning of the second and further by analogy.
Laying without symmetry is considered the most economical and easiest. However, the master should not forget that there should be no inserts less than 30 cm in the coating he creates. Therefore, it is still necessary to draw and calculate the priority displacement size. If a segment that does not meet the technological requirements is identified in the drawing, it is better to shorten the length of the first strip of the second row.
Note. A gap should be left around the perimeter of the floor to be laid, allowing the laminate to slightly resize without the formation of billowing bumps and without damaging the locks.
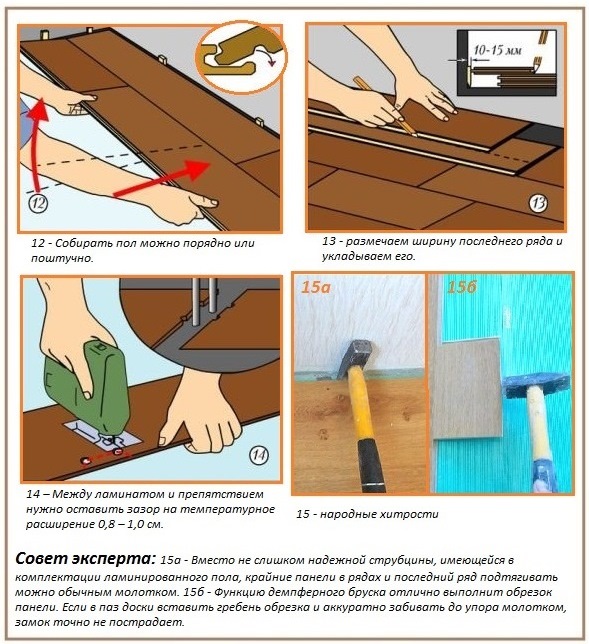
When planning, it must be taken into account that the laminate floor expands and narrows after temperature changes. It is believed that 1 m² of coverage is increased by an average temperature movement of 1.5 mm. Taking into account the average value, depending on the size of the room, the pavers leave a compensation indent, which allows the coating to lengthen and shorten, from 0.8 to 1.5 cm.
Preparation for the installation of the laminate floor
It is necessary to prepare the material itself and the rough basis for its laying. The base must be repaired and leveled:
- by grinding;
- pouring cement or polymer screed;
- plywood or GVLV flooring on point supports or logs.
As a result of leveling, the differences in height within a 2m² floor area should not exceed 2 mm. Before work, the rough base is thoroughly vacuumed so that, due to grains of sand and specks that accidentally fall into the castle joints, the panels do not make strained creaking sounds.
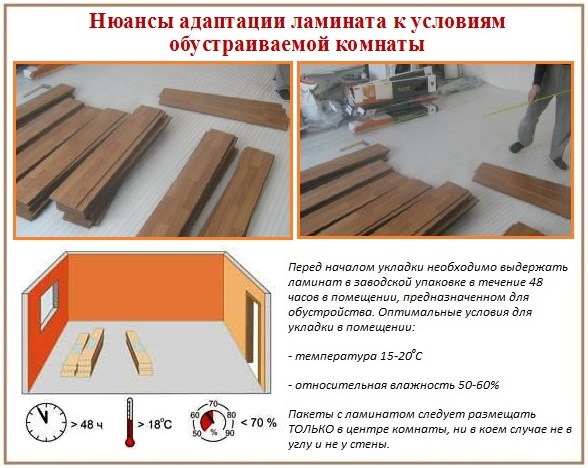
Laminate can not be laid on the day of its acquisition, it needs to be given the opportunity to "get used" to the surrounding conditions. Two days should be allocated for adaptation of the coating. Then the panels will be freed from packaging, sorted by shade, if there are some “differences” in color.During the construction process, the slabs that differ in tone will be evenly distributed so that sections that are too large in color do not work out.
Note. The laminated coating should be acclimatized at a maximum air humidity of 60%, a minimum limit of 50%. Optimum temperature for addiction is 18º Celsius.
In the period of getting used to the panel, it is necessary to lay the panels horizontally, in piles in the center of the room intended for decoration, so that the humidity of the walls does not affect the normal course of adaptation.
Laminate Stacking Procedure
It remains to find out how to properly lay the laminate on the prepared floor with your own hands, and begin to implement the idea.
General flooring process
We will lay the laminate floor as follows:
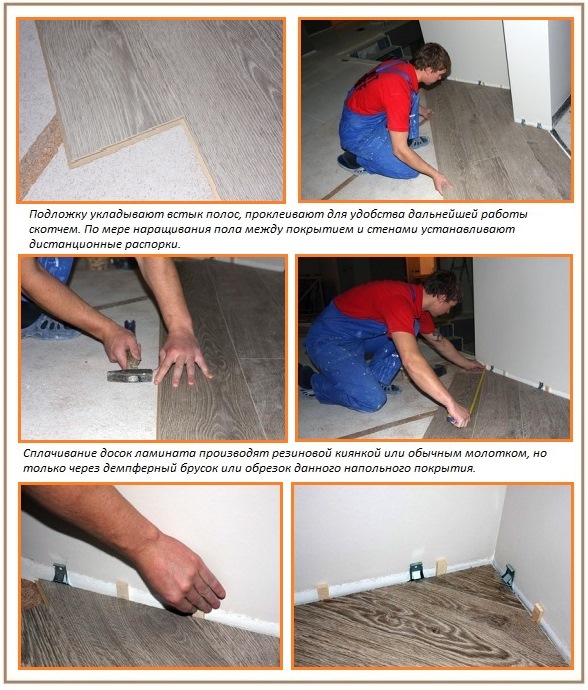
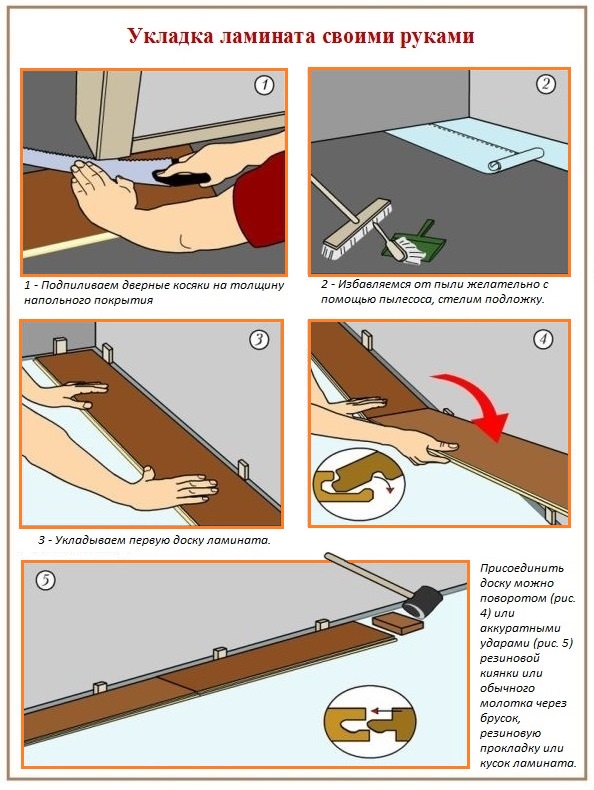
- We will completely cover the concrete base with stripes of a polyethylene film 200 microns thick. It will protect the slats created from moisture-sensitive components from the water released by the base. Wooden rough floors do not need waterproofing. We lay the strips with an overlap of about 20 cm, point-wise fasten with adhesive tape for the convenience of further work.
- We lay a substrate of EPS, foam polyethylene or cork. Since the thickness of the substrate is from 2 mm or more, it must be laid butt-to-edge so that there are no thickenings. Mats or stripes of the backing are also attached with tape. It is desirable that the components of the multilayer floor system are laid “in the cross” of the previous and subsequent layer. It is recommended that the substrate strips be placed across the laying direction of the coating panels. This means that the insulating polyethylene for the concrete subfloor is stele perpendicular to the substrate, but in the direction of laying the laminate.
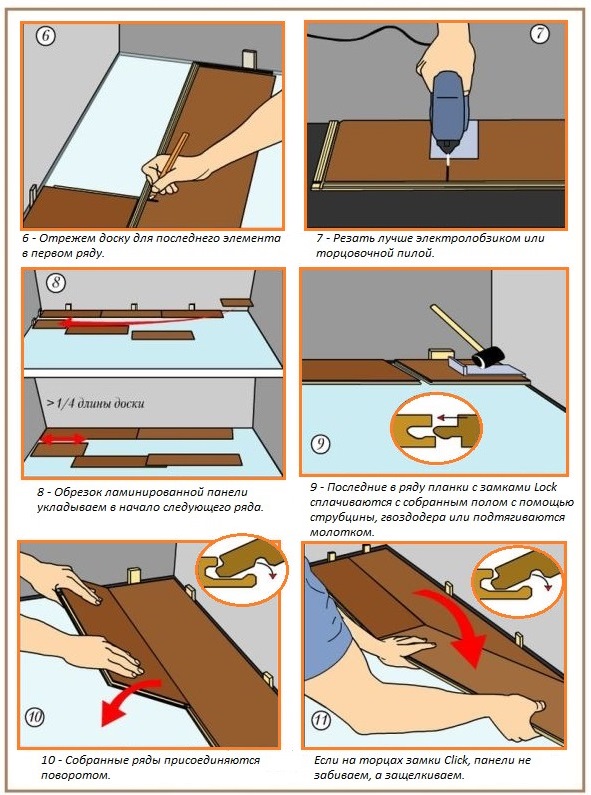
- We assemble the starting row of laminated boards, combining the end grooves with the end tongues in the manner specified by the manufacturer. For a perfect fit, we tap the attached panels on the opposite side with a rubber mallet or an ordinary hammer, but through a damper block or a piece of laminate, so as not to break the locking system.
- Without departing from the technological course and from the selected layout, we form the second row.
- We connect both assembled rows. Together with the assistant, we introduce, at the angle indicated by the manufacturer, the second-row sheet pile into the groove of the first strip. Slowly lowering it down, pushing it to a click with a characteristic clanking sound.
- We expose the assembled part of the floor to the wall, placing spacer wedges between it and the wall with a thickness equal to the deformation gap. These remote devices can be bought or made with your own hand from the scraps of the laminate. From the ends we also set wedges.
- We form and rally with the assembled part of the floor the third row. We act similarly up to the last row, not forgetting about distance struts.
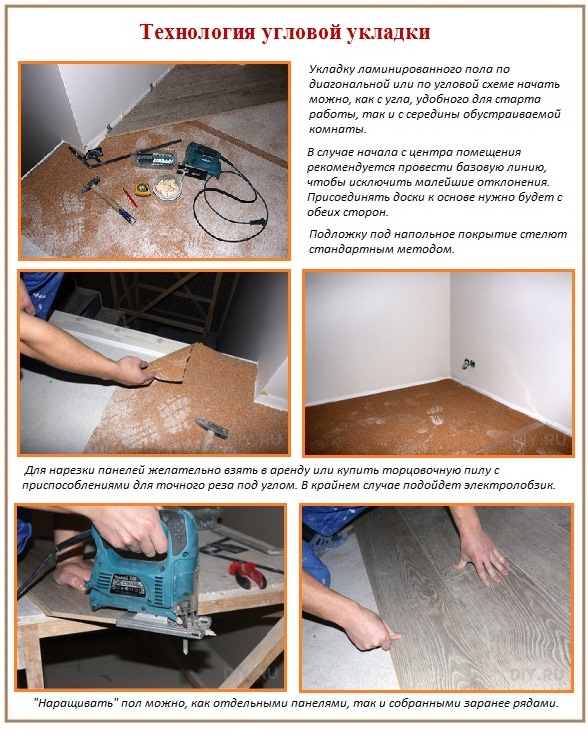
- To form the extreme strip, each panel is measured separately, applying the part turned upside down to the installation site. Piece measurements will help to avoid deviations associated with the unevenness of walls traditional for domestic construction. Not forgetting the deformation indentation, we draw a line on the inside with a pencil. We’ll also cut it off.
- To attach and fit the panels of the extreme row, we use a bracket. Craftsmen who are finding their own ways of how it is more convenient and cheaper to lay the laminate on the floor with their own hands, instead of using a clamp-clamp, use a hammer or nail clipper.
Laying near pipes, radiators, doors
In the process of installing a laminate floor, there are specific points, such as laying panels around pipes that overlap the ceiling, designing the doorway and inserting slats for low mounted radiators:
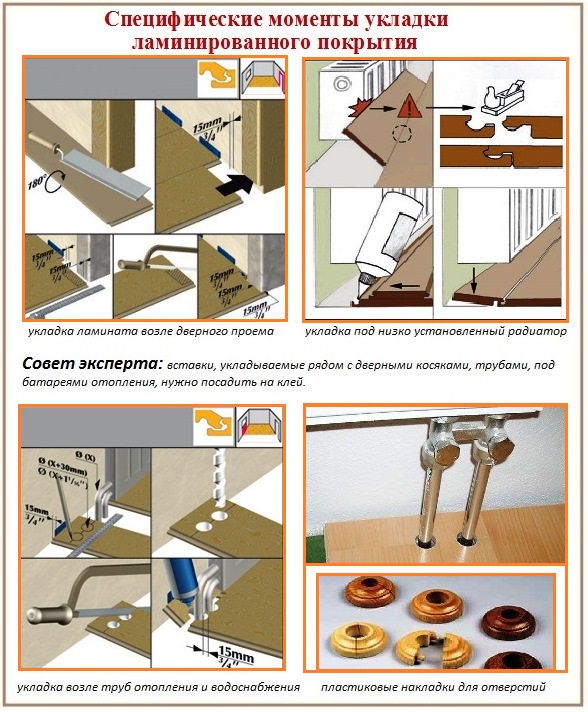
- If the heating battery interferes with snapping the board placed under it, cut off part of the comb and fasten the panel with glue.
- To install the coating around the pipes on the panel with maximum accuracy, draw their location, then drill holes whose diameter should be larger than the diameter of the pipes.Next, we will cut the drilled bar along the diagonal line parallel to the end and lay the main part in the usual way, and put the insert going behind the pipe on glue. The remaining gaps are masked with sealant or plastic pads.
- We begin the arrangement of the doorway with sawing off the jambs to the thickness of the stacked coating - a laminate with a substrate. In general, when there is a door frame in the opening, trimming of the jambs is advised to be performed before starting work, so as not to contaminate the floor and locks of the slats with dust and sawdust. Then you need to accurately measure and draw the real configuration on the panels stacked next to the jambs. We take into account that there must be a gap between the wall and the plates, but this indent must be closed with a box, that is, the board should be brought almost tightly under the jamb beam.
In the doorway with a threshold, we confine the boundary line to it, without a threshold, to the line located under the closed sheet. By the way, the canvas also needs to be “shortened”, but the height of the plastic or aluminum transition profile masking the seam should also be added to the height of the coating. Similar end profiles cover expansion joints dividing the laminate floor into segments if the covered area exceeds 10.0 m in length and 8.0 m in width.
Note. The skirting board installed at the end of the flooring is attached to the walls, not to the floor.
Despite the presence of some features, the complex process of the device of the laminated floor can not be called. All the moments that arise with independent stackers are thoroughly thought out by the manufacturers of the material. It remains only to make an effort and show patience.


6 comments