
Analysis of the technology for creating printed (stamped) concrete
Increasingly, construction technologies are emerging that are capable of creating works of art from familiar coatings and materials. A similar transformation is possible even with such everyday material as concrete. Through the use of polyurethane or metal stamps, a boring concrete surface can become like stone paving, wood flooring or slate slabs. Such concrete is called stamped, printed or press concrete. We will talk about it, as well as about the possibility of creating a printed surface on our own.
Content
The essence and possibilities of using this technology
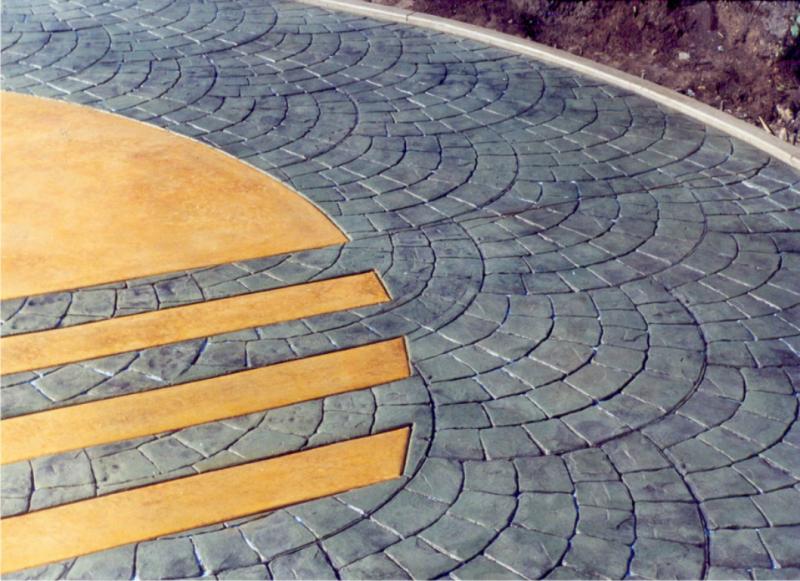
Stamped concrete is ordinary concrete, on the surface of which decorative stamping is applied with special stamps. The relief pattern can imitate any material: brick, paving stones, boards, animal skins, weathered stone, cracked ground. You can pick up stamps with leaf patterns, dinosaur tracks, animal figures.
Stamped concrete is especially popular when making terraces, patio, areas near pools, garden paths, sidewalks, gazebos, floors in restaurants and exhibition halls. This technology becomes irreplaceable during complex restoration work. For example, when it is necessary to recreate the destroyed part of an ancient pavement. Finding exactly the same materials, aged naturally, is often not possible. And with the help of stamped concrete technology, it is easy to create exact copies of existing old brick or half-erased stone.

Variety of stamps for printed concrete
The first stamps for printed concrete were made of cast aluminum and were massive forms equipped with handles. Such matrices are well suited to simulate conventional brick or stone patterns. But copying complex textures is beyond their power. Another thing is modern polyurethane dies. They are cast on real materials, the texture of which must be copied. As a result of this, with the help of polyurethane forms, incredibly authentic texture effects can be obtained.
Finished stamps can be purchased at many hardware stores or centers. When choosing it is worth paying attention to the degree of rigidity of the form. The denser the stamp, the easier it is to use it to make a clearly visible drawing. Too soft and pliable forms are more difficult to work with, you need to put more effort into them in the printing process.

Self-made technology
The technology of stamped concrete is quite simple, but you need to tackle it only with a certain proportion of existing skills in working with concrete. Otherwise, the result may be completely different from the one you were counting on. Problems can arise for the following reasons:
- concrete hardens quickly, after which the use of dies does not give clear crowding on the surface;
- to perform stamping with the help of stamps, physical force must be applied;
- errors in embossing a concrete surface are difficult to correct;
- stamped concrete technology requires an employee to be skilled in handling special tools to form and smooth the surface.
If you are sure that you will cope with potential problems, you can begin to create a concrete site and perform stamping work.
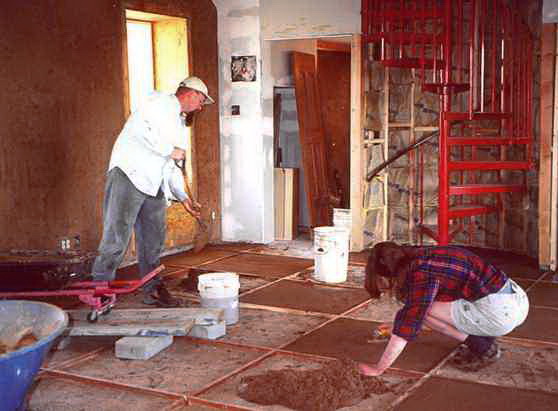
Step 1. Concrete site preparation
The basis for stamping is a conventional concrete platform with reinforcement made of concrete of the M350 grade and above.
The technology for creating such a platform:
- with the help of a peg and a cord indicate the boundaries of the area on which stamping will be carried out;
- remove the top layer of soil (depth 15-20 cm), tamp the soil bottom;
- pour crushed stone pillow (thickness 10-15 cm) at the bottom of the recess, ram it;
- on the border of the site, formwork is installed from the boards;
- lay a reinforcing mesh in the formwork, raising it above the ground by at least 3-5 cm (by laying stones, bricks under the mesh);
- concrete is kneaded by hand, using a concrete mixer, or ordered ready-made;
- concrete is poured into the formwork, a metal rule is used to obtain the required level of the site;
- compact concrete with a vibrorail;
- the top layer of concrete is smoothed with a smoothing machine, achieving smoothness and uniformity of the surface.

Step # 2. Application of color hardener
A color hardener is applied to still fresh concrete, which simultaneously paints the surface and increases its strength. A colored hardener is a powder that contains coloring pigments, an astringent filler, and ground particles of granite and silica sand. Due to the dispersion of the mixture, its particles penetrate into the pores of concrete and fill them. The concrete surface becomes denser and stronger. At the same time, the particles give the concrete a lasting color (about 30 tones to choose from).
The application of color hardener begins after the initial setting of the concrete surface. You can navigate at the moment when all the exposed water evaporates from the surface.
The color hardener powder is scattered on the concrete surface manually, from the center of the site to the edges. At the same time, movements similar to throws of a bowling ball are performed. A scoop of powder is scooped up, the hand is taken back, and the mixture is thrown forward with a sharp movement from the waist level. This principle of powder application minimizes the amount of particles flying through the air.
The first layer of hardener should be absorbed into the concrete, which takes 5-10 minutes. During this time, the surface of the concrete is smoothed by rubbing the dye into it using a magnesium trowel. Angles are also processed with angle trowels to make them bent, neat.
Then a second layer of color hardener is applied. It is necessary to more evenly paint the surface and compact it. The powder is applied in the same way as in the first case. After application, the surface is leveled by a steel smoothing machine.

Step # 3. Application of a release agent
The separation coloring component prevents concrete from sticking to the dies during printing. In addition, it additionally paints the surface of the concrete, giving it subtle shades of color. The release agent is available as a dry powder or liquid. Most often, powder is used, applying it to the surface of concrete with a wide brush (mowls).
The brush is immersed in a bucket with a separation component so that the bristles are evenly coated with powder. Then, holding the brush at the level of the belt, throw your hand forward and “spray” the powder on the concrete surface.
After staining, the corners of the site are treated with texture skins.
Step # 4. Surface stamping
Before you begin stamping, you need to make sure that the concrete has acquired the necessary degree of plasticity and in consistency has become similar to clay.If stamping is started too early, the concrete surface will not be able to support the weight of workers and maintain print lines. If it is late, then for a clear print you will have to put more effort on the stamps. In addition, the texture of the dies may not be printed on concrete that is too thick, especially at the end of the job.
To determine the degree of density, it is enough to press a finger on the concrete surface at several points on the site. If there are prints left, with a depth of 4-6 mm, then stamping can begin. You can perform the check in another way: place a stamp on the concrete surface (from the edge of the site) and step on it. The stamp should support the weight of the worker, not immerse in concrete, not slip on the surface.
If all the tests are successful, you can start stamping. Stamps are laid out on a concrete surface, one after another. Manufacturers often number stamps (1, 2, 3 ... or A, B, C ...) to indicate the desired sequence of their location in the printed drawing.
To imprint the texture of the dies in concrete, it is often sufficient to simply step on them. Sometimes light hand rammers are used for this.
After prints leave a concrete surface for curing for 12-24 hours.
Step # 5. Elimination of defects
On the concrete surface, at the junction of the dies, a slight displacement of the cement mortar often occurs. Sometimes, due to insufficient tamping, the seams of the printed pattern may look blurry, fuzzy. To fix surface defects, a seam and joint is carried out with a hand roller, and roughnesses are cleaned with texture skins.
Step # 6. Shrink seam cutting
Several cut joints in the slab provide stress relief and prevent cracking. Such joints can be made in still fresh concrete using a special carver. Or cut the seams with a grinder after the concrete has dried.
Step # 7. Surface wash
The next day, flush the surface. Excessive separation component is flushed out of the hose with water. After - perform acid washing (hydrochloric acid) to obtain the desired effect of combining two colors on the surface. During this process, the pores of the concrete also open, which contributes to a better interaction of its surface with the sealant.
Step # 8 Sealant Application
The next day, a varnish-sealant is applied to the concrete. It performs a number of functions:
- protects the surface from abrasion and wear, as well as from the penetration of oils and chemicals;
- gives the surface a shine of various saturations (from barely noticeable satin to saturated lacquer);
- enhances the color saturation of concrete;
- simplifies the maintenance of the treated surface.
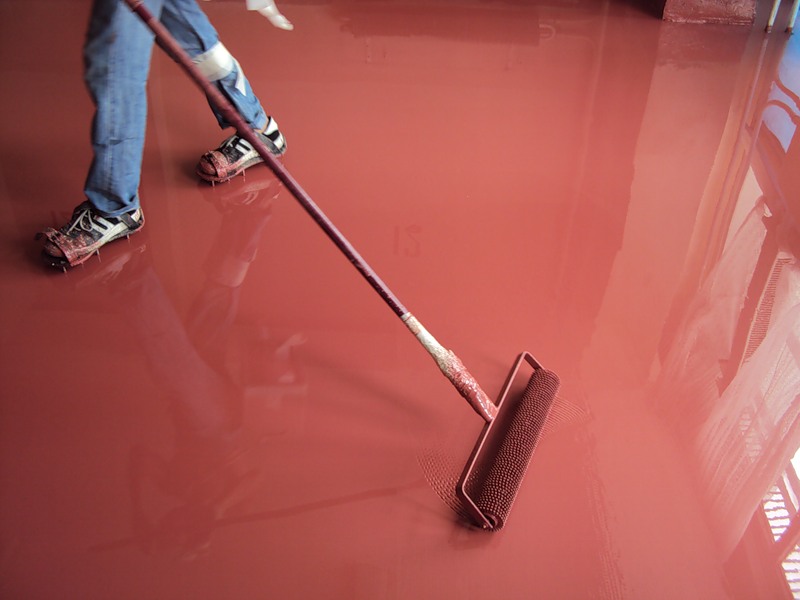
The sealant is applied by roller, rolling it on the surface. But, if the stamped texture with deep prints, when applying sealant, it is desirable to combine rolling with a roller with additional brush treatment. Usually requires 2-3 layers of sealant.
After the sealant has dried, the stamped surface will be completely ready for use.

Some tips for quality stamping
I would like to note a few points:
- If you are using the stamp for the first time and have no idea what its print on concrete will look like, make a test print on the compacted sand.
- Avoid repeating the printed pattern on the surface, especially if the stamps imitate natural materials (stone, wood, etc.). Random compositions will look more realistic.
- To get the effect of antiquity on the surface, apply a small amount of a dry separation component (in the form of powder) to still liquid concrete. Spray the liquid release component on top of it. The liquid will dissolve a light layer of powder, after which color accents similar to abrasions will remain on the surface.
- Ensure that the particles of the separation component are well pressed into the concrete when printing.Otherwise, it will simply be washed off with water when washing the surface.
- Make sure that people walking along the dies during tamping wear clean shoes without traces of construction debris and dust. Inevitably, these contaminants will fall onto fresh concrete and disrupt the desired stamped surface texture.
That's all the secrets of stamped concrete technology! But, before embarking on an independent stamping, we suggest you watch a small educational video. It demonstrated the main stages of the technology: painting concrete, applying a separation component and creating a surface texture using dies.
2 comments