Adobe floor: analysis of technology for arranging clay and adobe coatings
Clay floors are one of the most inexpensive and durable. They are carried out directly on the ground without the use of lags, foundations or other additional structures. The main component of such floors is clay, which either costs nothing (if you dig it yourself), or is sold for a penny. Clay floors are further popular by the desire of modern society for eco-style, as a direction of construction using natural, safe materials.
Content
In which rooms is it better to make such a floor?
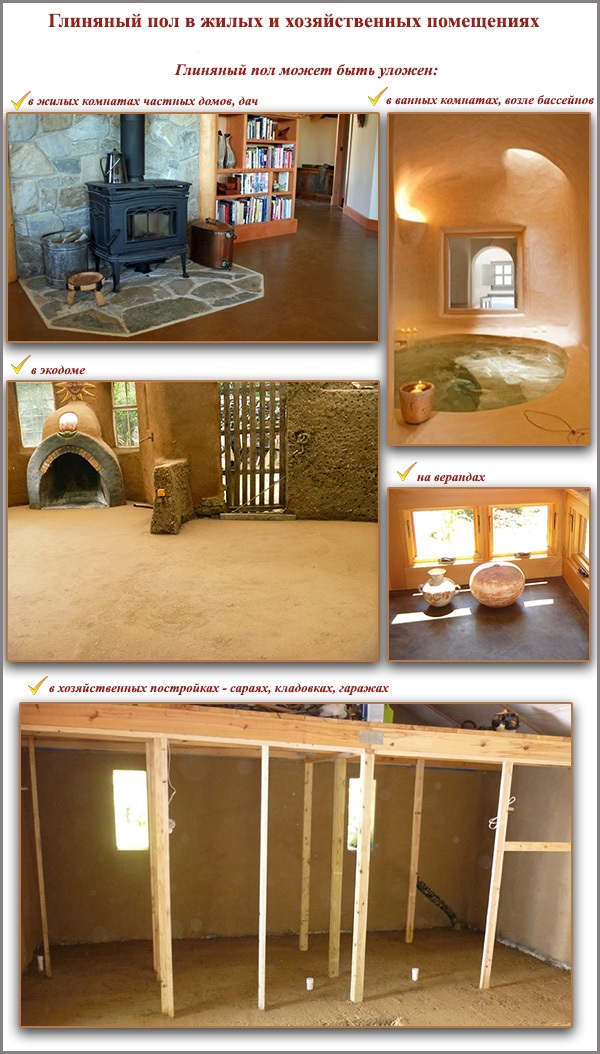
Due to its unpretentiousness and various finishing options, clay floors can fit into any interior of a single-story house or cottage. If desired, their surface can be impregnated with oil, waxed, decorated with tiles, covered with linoleum or carpet. Since clay has high thermal insulation properties, it is possible to use it for arranging a warm floor system.
Durability, strength and moisture resistance make clay floors an excellent option for equipping farm buildings (sheds, chicken coops, garages, storerooms, cellars).
Step by step instructions
Clay floors can be made using several technologies, using various mixtures. Clay in the composition of the floor can be supplemented with straw, lime, cement and other materials. Consider the principle of the device of such a base on the example of its main options: adobe floor and cast adobe.
Option # 1 - adobe floor
This option is the easiest. It is more suitable for arranging the base in sheds, pantries and other outbuildings. Although it can be used in dachas, in houses of temporary (summer) residence.
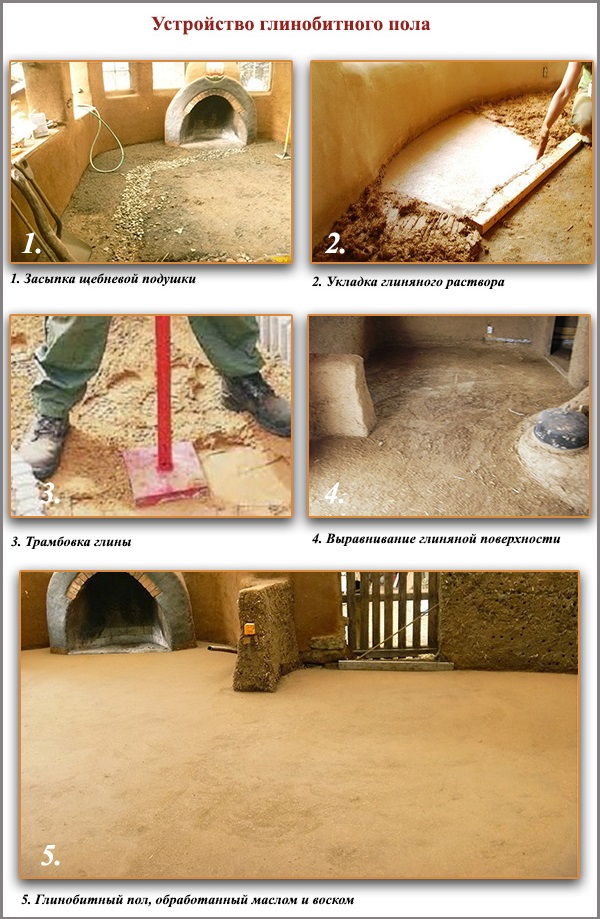
The clay floor is a clay-sandy, densely packed layer. He laid out right on the ground. For the device of this floor you will need greasy clay, sand and tampers.
Progress:
- Remove the soil layer with a depth of 50-60 cm.
- Lay on the bottom of the resulting pit a layer of sand with a thickness of about 10-15 cm. Level it and compact it. For this, a manual tamper is often used, made of a piece of log or beam about 100 cm long, 10 cm in diameter (cross-section). A grip is nailed to the upper end, with which you can hold the clot. A board with dimensions of 20x20 cm is attached to the bottom end.
- A layer of crushed stone, 10-15 cm thick, is poured over tamped sand. It is also leveled and compacted.
- A thick, heavy solution of clay and sand is prepared (the amount of water is minimal).
- The solution is laid out on a layer of crushed stone, leveling it with a trowel or a spatula.
- Compact the clay layer by tamping. The places where the pits form are leveled with an additional portion of the solution. Tamping is continued until the tamper begins to bounce off the surface.
- Sprinkle the surface with coarse-grained sand and try to ram it into the thickness of the clay floor. The remains of sand remaining on the surface are swept away with a broom.
After drying of such a floor, it is processed with oil and wax.
Option # 2 - adobe floor
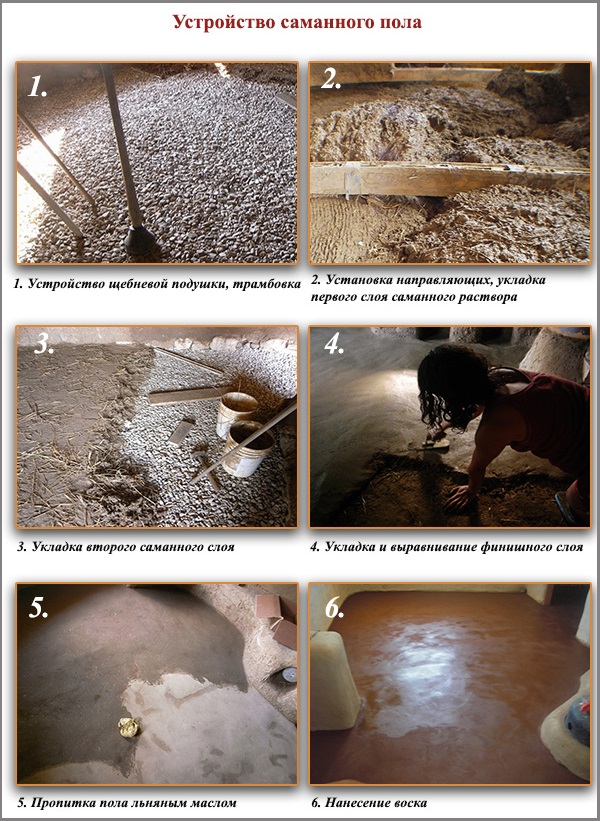
Saman is a composite material made by mixing clay, sand and straw with water. Ready adobe is laid on the drainage layer of crushed stone or gravel, aligned with the guides. Usually laying occurs in several layers. The first 1-2 layers are basic and play the role of the base. The last layer is the finish, traditionally coated with oils and wax.
In the manufacture of the adobe floor, crushed stone (for drainage), sand, clay and straw are used. First sand is mixed with clay, then water is added. The straw is interfered at the last stage, trampling it into the mixture. Typically, the ratio of clay and sand in adobe varies from 1: 1 to 1: 3. The amount of water is from 0.25% of the clay volume. The amount of straw is 10-15% of the volume of the mixture. You can mix clay, sand and water manually (using a shovel, trowel) or in a concrete mixer.
Consider the order of work:
Removal of the fertile layer (30-40 cm). The upper fertile layer is removed on the ground, be sure to choose the roots of plants. Deepen by 30-40 cm, then tamp the base.
Perform drainage of gravel (10-20 cm). The rammed base is covered with a layer of gravel 10–20 cm thick. In areas with harsh climates, it is possible, in addition to gravel, to use insulating bulk materials. Perlite with low thermal conductivity is well suited for these purposes.
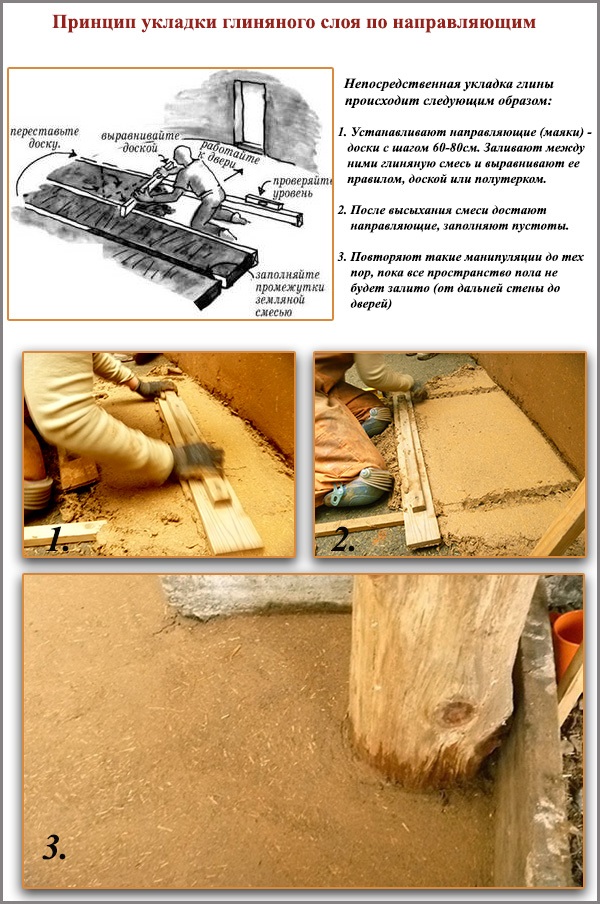
Laying the main clay layer (4-10 cm). Laying is carried out using guides - even, straight boards, 4-10 cm wide. They are installed on the edge, fixing with sticky pieces of adobe. The step between the guides is 60-80 cm (at this distance it is convenient to “pull” the mixture by the rule alone). The location of the guides is parallel to the wall along which it is planned to begin work. Usually, this is a wall located opposite the front door.
Between the guides lay the adobe mixture, leveling it with a trowel. To achieve a flat surface, the mixture is “pulled” along the guides with a wooden or metal rule (you can use a flat board, a long half-tera). You should get a continuous and even, but rough surface. Additionally, this layer does not need to be wiped.
After 1-2 days, when the adobe mixture is seized, guides are carefully removed from it. However, they can be left in the thicker if there is no need for reuse. The voids left from the guides are filled with adobe mixture. In order for the wet portion of the mixture to adhere properly to the already dried up layer, the edges of the grooves are moistened and loosened with a sharp tool.
The main layer, depending on its thickness, temperature and humidity, dries 1-2 weeks. Only after that it will be possible to move freely around it. If necessary, accelerate the process, install a fan heater in the room. Simply raising the temperature (with radiators, for example) is not enough. For uniform drying of adobe, air movement is necessary, blowing.
Laying the second (intermediate) layer (2.5-4 cm). This layer is optional, but allows you to increase the thickness of the clay layer and increase the heat-saving properties of the surface. In the thickness of this layer can be laid cables of the warm floor.
This layer is laid in the same way as the first, using guides. This time they use boards (slats), 2.5-4 cm thick. Saman is laid out between the boards fixed on the edge, on the previously wetted surface of the main layer - for better adhesion. The surface is leveled with a trowel and “pulled” along the guides. To reduce the likelihood of cracks on this layer, it is recommended that the guides be laid out at right angles to the guides of the first layer. Then two layers of adobe will be laid perpendicular to each other, which will increase the strength and strength of the finished clay floor.
The last, finishing layer (1-2 cm). The last layer of adobe will bring the floor to the required level. This layer is the thinnest, so there is a high probability of occurrence of cracks on it.For this reason, do not make this layer less than 1-2 cm.
If the clay floor will be the front floor surface, thinner and shorter stalks of straw are introduced into the composition of the adobe mixture for the finishing layer.
As rails, thin rails or metal rails (profiles) are used, 1-2 cm thick. Also, the finishing layer can be applied without rails, carefully laying out each portion of adobe and controlling its horizontal level. The clay mixture is spread with a spatula, smearing and carefully pressing it to the previously moistened surface of the second layer. The finish layer is carefully leveled, overwriting the clay, “polishing” it with a grater, putty knife or trowel.
When the adobe floor is completely dry (it will take several weeks), you can begin to finish it.
Clay decorative processing
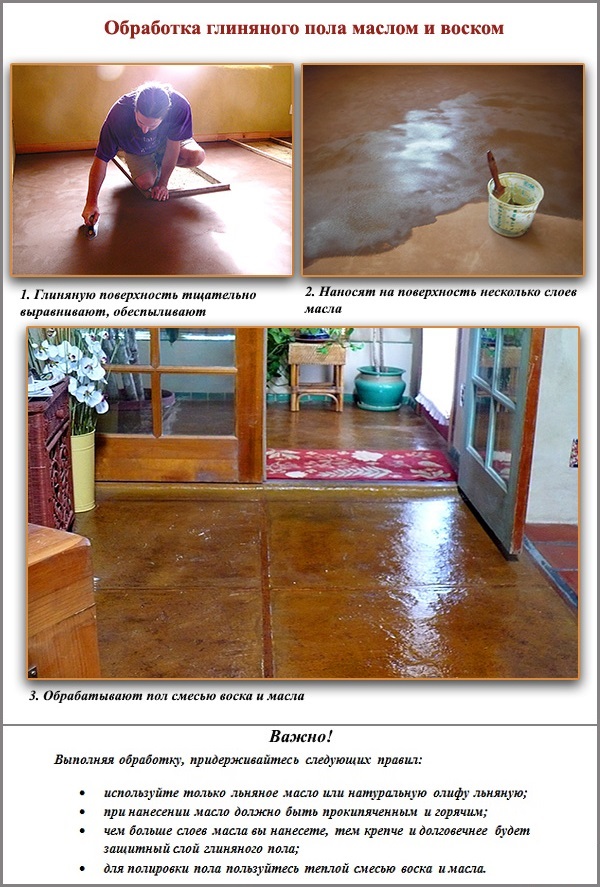
For clay floors made by any technology, impregnation with several layers of oil and waxing with wax are usually used. This treatment allows you to get a dense and hard layer of protection on the floor, comparable in thickness to the eggshell. As a result, the clay floor becomes absolutely waterproof, as strong and durable as possible.
For impregnation, boiled linseed oil is best suited. It is applied hot, since in this state it penetrates the clay pores more easily. The optimal number of layers is from 4 to 6. You can use this scheme:
- 1st layer - undiluted oil;
- 2nd layer - oil and solvent (turpentine or alcohol) in a ratio of 4: 1;
- 3rd layer - oil and solvent 1: 1;
- 4th layer - oil and solvent 1: 4.
Or, if you want to increase the number of layers, you can do this:
- 1st layer - undiluted oil;
- 2nd layer - oil and solvent in a ratio of 4: 1;
- 3rd layer - oil and solvent 3: 2;
- 4th layer - oil and solvent 2: 3.
- 5th layer - oil and solvent 1: 4;
- 6th layer - undiluted solvent.
The swab, roller, brush or sponge is abundantly moistened with oil (or a mixture of oil and solvent) and applied to the clay surface. The next layer of oil is applied only after drying (absorption) of the previous one. With each subsequent layer, the absorption of clay will decrease. Drying, the oil penetrates the clay structure, making it less porous and harder. The last layer of oil should form on the surface of the puddle. This will mean that the permeability of the floor is minimized.
After a few days, when the oil is completely dry, the surface is greased with a paste of wax and oil. This will make the floor practical and make it easier to care for. Regular washing with water with detergents or soap is all that will be needed to maintain cleanliness.
To obtain a paste, wax and hot oil are mixed in a ratio of 1: 2. A small amount of this mixture is enough to grate the floor. Rub it into the floor with a soft cloth without lint. After the wax has dried, you can experiment: pour a glass of water on the floor. On a quality-polished surface, the liquid will roll out in the form of balls and small puddles. Everything that has been poured will remain on the floor, not a drop will leak.
Over time, the wax erases, so it is recommended to supplement the care of the clay floor with periodic rubbing with wax.
Advantages and disadvantages of these floors
Clay flooring is a great alternative to many modern flooring. Moreover, he can compete with them, both in quality and in decorative appearance.
Advantages of the clay floor:
- low price;
- environmental friendliness;
- durability;
- strength;
- moisture resistance (with proper processing);
- high thermal insulation properties;
- simplicity in leaving (it is possible to sweep a broom, to wash with water);
- ease of restoration and repair.
The disadvantages include only the long and time-consuming process of the device cast cast coating.


1 comment