Do-it-yourself monolithic concrete staircase: step-by-step construction steps
Monolithic concrete staircase - the most durable and durable. Therefore, it is it that is most often present in capital concrete or brick houses with several floors. The life span of such a concrete structure without repair is estimated to be decades. Timely repairs can make it almost eternal. At the same time, despite the monumentality, it is not at all difficult to make a concrete staircase on your own. Consider all the steps that need to be taken to build a monolithic concrete staircase, in stages.
If you have no time to read, then you can find out about all the stages of building a concrete staircase by watching the video plot:
If you want to understand in more detail, then read on.
Content
Stage # 1. Choosing a ladder type
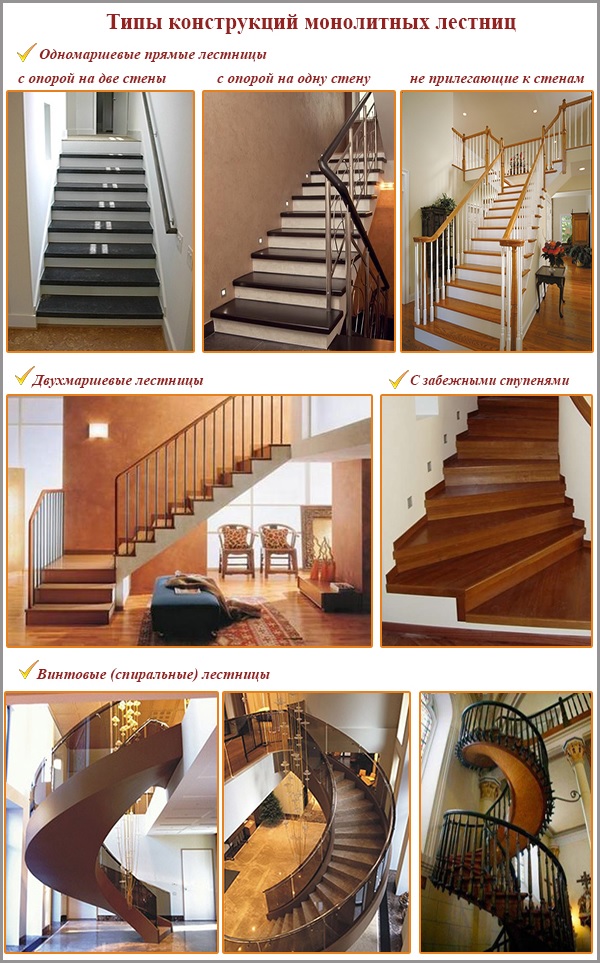
First you need to choose the shape and type of construction of the stairs. By design, all monolithic concrete staircases can be divided into straight (single-march and two-march) and spiral (spiral).
The simplest option is a straight single-flight staircase inscribed between two walls. In this case, the end parts of the stairs, as such, are absent and the formwork elements are attached directly to the walls.
It is more difficult to build a marching staircase with support on only one wall. To arrange the free end of such a ladder, one side part is added to the formwork design.
There are marching stairs without supports on the walls, that is, they rely only on two points - the upper and lower floors. To build such a ladder, it is necessary to assemble the formwork with two side parts.
Despite the simplicity of the device, it is not always possible to build a single-march staircase of the desired height in an ordinary house. Rather, there is not enough space to install it. Then a two-flight staircase is built, the marches of which are located at a necessary angle (traditionally 90 °). Such constructions come with inter-marching platforms or running steps.
However, the most decorative (but also difficult to perform!) Among the monolithic stairs are screw structures. The difficulty lies in the manufacture of irregular formwork, which can form a curved staircase. For such formwork, many piece-made curved and bent boards are used. It is also a laborious affair to knit an irregularly shaped framework.
Spiral staircases can rest on one wall or be located at a distance from the walls, that is, have two own side faces.
Thus, for a home craftsman who does not want to use the services of professionals, it is better to prefer a straight single-flight staircase for construction.
Stage # 2. Design calculation
Before starting the construction of the stairs, it is necessary to carry out a preliminary calculation of all its elements. And to develop a drawing indicating the dimensions of the structure, the number of steps, their width and height.
Lifting angle
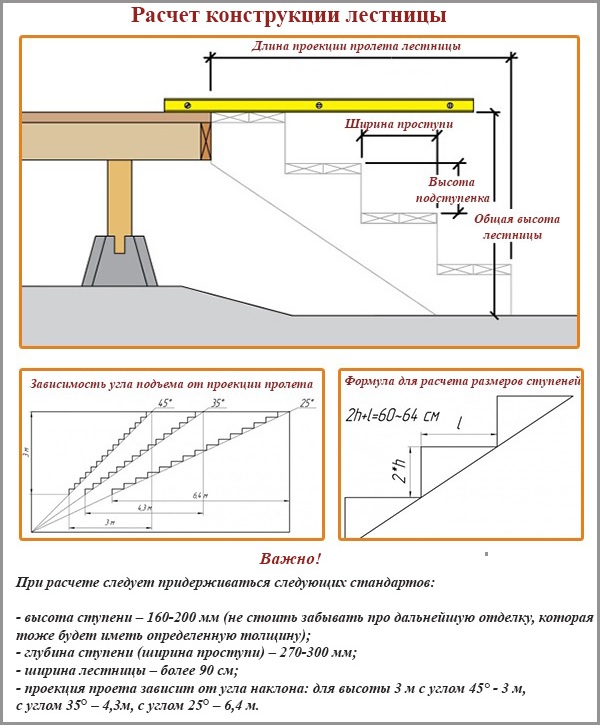
The first important characteristic is the angle of elevation (tilt), which determines the height and length of the stairs. At the same height, a staircase with an elevation angle of 25 ° will always be longer than a staircase with an angle of 35 ° or 45 °.For example, a staircase with an angle of 25 ° and a height of 3 m forms a projection of a span of 6.4 m. A staircase of the same height with an angle of 35 ° - a projection of a span of 4.3 m. A staircase with an angle of 45 ° - a projection of a span of 3 m.
In other words, to build a staircase with an angle of flight of 25 °, it is necessary to spend 2.35 times more materials than when building a staircase with an angle of 45 ° (with the same height of both structures).
Step sizes
Having chosen the height and angle of the stairs, it is necessary to break the structure into steps. Optimum sizes: step height - 16-20 cm, width - 27-30 cm.
If you make steps above 22 cm, then it will be difficult to climb them, especially for older people. People who are accustomed to the traditional step of the steps will stumble without bringing the sole of the shoe to the next step when climbing. During the descent, a fall is possible. Too low steps (below 15-14 cm) are also inconvenient. According to them, an adult will “mince”. Although for older people they are safer. They are suitable for children.
As for the width of the step, then making them less than 25 cm is unwise. The foot will slide off when you step to the tread. The width of the step greater than 31-32 cm will cause a person to lengthen the step to get to the next step.
When choosing the dimensions of a step, you can use the formula: 2H + L = 60-64 cm. In this case, H is the height of the step (riser), L is the width of the step (tread). For example, the above numbers of optimal sizes fit perfectly into the calculations: 2 x 16 cm + 30 cm = 62 cm.
Ladder width
The width of the stairs usually depends either on the distance between the walls where it needs to be entered, or on the availability of free space. It is undesirable to choose a width of less than 80 cm. This is too narrow a staircase, climbing (going down) along which a person will feel himself walking through a tunnel. In addition, it is inconvenient (or impossible) to carry furniture along such stairs. The optimal width is more than 0.9 m.
The calculations of the staircase construction are detailed in the video:
Stage # 3. Formwork assembly
After all the calculations, it's time to create the future outlines of the stairs. That is, to build the formwork, into which concrete will be poured in the future.
Formwork assembly is the most difficult stage in the construction of stairs. It requires scrupulous, accurate work with accurate alignment of all pre-calculated dimensions of the structure. Any oversight at this stage can lead to failure of the entire construction project (the shape of the structure, its dimensions will be violated, the surface will be inconvenient for subsequent finishing).
For the construction of formwork you will need:
- waterproof plywood (thickness 12-18 mm) or edged board (thickness not less than 30 mm) - for the lower part of the formwork (bottom), flanging and risers;
- waterproof plywood (thickness 6.5-9 mm) - for curved sections (if necessary);
- boards (thickness 50 mm, width 150-170 mm) or supporting bars 100x100 mm - for supports;
- bars 100x100 mm - for connecting plywood sheets or boards with each other;
- metal corners, wood screws (3.5 mm) - for mounting.
Wooden formwork elements in contact with concrete must be absolutely smooth. Then the concrete surface after hardening will turn out to be smooth, practically not requiring finishing. Therefore, the sides of the boards, which are planned to be placed on the inside of the formwork, must first be sanded. If smooth plywood is used, then no preliminary leveling steps are necessary.
The formwork assembly is carried out as follows:
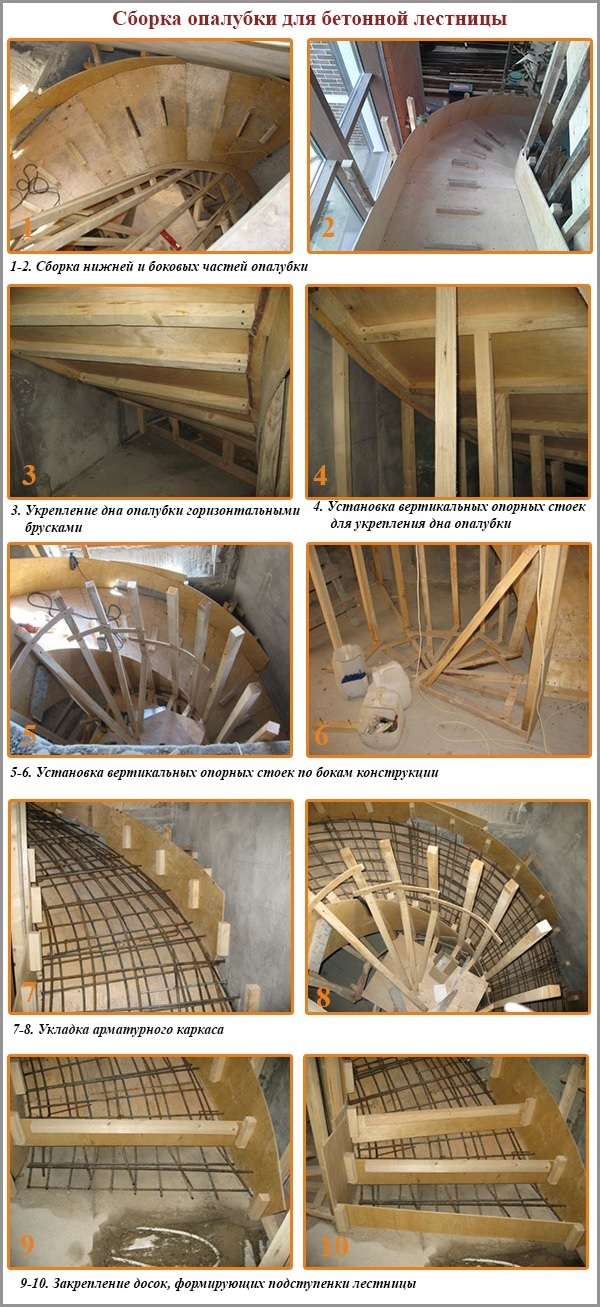
1. Expose the lower part of the formwork, on which the entire mass of concrete will be held. To do this, you can use the dimensional sheets of plywood or boards. They are tightly fastened to each other with the help of bars fixed on the outside of the formwork (ready-made wooden panels can be used). From the bottom, the lower part of the formwork is supported by boards or supporting bars. The step of the supports should coincide with the step of the steps.
The formwork elements are usually fastened using self-tapping screws, rather than nails. The fact is that after the concrete has hardened, the formwork will have to be removed, which is easy to do by unscrewing the screws. It is more difficult to take out the nails, so they try not to use them for formwork.
2. The lateral edges of the stairs are limited by flanging - plywood or edged board. Flanging is also reinforced with planks (bars) from the outside, since by itself it will not be able to withstand the pressure of concrete. The boards are firmly fixed on the flanging, especially if they were angled. At this stage, structural reinforcement is usually performed (see step # 4).
3. Install boards (plywood) of risers, fixing them to the flanging (or to the wall) using metal corners.
4. All joints of formwork elements (plywood, boards) are coated with cement-sand mortar or leveled with an angle grinder, a plane. Such alignment of the walls of the formwork will allow at the end of the work to obtain a smooth, even surface of the concrete staircase. This will facilitate the further work of the finishers, that is, it will be possible to plaster and perform grinding work on an already finished concrete structure to a minimum.
Stage # 4. Knitting and installation of reinforcing mesh or frame
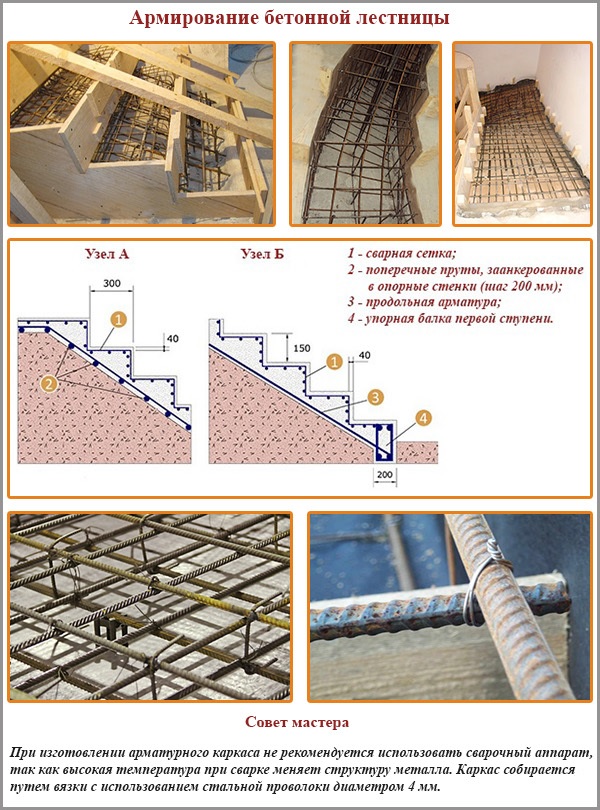
If the staircase is small, then for reinforcing, you can use a grid connected from reinforcement with a diameter of 10-12 mm. The reinforcing rods are arranged in increments of 15 and 20 cm to form a mesh with a cell of 15 x 20 cm. The rods are connected together using wire.
For a large staircase use a reinforcing cage. It consists of two or more grids interconnected by vertical rods. Between the grids leave a distance of 2-3 cm.
The reinforcing cage (mesh) is a kind of "skeleton" of the structure, it will hold a frozen concrete mass. Therefore, the horizontal rods of the frame (mesh) are fixed in the wall for reliable connection with the future concrete staircase. For this, holes of the required diameter are drilled in the wall and pins are driven into the hammer.
The frame or mesh is laid on the lower part of the formwork at a distance of 2-3 cm from the bottom. To raise the reinforcement, you can use stones, bricks or special plastic supports-clamps.
Stage # 5. Pouring concrete
For stairs use concrete grade not lower than M200 (class - not lower than B15). It is either kneaded on its own with a concrete mixer, or ordered at RBU.
A very important rule: concrete for the stairs should contain crushed stone with a size of at least 10-20 mm. Large crushed stone will contribute to the retention of concrete in the space of steps. A smaller aggregate, on the contrary, will make the concrete moveable and malleable, which will lead to its leakage from the formwork of the steps.
Filling is performed as follows:
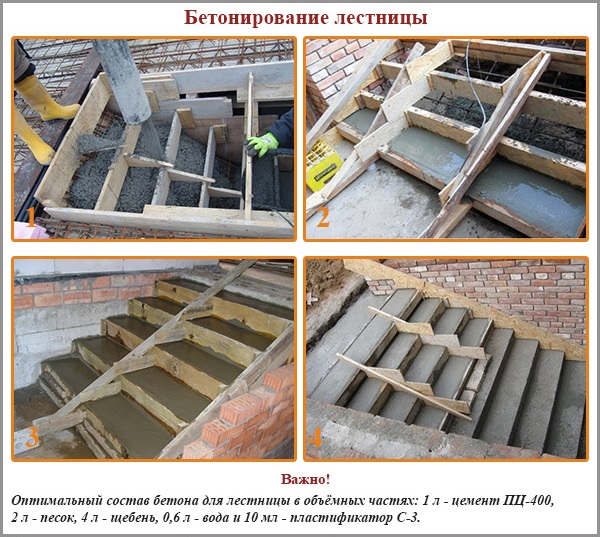
1. Start pouring from the lower steps. At first, 2-3 lower steps are poured with concrete.
2. Tamp concrete. Ramming helps increase the density and strength of the composition, as it removes air pockets from its thickness. The easiest way to tamper: after pouring concrete, pierce the reinforcement in several places. However, this method is not very reliable. It should be remembered that 1% underconsolidation of heavy concrete leads to a decrease in its strength by 5-7%! Therefore, professionals prefer tamping concrete not with reinforcement, but with a special mechanism - a construction vibrator.
For any type of tamping, part of the concrete will be squeezed out through the formwork. The squeezed concrete is thrown up or down (to where there is an insufficient amount of the mixture).
3. The steps are given the final shape, smoothing them with a trowel (trowel).
4. In the same way fill all overlying steps.
5. The poured concrete is covered with a film to prevent premature solidification and cracking. Instead of the film, you can use another method: periodically moisten the concrete that has not yet hardened by spraying it with water.
Stage # 6. Formwork removal
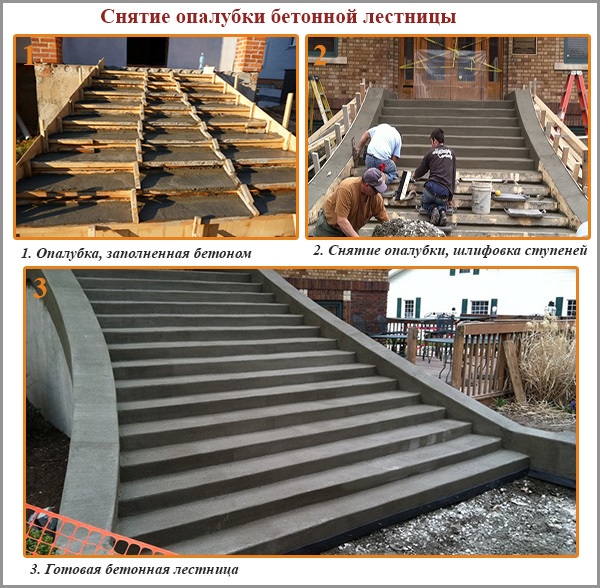
The formwork is removed carefully, in several stages. Initially, after a few days (5-7 days), when the concrete mass hardens, formwork is removed from the steps and flanging. You need to act carefully. If the concrete is still wet, it is impossible to remove the formwork in any case. Otherwise, the surface of the stairs will be damaged (cracking, chip formation).
The steps and ends of the stairs freed from formwork are leveled with grinders. It is most convenient to use an ordinary grinder with a circle on concrete, which will make the surface of the stairs smooth and even.
Only after 21-28 days (depending on the weather and the rate of hardening of concrete) can the retaining boards and the lower part of the formwork be removed. This is a very crucial moment. If you remove the support too early, there is a possibility of collapse and destruction of the entire concrete structure.
After complete removal of the formwork, the lower part of the staircase is subjected to grinding by the grinders.
Stage # 7. Finish finish
For concrete stairs, there are a lot of different finishes:
- tile;
- laminate;
- wood;
- porcelain tile;
- acrylic stone;
- carpet.
However, all these materials, according to technology, should be laid on a flat surface. After removing the formwork on the concrete staircase (especially on the surface of the steps), minor irregularities can be observed: mounds, pits, chips. Therefore, before starting to lay the finishing coating on the stairs, all its surfaces are grinded and plastered.
Finishing the end parts of the structure usually consists in plastering and coating with paint. Next, steps are already being finished with one of the above-mentioned floor materials.


10 comments