Technology for installing all types of underfloor heating for subsequent tile laying
There are several methods for floor heating made of ceramic tiles. To understand which warm floor under the tile is better to choose, you need to answer a few questions. Will this system be the main or additional source of heating? Is a concrete screed planned? What is its maximum possible thickness considering the height of the ceilings in the room? Is the property heated centrally or autonomously? Answering each question, you will narrow down the possible range of options for the device of underfloor heating. This will determine the most optimal way.
Content
Option # 1 - electric floor heating
Under the ceramic tile, usually used as a flooring in bathrooms and kitchens, you can lay both a heating mat and a heating section. Ceramic tiles are characterized by high heat transfer. Therefore, it is not surprising that systems of underfloor heating, made on the basis of a resistive cable and laid under this floor covering, have almost one hundred percent efficiency.
So what should be preferred - a heating section or a heating mat? Let's figure it out.
Use of heating sections
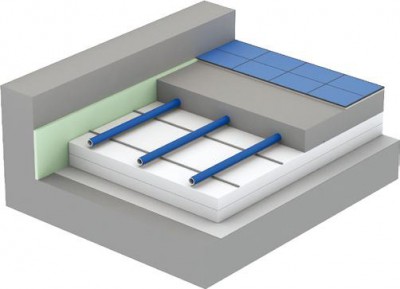
One of the most important requirements for choosing this electric underfloor heating system is the ability to raise the floor in the room to 7 cm or more. After all, the installation of the heating element is carried out in a concrete screed, the thickness of which should be at least 3 cm, but not more than 5 cm. Tile glue is already applied on top of the screed and tile laying is carried out.

Operation of a warm floor begins no earlier than 30 days from the moment of its installation.
The technology of gluing ceramic tiles to the underfloor heating is similar to the methods of its usual laying. However, there is a difference: you need to use a specific glue. We will tell you more about what kind of glue and how to choose it here:https://floor.expertexpro.com/en/tepliy-pol/plitochnyj-klej-dlya-teplogo-pola.html.
Use of heating mats
Laying a warm floor under the tile in this way is most suitable for those who are already completing repair work and who have neither the desire nor the ability to tinker with pouring a cement-sand screed. The heating mat is mounted directly under the tile adhesive, which significantly reduces installation time.

The advantages of this method of floor heating from ceramic tiles include, in addition to ease of installation, the possibility of saving space, as well as quick heating of the floor covering during operation. By the way, you can feel the charm of a warm floor within a few hours after installation, during which the glue dries. The downside is the fact that the installation of the system using heating mats is carried out only in open spaces.
About the features of installing an infrared heat-insulated floor, an electric cable system and the nuances of installing pipes for water heating, you can read in the article:https://floor.expertexpro.com/en/tepliy-pol/montazh-teplogo-pola-svoimi-rukami-video.html.
Option # 2 - infrared floor heating
When laying an infrared heat-insulated floor for subsequent laying of tiles, additional material will be required, as manufacturers advise to use glass magnesite or drywall. Before starting installation work, they are determined with the size of the area to be repaired.
Remember that for effective floor heating it is enough to cover 80% of its surface.
The procedure for the work is as follows:
- Clean the surface and proceed with the flooring of a layer of heat-insulating material: Polyphoma or Infraflex.
- Next, lay the thermal film, cutting it with the longest panels. This will minimize the number of connection points for connecting wires.
- Do not forget to insulate the copper strip exits on the cut line of the film.
- To prevent a possible shift of the laid thermal film, fix its edges to the surface of the heat insulator using ordinary masking tape. Make sure that there are no overlapping strips of thermal film on each other.
- Next, connect the thermostat, the installation of which is carried out in a convenient place for approach, not far from the existing wiring.
- Connect the connecting wires and output them to the thermostat, making the connection according to the scheme applied by the manufacturer to the underfloor heating system.
- Connect the temperature sensor, which should be located directly under the tile.
- Carefully insulate all connections and wire connections. Professionals advise using a thermosilicon gun for this.
- Connect the thermostat to the mains by a professional electrician.
- Check the operation of the mounted system by making a test connection.
- Lay the plastic layer on top of the thermal film.
- Next lay sheets of drywall or glass magnesite, on top of which lay the tile.
Here's how it all goes on independently and at home:
The use of aluminum foil and materials, the manufacture of which it is used as a basis, is prohibited. It is also forbidden to lay a metal mounting grid when laying ceramic tiles.
You may be interested to learn how to repair a warm floor. About how to find out the cause of the malfunction, as well as about the features of repairing the water system, you can read in the material:https://floor.expertexpro.com/en/tepliy-pol/remont-vodyanogo-i-elektricheskogo-teplogo-pola.html.
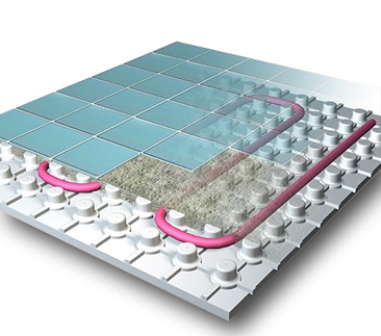
Option # 3 - water floor heating
Water floor heating works according to the following principle: it is mounted between the floor and ceramic tiles piping loop systemalong which hot water circulates. It is especially advisable to think about the construction of such a system for owners of large country houses, whose area is about 100 square meters. For apartments, this option of underfloor heating is not suitable, because it contributes to an increase in hydraulic resistance in the central heating system. In addition, the passing hot water through the warm floor is returned to the system already chilled, which, of course, will cause complaints from neighbors.
Installation of a water heated floor, like cable, requires pouring concrete screed. This means that the room will have to significantly raise the level of the floor surface. During installation, the following steps are performed:
- The surface of the main floor is prepared, while old coatings are removed. Removes dirt and debris, and also removes all dust with a vacuum cleaner.
- Leveling floor screed is in progress.
- Thermal insulation is laid on a dried concrete layer, the role of which is most often expanded polystyrene.
- On top of the thermal insulation, the pipeline is installed according to the selected scheme and connected to the mixing unit - collector.
- The structure is poured with concrete and leveled according to pre-set beacons.
- After the concrete has dried, the tile is laid.
Video briefing:
The pluses of a water warm floor include uniform heating of indoor air in all directions. This system can be used as the main source of heating, which is much more efficient than the use of radiators. The disadvantages of this method of floor heating include the complexity of installation, limited use and reduced room height.
The options discussed above will help determine the choice of a tiled floor heating system. Remember that self-installation of a warm floor under the tile is possible, however, without experience in performing construction work and primary knowledge of electrical engineering, it is still difficult to competently and properly work. Therefore, it is advisable to contact specialists who are professionally engaged in the installation of various types of underfloor heating.