
How to put a tile in the bathroom - 9 steps on the way to a beautiful room
The tile is an ideal finishing material used in bathrooms and toilets. Thanks to the combination of different types of ceramics, it is possible to create amazingly beautiful interiors. In order to properly carry out facing work and not spoil the expensive material, you need to know the technology for their implementation. It is even better to know some tricks that are acquired by master tilers only with experience. Having learned more information about how to put tiles in the bathroom, you can try to do your own laying. However, professionals will cope with this task much faster and, of course, better.
Content
The choice of bathroom design
There are hundreds of bathroom design options, and you can always come up with something new. A variety of market offers makes it difficult to choose the original tile, because you want to buy everything. However, mentally wondering how this or that tile will look in your bathroom, you can significantly reduce the number of options. Of the remaining few instances of the tile, it is not difficult to choose the best.
When choosing a tile, try to avoid too aggressive colors and unimaginable surrealistic patterns, as such a design can quickly get bored and even cause psychological rejection. The tile is not laid for a couple of months, but for a long time, so bold decisions must be taken consciously.
Materials and tools
The tile is bought taking into account the squaring of the walls with a small margin of "battle". To carry out an accurate calculation, measure the width of each wall and multiply by the height of the room, then the obtained results are added up. Add to it one square meter per stock. You can choose a tile with smooth, rounded or chamfered edges, providing a snug fit of the cladding elements.
Tile adhesive for the bathroom should have moisture resistance, sufficient adhesion to adhere the surfaces of the tile and wall, good ductility, and a long time for correcting the installation. To get started, just buy a couple of bags, and then buy more, based on actual consumption. It is necessary to follow the instructions for mixing the glue to get the desired consistency of the solution.

So, what else do we need:
- The primer is necessary for processing walls and floors to reduce their absorbency. If you ignore this point, then the adhesion of the adhesive solution to the wall surface may be deteriorated.
- Waterproofing of walls and floors is also required, since the bathroom belongs to rooms with a high level of humidity.
- Tile cutter is an indispensable tool that allows you to accurately trim tiles for laying in places where solid tile is not included.
- Drill and a drill “ballerina” to it, which will be needed to get even holes in the tile for the output of communications.
- Metal and rubber spatulas of several sizes for applying tile glue, grout, coating waterproofing.
- Primer roller.
- Metal profile for first row beating.
- Building level, rule for determining the evenness of the walls.
- Pencil
- Plastic crosses for an even seam between the tiles.
- Bucket, rags, sponge.
Choosing a tile for a bathroom is not such a simple question, as many may think. We will help you with tips and tell you about options for stylistic design in the material:https://floor.expertexpro.com/en/pol-pokritiya/plitka/kafel-dlya-vannoj-foto.html.
Wall preparation
Dismantling of all plumbing equipment with which the bathroom is crammed is carried out. The dimensions of the bathrooms are so small, so the space is completely freed from all the excess that interferes with the work. In addition, this will save plumbing and furniture from possible damage and dust. In addition, after laying a new tile, it is unlikely that you will want to drag old equipment into a transformed bathroom. As a rule, when repairing bathrooms, plumbing is also changed, not to mention furniture.
After the release of the premises, they begin to dismantle the old tiles. In this case, work should be carried out carefully, trying to inflict the least damage to the walls, which then have to be leveled. How to remove the tile from the floor can be seen in the video. The tiles are removed from the walls in the same way.
After cleaning the floor and walls from the old coating, the stage of their leveling begins. High-quality masonry in the bathroom is possible only on perfectly flat surfaces. Therefore, all walls are carefully checked by the rule for the level, while it turns out that there are “pits” and “blocked corners” on the surface. Large defects are sealed with cement mortar or plaster. Minor flaws are leveled with starting putty. Sometimes grooves are specially made on the walls, which can improve the reliability of fixing the tiles.
After leveling work is completed, the room is cleaned of debris, dust and walls must be primed. The primer layer is applied with a roller on the entire surface of the walls, thereby managing to remove all remaining dust particles, as well as reduce the moisture absorption of the base. The primer is allowed to dry, a couple of hours is usually enough for this. The exact time is indicated by the manufacturer on the label.
Next, a coating is applied on the walls with waterproofing, which is bought ready-made and distributed on the wall with a spatula or roller. Experts advise applying two layers of waterproofing. After such preparation of the walls, they will not be afraid of any mold or fungus.
Wall marking
In order for the tile to be laid evenly in the bathroom and whole tiles to be visible, it is necessary to “beat off” the first row in terms of level. Using a water level, a point is fixed in one of the corners, which is transferred to all the remaining corners. A line is drawn in pencil. If all measurements are correct, then the end of the continuous line will necessarily coincide with its beginning.
Important! The distance from the floor on which the line is drawn is determined based on the number of possible laying of whole rows of tiles. The account is kept from the ceiling. Thus, the cut parts of the tile will be located at the very bottom and will not spoil the appearance of the ceramic masonry.
Walls are also measured in order to determine the start of tile laying, while it must be clearly understood where the row of trimmed tiles will be located. Indeed, for this, the most inconspicuous place is chosen. A decision is also made on the number of “cut” rows, which increase the amount of work carried out by an order of magnitude. For example, to achieve symmetry, it is necessary to lay trimmed tiles on both edges of the wall. Sometimes a decision is made not in favor of symmetry, but in favor of one “cropped” row, stacked from any one side of the wall.
During the marking of the walls, they are determined with the decor, the location of the tiles with the pattern, the starting place of the decorative borders and other design solutions. The layout option is selected from several possible ones:
- classic straight seam; tiles go butt to butt;
- laying apart according to the type of brick wall;
- masonry at an angle, rhombus, diagonally possible only when working with square tiles.
Each docking option has its own advantages. At the same time, you can come up with your own version and try to put it into practice. Imagination can only be limited by the impossibility of technical implementation of the plan.
For facing work, it is important to make the correct calculation of tiles for the bathroom. Moreover, the possibility of an error must be excluded, since if there is a shortage of material, you will have to stop work and buy tile. Our article will help you calculate the required number of floor and wall tiles:https://floor.expertexpro.com/en/pol-pokritiya/plitka/skolko-nuzhno-plitki-dlya-vannoj.html.
"Beating" the first row
On the drawn line, the first row is beaten using a metal profile, an iron corner or a flat wooden bar. This support will ensure the evenness of the masonry rows of tiles, as well as provide support for the cladding until the tile adhesive sets. Although there are special types of glue that do not allow the possibility of sliding tiles.
Glue preparation
A portion of glue is prepared immediately before starting tile gluing process, since there is a temporary restriction on its use, after which it begins to lose its properties. Glue is poured from the bag into the water, poured in the required amount into a clean container. Information on the amount of water is in the instructions that the manufacturer places on the packaging of the dry adhesive mixture.
Using a drill, the adhesive is thoroughly mixed, left alone for a while (see instructions) and then mixed again. The result should be a jelly-like homogeneous mass, in which there should be no lumps.
Tile
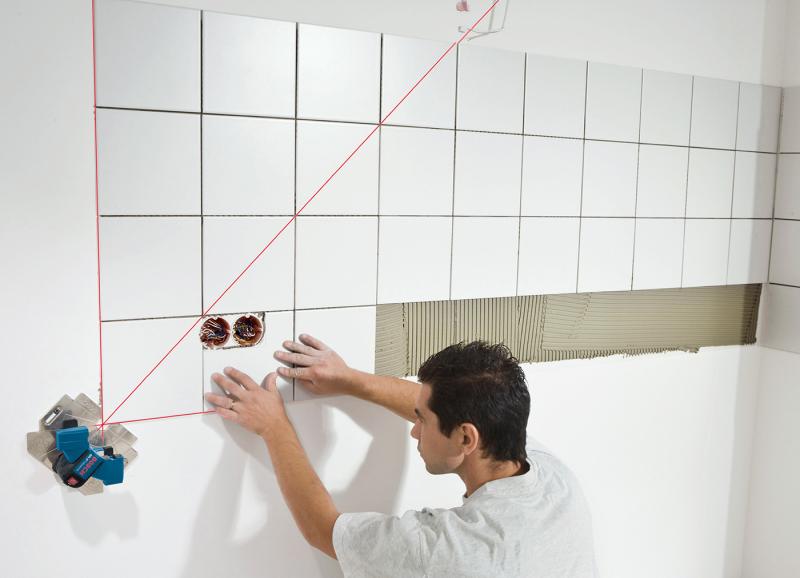
Glue is applied to the wall with a notched trowel, with the help of which grooves are formed. Some master tilers apply glue directly to the tile. At the same time, it is recommended to wet the surface of the tile with water to prevent moisture from drawing out of the adhesive solution.

Important! The heavier the tile, the deeper the grooves should be. The required depth is achieved by selecting the appropriate notched trowel.
The tile is applied to the wall and pressed lightly, thereby achieving full contact of its surface with the adhesive solution deposited on the wall. It is impossible to allow the presence of voids, which then can contribute to the breaking of the ends of the tiles during operation. The presence of voids, determined by the characteristic sound emitted when tapping masonry, indicates the lack of professionalism of the performers who carried out the repair of the bathroom.

To ensure the evenness of the gaps between adjacent tiles, cross-shaped plastic spacers are used, which are subsequently removed and the seams are rubbed with a special mixture. Experienced craftsmen do without these auxiliary struts, performing all the work by eye. Beginners should not experiment and stock up on inexpensive “crosses”.
Until the glue has seized, it is necessary to remove its excess from the seams, and then later there will be difficulties with grouting. You will have to make a lot of effort to “dig out” the hardened adhesive solution.
Tiles are laid out in accordance with a previously developed scheme, not forgetting to insert decor elements in the right place. The bottom row of tiles is laid out last.
You can familiarize yourself with a detailed analysis of each stage of wall cladding with tiles in an article on our website:https://floor.expertexpro.com/en/pol-pokritiya/plitka/kak-klast-plitku-na-stenu-video.html.
Tile cutting
Tile cutting into parts is carried out by a tile cutter, which ensures the evenness of the trimmed edge, the absence of cracks and chips at the site of the cut.Professionals use expensive equipment that can withstand intense loads. Fans just need to buy a cheap tool designed for domestic use.
On the front side, serifs are made, along which then an incision is made with quick movements made several times. Then it is clamped in the center with a tile cutter, and the tile splits into two parts along the cut line.

The cutting of round holes in the tile is carried out with a drill, on which a drill is attached with a special nozzle having the shape of a compass and called the “ballerina”. This tool allows you to drill round holes of various diameters for electrical outlets, wall lights, exit points of sewer and water pipes.
How to glue floor tiles?
For the floor, a special floor tile is selected, which has a less slippery surface and a denser structure that can withstand loads. In this case, a color close to the gamut of the wall cladding or, on the contrary, contrast is chosen. It all depends on the design idea.
Leveling the floor, if necessary, is carried out using a cement-sand screed, as well as quick-drying self-leveling mixtures. After drying, the surface of the screed is primed with undiluted solution, which dries in a few hours. Next, the tile adhesive selected for the floor tile is kneaded, which is applied to the base with a notched trowel. Then the tiles are laid, which is slightly pressed into the glue solution. Unfixed glue is also removed from the seams to grout them later.
Grouting between tiles
Manufacturers produce grouts of various colors in the form of dry mixes, which are diluted with water before use. The resulting solution is applied to the joints with a spatula, the residue is easily washed off the ceramic surface with a damp cloth or sponge before it dries.
Grout is not used in corners, but special sealant is applied to the seam. Excess sealant is easily cut off with a wooden stick.

We hope that this article will help you understand how to lay tiles in the bathroom, as well as assess the volume and complexity of all work. With this information, it is easier to understand the level of your abilities. Most likely, you should entrust the bathroom repair to professionals, whose knowledge you can easily check by asking a few questions covered in this article.

1 comment