
How to level the floor with plywood: step-by-step instructions
Agree that a situation where the floors need to be leveled, and “wet” processes are undesirable, is not uncommon. And far from always there is the opportunity and desire to build fashionable dry screeds with expanded clay, or the ceiling height does not allow that. What to do? There is an exit! Most often, such a floor is aligned with plywood or MDF, particleboard, OSB boards. Each material has its own disadvantages and advantages, but in this article we will consider in more detail just plywood, its properties and the subtleties of installation, because unlike fiberboard and OSB boards, plywood is a natural material, not recycled production waste. Everything, to the last detail - so that you end up with a long-lasting, moisture-resistant and really even base.
Plywood may look like rather fragile and thin sheets, but in fact it is not. Plywood is one of the most popular building materials, which is made from several pressed sheets of processed natural wood. Wood fibers are located in different layers perpendicular to each other, which makes the resulting strength high.
Plywood is the fastest way to level floors so that even tiles can be laid on them. At the same time, this finish has other advantages:
- Large format sheets, which while transporting is still convenient.
- Easy installation, anyone can handle.
- Reliability and durability of the finished base.
- The ability to make plywood floors even in wet rooms.
- The complete absence of smells, only a barely perceptible aroma of wood - and this is still without a finish coating.
- Ease of processing, cutting, coating with a protective agent and a minimum of construction debris.
- The stiffness of the sheets, which may also bend slightly. Valuable quality!
Plywood also performs the function of insulation, which significantly reduces heat loss of the floor. In addition, plywood can also be both a rough and a fine floor - depending on its grade and grinding.
Basically, plywood floors are equipped for three purposes:
- Level the floors with slight irregularities and prepare for the subsequent installation of the final coating.
- Significantly improve the thermal insulation of the room.
- Provide additional waterproofing of the floor for laying the laminate.
The second point is especially relevant for those apartments and rooms that are located directly above the cold basement. But in rooms where there is a considerable temperature difference (as in a seasonal summer residence), it is impossible to level the floor with plywood. As well as where the humidity is high (for example, a pool or sauna).
And now - all the technology step by step!
Content
Stage 1. Assess the condition of the floor
If the error in the height of the floorboards is only 5 mm in different places, boldly attach the plywood directly to the plank floor. If the height difference is more than 1 cm, but not higher than 8 cm - create point or tape supports in the form of a crate. In simple terms, adjustable lags. Here is a simple solution.
Stage 2. Choose a quality material.
Construction requirements for plywood, which acts as an intermediate element of the floor, according to SNiPs are the same as for a rough screed.
In total, five grades of plywood are produced today:
- Grade E is elite, it has no defects at all.
- The first. Such a sheet does not have external defects, although small chips and microcracks are allowed.
- The second, more affordable. In such plywood you can find only up to 5% scratches and small dents, and only up to 2% - traces of glue. For plywood, such plywood is best suited, both in terms of cost and quality.
- The third grade already has knots on the surface, even dropped out, and small amounts of wormholes.
- The lowest grade is the fourth. Here you will find the most flaws, although the veneer itself will be glued quite qualitatively. This is “technical” plywood, it rarely evens floors with it, although this happens. For example, this is not the worst option for budget construction decisions, like a summer cottage or a temporary building.

Here's what the fourth grade plywood flooring process looks like:

Also on sale is the so-called “sheet plywood”. Its thickness ranges from 12 to 20 mm, and it is available in the form of 300x300 or 300x360 mm. Differs in greater moisture resistance.
It is important to choose the right plywood material specifically for the device of your floor. Pay close attention to such points:
- The number of layers in one sheet, which is easier to measure in thickness. For the floor, it is better to take sheets of 12-16 mm, where the number of layers varies in the region of 9-11 per sheet.
- Surface quality, grade, and processing - is grinding or not.
- Brand for glue water resistance.
- Emission class. You don't need formaldehyde in the living room either.
The strength and quality of the subfloor, its resistance to loads and deflection will depend on the thickness of the plywood sheet chosen by you. When choosing, build on what the final flooring will be like. So, for the carpet or linoleum, you can put the thinnest sheets, but for a laminate or parquet - no thinner than 10 mm. In any case, the thickness of plywood should not be less than a parquet board or laminate. And it’s right to heat the head of the self-tapping screw, if the coating is already very thin:

And now about the brands. For industrial construction, where there is a large cross-country ability (and, therefore, a serious load on the floor), plywood is laid with FB or FOF grades, but for private individual construction a more lightweight option is suitable - FSF and FC. In the latter case, phenols are no longer used for the manufacture of sheets, but to create a stronger base, as in the FSF and FB plywood, they exist - so far without it.
FSF plywood is quite durable and wear-resistant, has increased mechanical strength and water resistance. Such sheets do not change their properties even with serious changes in humidity and temperature, and all thanks to the small addition of phenol-formaldehyde resins. Which are not toxic, but are clearly not intended for bedrooms.
FC is a plywood with extremely low moisture resistance, but for its production a safe adhesive composition of carbide resin is used. Put this floor in the bedroom or nursery, where there is always an emphasis on the environmental friendliness of the finish. But the FSB is already more suitable for corridors, kitchens and bathrooms due to its moisture resistance, but toxins are also present in it. You should not breathe such a floor at night, but you can use it for other rooms. And how unsafe such plywood is for health, you can according to the attached technical data. Find one of these values in them:
- E1 - up to 10 g of mole per 100 g of dry wood mass.
- E 2 - per 100 g of dry weight is already 30 g of resin.
Sanded plywood is well suited for further painting, laminate flooring or for laying tiles. You can easily understand what kind of processing the sheets went through at the factory, by marking:
- NSh - unpolished ordinary plywood.
- Ш1 - polished on one side only.
- Ш2 - polished on both sides.
Another point. In each sheet of plywood, the layer thickness ranges from 1.7-1.9 mm. And the more such layers, the stronger the plywood sheet.
And finally, what wood is made of plywood is important. So, conifers are usually used only for flooring on balconies, loggias, roofs and basements. The thing is that even a small content of phenol-formaldehyde resin in its composition completely neutralizes all that is valuable in spruce, pine, fir and cedar. Therefore, durable and safe birch plywood, which also has good thermal insulation properties, is more suitable for homework. Here's what it looks like:

Stage 3. Improving the quality of sheets
In total, plywood has 12-15% humidity. It is possible to increase the moisture resistance of plywood by impregnating with putty based on polyvinyl acetate, which is somewhat similar to PVA glue. Do everything according to this instruction:
- Step 1. Take a sheet of plywood in your hands and soak it on one side until spots begin to appear on the opposite side. Then - on the other, only twice already.
- Step 2. Dry the plywood in a horizontal position for at least three days, in a dry room with normal room temperature.
- Step 3. Once the sheets have dried, treat them with a wood preservative.
Tip: if you need to level the floor with sheets that are not afraid of moisture, then pay attention to the brand Greenboard GB3 (12 mm). Between them it is also possible to lay a heater.
And strength can be improved thanks to acrylic varnish. Apply it in two layers, and the second - only after the first has dried.
Stage 4. Preparing the floors for leveling
In fact, the whole process of leveling the floor with plywood looks like this:

Plywood is laid directly on the floor when the base can be called relatively flat, and minor correction is required. But in all other cases, the floors need to be regulated with lags, and only on them - to lay plywood sheets.
As for the primer of the base under plywood, experts convince them to use a primer instead of it - a special kind of it, which is different in that it contains more solvent, and it penetrates deeper into the floor surface. Such a composition can be made at home: just take the bitumen mastic for laying plywood, and dilute it with gasoline. The primer works much better on the adhesion of different materials, and coating them with a base is called priming in the construction language.
Process fresh floor logs with an additional protection against fungus and insects. If you are worried about environmental friendliness, then the German composition of Leinos is suitable for you, where the volatile compounds are only one gram per liter, and this is with the European standard, which does not allow exceeding 30 grams per liter.
You can even the floors with plywood on stiletto heels:

Even before leveling, be sure to check the condition of all communications under the floor, and if necessary, replace the bad pipes. After all, after you lay down the plywood, you will not have access there. Remove also the old rotten boards, and replace them with new ones.
Step 5. Format the sheets
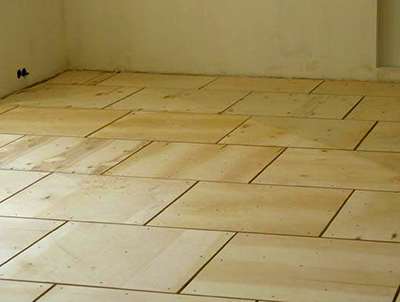
Standard sheets of plywood, as a rule, have dimensions of 125x125 cm. Here is an example of their laying:

However, many experienced craftsmen consider it necessary to cut them into four parts so that squares with a side of 60 cm are obtained. It is not only more convenient to work with such squares - they end up with much more damper joints at the joints, and this is important to compensate for moisture and thermal deformations . And the sheets themselves will be much stronger, because they are now less susceptible to deformation. But after cutting the plywood, it is important to pay attention to the ends of the workpieces - there should be no delamination in them. If there are any, then only change, the floor will turn out to be of poor quality.
If you will lay plywood in two layers, then divide the future thickness of the flooring into two:

Hold the sheets of plywood for several days in the room where you will lay them.Just lay them on top of each other so that there is no deformation, even better - put them on the edge if the sheets themselves are not too thin. This is necessary for the acclimatization of the sheets, but if you make the plywood floor immediately, without such preparation, then the laminate laid on top will go “waves”: the sheets will simply take in moisture from the air, like anything that is in such a room will happen natural expansion. The plywood base swells, and the laminate begins to lift in places, breaking fragile locks. Needless to say, the finish itself under these circumstances, too, will not last long.
And it is also important how different the humidity and temperature in the warehouse were. So, if the difference is small or the conditions are the same, it is enough to leave the plywood in the room at night, if the difference is from 2 to 8 degrees - about three days, and with a larger one - for a whole week.
Stage 6. We mark the front of work
Here's how to correctly determine from what angle in the room to start laying plywood sheets. We just take the usual building corner, and apply: which of all four corners will be closest to 90 ° (by the way, you will be surprised by the curvature detected), from this we start working. And it is desirable that this angle is the highest - find it. If you give preference to that angle, which is more than 90 °, then between the wall and sheets of plywood, an ever-increasing gap will begin to form.
Another simple way to find out how much the angle of the room corresponds to 90 ° is to measure 3 cm on one side of it, 4 cm on the other side, and draw a general hypotenuse of this resulting triangle. If it is 5 cm, then it is exactly 90 °. Calculate the required number of plywood sheets as follows: total floor area plus 10% for cutting.
Sometimes plywood on the lags can make a creak when walking on the floor - this can also be decided. Just before its flooring, pour a few drops of molten paraffin directly over the bars. But with a professional installation, the lags are glued with a special construction tape:

Stage 7. Correctly fasten plywood to the base
Wood, of course, is hygroscopic material. Therefore, the maximum air humidity in the room where the floor was leveled in this way should be only 68%. And if plywood has not yet been processed, then even up to 60%. With an air humidity of up to 85%, plywood will begin to delaminate within a month. This is what concerns the working environment. And now about the technology itself.
Base plywood alignment
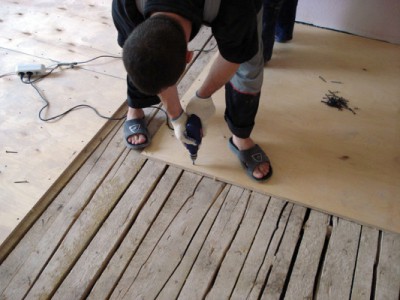
Plywood to the concrete or wooden base must be fixed correctly. This method is called an “envelope”: we drill in the corners, in the middle of each side, and in the center. For a concrete floor, use a carbide drill - the usual one will immediately become dull.
Then the sheets are removed, and blind holes for dowels are drilled in the concrete floor according to marks from the previous ones. The dowels are also driven into them, after which the plywood is put in place, and the screws and the screwdriver with a special insert under the slot-cross are driven before the head is drowned. Self-tapping screws for fastening plywood, use a length of 32, 41 or 55 mm, dowels are more suitable for SORMAT 6. Drill a hole ¾ of a self-tapping screw. Although some builders do not complicate their lives with such subtleties, and they drive the cap of self-tapping screws into plywood with strong hammer blows. As a result, the strength of the fasteners is broken.

Here's how to lay plywood only on glue:
- Step 1. Thoroughly clean the room from dirt dust. This should be done not so much for hygienic reasons, as due to the fact that even small debris may not allow the plywood to be laid evenly.
- Step 2. We put an insulating layer: glassine, polyethylene or a usual substrate under the laminate.
- Step 3. Now lay out the plywood sheets without fastening - the way it will then be mounted. Match the elements to size, trim what you need, and label all the sheets to avoid confusion.
- Step 4. Remove the plywood and cover with linseed oil if necessary.Better in two layers, and special attention needs to be paid to the ends. Drying oil does not allow plywood sheets to deform, but the seam between them leaves enough to compensate for thermal expansion. It is important!
- Step 5. Once the sheets are dry, you can stack them. When laying, make sure that all four corners do not converge together.
- Step 6. If you are laying thin linoleum, and not laminate, then additionally fill the plywood joints with sealant. They will not push through, nor will they interfere with thermal expansion.
- Step 7. Only the backing and the finishing coating remain - the floor is ready!
And to glue the plywood to the subfloor, take glue like “Bustilat” or use ordinary parquet mastic. Do not leave cracks - this is such a "floating plywood floor." You can only glue the ends of the sheets. But under the parquet, plywood needs to be glued and fastened with 5x60 mm screws in dowels, and sheets should be laid with mounting slots of 2-3 mm. For this purpose, it is better to use carbide adhesive, which in essence is a solution of urea resin, which includes hydrochloric and acid hardener, and a filler of gypsum or starch.

Alignment of plywood on logs
And now about the installation of the lags. The plywood floor on the logs is good in that it is convenient to hide any communications under it, and even arrange additional heat and sound insulation. You can arrange it without any problems, there is nothing complicated:
- Step 1. We expose the logs according to the level and fasten to the floor slabs. Use screws with anchor bolts or plastic dowels for this purpose.
- Step 2. If the bars themselves were not processed by anything before - now is the time. High-quality waterproofing will allow them to serve much longer.
- Step 3. On plywood sheets, mark and drill holes for fastening in advance. If you will "heat" the hats, drill holes for them a little larger than necessary.
- Step 4. Lay sheets of plywood across the log. On adjacent sheets, screw the screws in a checkerboard pattern only. Leave a gap of up to 3 mm between sheets - for thermal expansion. The edges of all sheets of plywood should fall precisely on the logs, and in no case "hang" in the air.
- Step 5. Now you can lay linoleum or laminate.
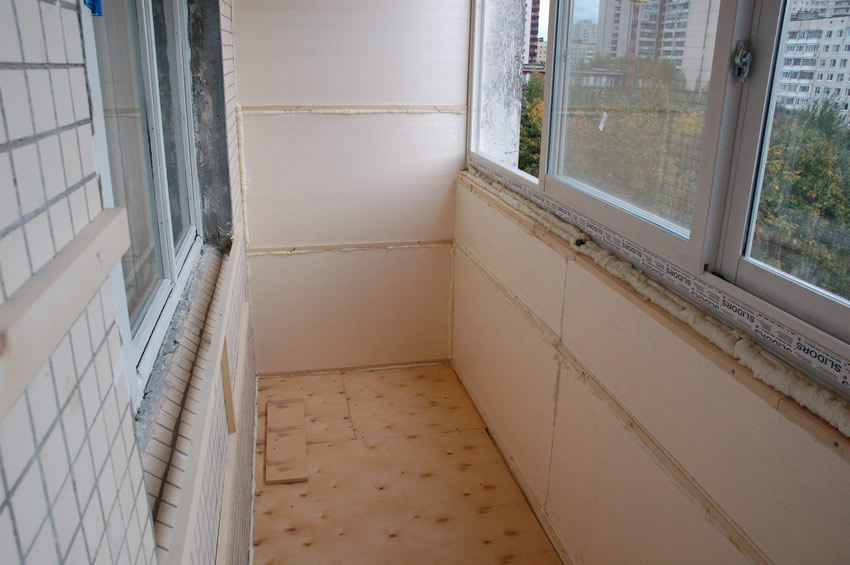
But it’s more convenient to fasten plywood not just on logs, but on a crate of beams of 40x50 cm squares. On top of such a structure lay a glassine that protects the floor from condensation, and only then - sheets of plywood about 18 cm thick and cut into 60x60 cm squares. For a house with a complex floor structure, this is an indispensable option:


It is possible to level the floors with plywood according to the old lags:

And even with insulation:

And here are the standard requirements for the width of the gaps between the sheets:

Although many experienced builders are sure that it is better not to leave large gaps between the plywood sheets - small enough gaps of 1 mm filled with elastic glue or sealant are enough.
Step 8. Grind the finished plywood floor.
Grinding of plywood is necessary because this operation allows you to save the base from burrs and cuts, as well as elevations that are hardly noticeable to the eye. Moreover, you can grind not only with a machine, but also with ordinary sandpaper. And after grinding, be sure to clean the plywood floor from dust. Everything is simple:
Step 9. Check the result.
Properly laid plywood on the floor looks like this:
- The sheets do not touch the walls anywhere, and between them there are gaps.
- The rule laid on the surface shows the exact horizontal. Moreover, you need to check in several places, each time orienting the level in different directions. The maximum allowable value is 0.2%.
- Now you need to knock on the finished flooring with a wooden block. The sound should be the same throughout the area, solid. If somewhere you hear a dull sound - in these places the plywood exfoliated from the base, which is bad, because according to SNiPs, the adhesion area of plywood to the floor should be at least 80%.And, even if under one of the sheets of voids under the plywood there is more than 20%, this section will have to be re-glued.
Was the test successful? We congratulate you - your floors are perfectly aligned!
4 comments