
How to insulate the floor on the balcony or on the loggia: the choice of insulation + step by step instructions
In a city apartment, every square centimeter is worth its weight in gold. Therefore, the human desire at all costs to "ennoble" their housing, to get the most practicality from every corner of it is quite natural. Each logician and innovator, looking at the cold loggia, represents either a children's play area or a study there. So why not realize the dream? The main task that will appear before the newly-made enthusiast is the need to carry out a number of thermal insulation measures so that coziness and comfort fill the hitherto uninhabited territory. In this article we will talk about how to insulate the floor on the balcony (loggia).
Content
The choice of optimal insulation
Actual today are such materials for insulation:
Option # 1 - nefozero
This is the insulation of the last "generation" made of aluminum foil and foamed polyethylene. Penofol has established itself not only as an excellent means for thermal insulation, but also as a worthy hydro and sound insulation. The industry offers consumers one-sided and two-sided designs.

Available in rolls, thickness - 3-5-10 mm. An important advantage of the use of penofol is the saving of space reserved for insulation.
For gluing pieces of material using aluminum tape.
Penofol insulation technology implies its joint use with penoplex.
Option # 2 - Styrofoam
This insulation "rooted" in the construction industry for a long time. It is used to this day due to its low cost. Available in sheets 2-10 cm thick. Perfect for warming the balcony floor. Pieces of polystyrene foam are placed between the logs of the floor, the detected cracks are foamed, the finish coating is laid.

Option # 3 - foam (expanded polystyrene foam)
Extruded polystyrene foam has “reference” thermal insulation properties. Among its other advantages - low vapor permeability, absolute chemical inertness, lightness, ease of use. More expensive than other heaters. Available in sheets of 2-3-5 cm thick.
Option # 4 - mineral wool
Porous material resembling classic wool. Get mineral wool from fiber (basalt, fiberglass), past the path of melt, drawing, cooling, crushing. She is not afraid of moisture, keeps heat well.

Among the shortcomings, it is worth highlighting the inconvenience of working with it - the material is pricked. Mineral wool is produced in rolls and in sheets. Unlike other heaters, it is able to penetrate into any gap. This is a significant plus.
What needs to be done before starting work?
It is no secret that the balcony slab is subject to atmospheric influences, has regular “contact” with precipitation. In the "old" house, it can become completely unusable - then we will not be talking about insulation at all, but rather, overhaul or even demolition of the structure. Although, it is worth noting that especially neglected cases are immediately visible.All doubts about the strength and reliability of the plate are best dispelled in a dialogue with the management company. Information about the maximum allowable load will also be not superfluous.
If the balcony is not threatened with demolition and its condition is more than satisfactory, then, armed with a level and a ruler, you can go to find out the curvature of the slab and the desired level of floor rise. All desired values should be correlated with real possibilities.
To make the floor level of the balcony or loggia higher than in the room is unreasonable - and this is obvious. It should be either on par with it, or slightly lower.
Important! It is dangerous to pour “a ton” of screed on the balcony to raise the level.
The next important step should be the general warming of the balcony. After all, the cold does not come only from the floor - bare walls and the roof also do their job. If you do not carry out their insulation, then the sense of "exercises" with the floor will be small.
General recommendations for insulation
Remember the conclusion of central heating on the loggia (balconies) is prohibited.
Do not insulate the floor with expanded clay - the thermal insulation properties of the material clearly do not “reach” the foam; the thickness of the floor insulated with it will be quite large.
Work with the floor should be after the installation of insulating tape on the walls.
How to insulate the floor on the loggia - a description of the process
To make insulation of the floor on the loggia or balcony is not so difficult. It is difficult for those who do not seek to understand. You will need such consumables and tools: a drill with a nozzle; hammer drill; jigsaw; polyurethane foam balloon; construction knife; pencil; self-tapping screws; roulette; bars; polystyrene foam; penofol roll; Particleboard / plywood.
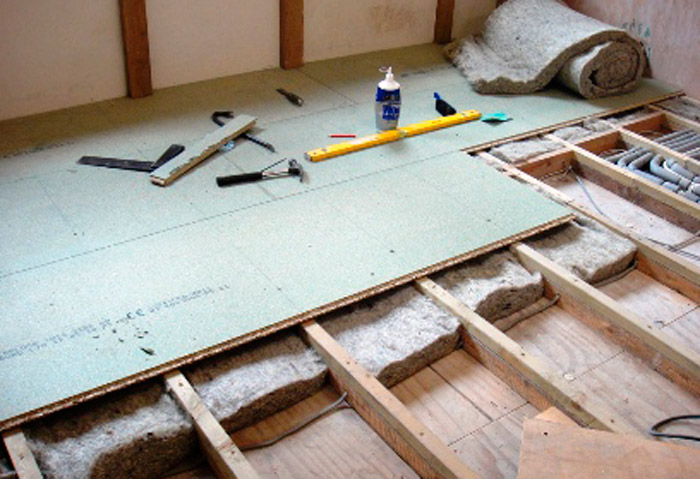
First you need to thoroughly clean the surface of the floor. You can just sweep it, but it’s better to vacuum it. Thin insulation (5 mm thick) should be laid over the entire surface of the floor, if necessary, trimmed with a knife. Try to use whole pieces in order to avoid a large number of joints. After laying this first layer, it is necessary to foam the entire balcony around the perimeter, without missing seams and joints. In the same way, lay the second layer.

Next, you need to measure the width of the loggia, and using a jigsaw to cut the bars. The distance between the transverse bars should be about 50 cm. The first and last can be installed with 5-10 cm indent from the wall. After the preliminary “fitting”, the bars must be fixed. Each of them is attached to 4 self-tapping screws, and the extreme ones should be placed indented 7-10 cm from the end of the beam. At this stage, fixing is carried out without leveling.
Now you should start filling the openings between the bars with polystyrene (30-50 mm). The thickness of the material is determined by the parameters of the beam. Ideally, the insulation should be on a par with it. Try to get the polystyrene as tight as possible into the openings - the fewer cracks, the better. If they nevertheless "draw", take the foam and go through it all over the floor, filling the voids.
Cut the penofol of the required size (balcony length + 40 cm), lay it on the floor with the foil up - so that it goes on the opposite side walls by 20 cm. If, due to the design features of the balcony or loggia, a certain area of the floor remains uncovered, it should be laid on an appropriately sized piece of overlap.
At this stage, the thermal insulation work ends - the stage of leveling the floor with the help of longitudinal bars starts and the installation of plywood or chipboard starts.
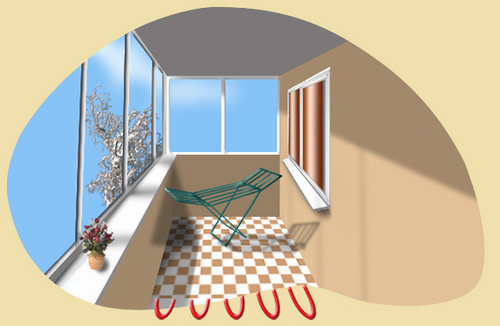
Underfloor heating as an alternative
Insulation plates (styrodur) with a thickness of 20-40 mm should be glued to the concrete base with special glue. Before laying a warm floor, the insulation must be covered with a thin layer of the same glue or put on it a welded mesh of metal. Information on the specific power of the system will help determine the choice of the heating section. For balconies, this is mainly 150 W / m2.
Consider an example.If the heat loss of the loggia is small, and the desired temperature is 18 degrees, then a power of 150 W / m2 will be quite enough. The step of laying a warm floor will be about 12 cm. You can use a thin warm floor: it will avoid raising the floor level and is easy to install.

It is possible to achieve a temperature exceeding 20 degrees if the specific power reaches the level of 180 W / m.sq. Laying step should be 10 cm. If the heat loss of the balcony is quite large, cable laying in steps of 7 cm will help to achieve comfortable temperatures.
The tape unfolds on top of the insulation coated with a thin layer of glue, and is fastened with self-tapping screws. The distance between the rows of tape should not exceed half a meter. Underfloor heating is installed in accordance with the instructions and recommendations of the manufacturer. A temperature sensor is placed between the branches, enclosed in a corrugation. The end of the heating section, as well as the wire from the temperature sensor, are brought to the thermostat. It is desirable that the installation of the heat regulator be carried out by an experienced specialist.
Screed should be poured over the cable (about 5 cm). A thin warm floor does not require this “manipulation”: it can be laid directly, for example, in a layer of tile glue. The cable can be “activated” only after the screed has completely hardened (these terms must be indicated in the solution description).
It is highly desirable that the instructions for the materials that you later plan to use (tile glue, linoleum) indicate that they are suitable for use in the "mode" of a warm floor.
Video example of work
This video demonstrates another way to warm the balcony floor. From it you can draw a lot of curious knowledge - a specialist conducting a master class unconditionally refutes some generally accepted recommendations for floor insulation on the loggia.
There is no universal way to insulate the floor, suitable for everyone and everyone. Choose the best option based on your financial capabilities, structural features of the balcony space and, finally, its final destination.

4 comments