Grinding and polishing stone floors: learning to work with granite and marble
Floors made of natural marble or granite, like any other, lose their attractiveness over time. Lacquered gloss disappears, multiple scratches and chips appear. However, such damage is not a reason to change an expensive coating. Stone floors can be restored to their former gloss with the help of a set of restoration works, which include grinding and polishing of the coating. In construction companies, this whole complex is often called simply - polishing marble or granite.
Measures to return the stone surface gloss:
- grinding;
- direct polishing;
- finish polishing;
- impregnation.
It is worth noting that granite and marble are stones with different characteristics. Marble is a soft, porous material that can be easily processed with abrasives. Granite is much harder, requiring long and laborious polishing. Therefore, there are slight differences in the processes of restoration of marble and granite surfaces (we will pay special attention to them).
In any case, all these works can be entrusted to construction or cleaning campaigns, in the arsenal of which there are specialized mechanisms and experienced workers. Or perform the restoration yourself. To do this, just use the guide below.

Content
Step 1. Preparatory work
Before starting work, the coating is carefully inspected. It is possible that in the process of operation deep cracks and chips appeared in some places. They should be filled with special putty for stone, polyester glue or a mixture of sand, cement and water glass.
Then they wash the surface with a detergent suitable for the stone (this must be done in any case, even if the repair of cracks was not performed). They wait until the floor is completely dry and only then start grinding.
Step # 2. Surface grinding
Grinding is the removal of deep scratches by removing 1-3 mm of the surface layer of stone. The result is a smooth and visually smooth surface without gloss (matte).
Grinding tools
To perform grinding use grinding machines and diamond cups.
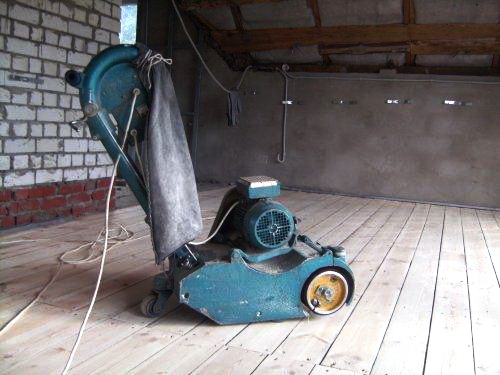
Construction crews professionally engaged in restoration use rotary grinders for grinding. However, they are too expensive to purchase for one-time household use. Therefore, when self-polishing large areas of the floor, it is more rational to rent such a machine.
If you have to polish the stone in an apartment or house (with small footage), you can do with a simpler tool - a grinder (angle grinder). For grinding, a tool with a power of 1200-1500 watts is suitable. Since grinding and subsequent polishing is carried out on a wet surface, it is desirable that the grinder be equipped with a water supply function.
As mills for grinders and grinders, diamond cups are used. These are metal circles, on the working surface of which there are grinding segments with a diamond coating.
The most popular cups used for home repairs (installed on angle grinders) are double-row and turbo.Double-row cups grind the stone in two rows of rectangular segments arranged in a circle. They are used for rough grinding, when the stone floor requires significant leveling. Turbo cups provide a more delicate, soft finish. Their segments are wavy, inclined. Thanks to this form, turbo cups polish edges and chamfers on stone floor slabs.
How is stone floor polished?
Before grinding, the floor is abundantly moistened with water to cool the diamond cups. Grinding is carried out at full power, gradually the entire surface of the floor is milled. When using a grinder, it is important to know what to press, during processing, on the tool is not necessary. This will not lead to better and faster erasure of the stone layer. Rather, on the contrary, the grinder will stop, which is fraught with damage.
If the floor is old enough and there is damage in the area of the joints, then in the process of grinding they are restored. What does it mean? After the initial grinding, the seams are cleaned or embroidered with a grinder. A special filler for the stone (pigmented to match the color of the coating) is used to fill the seams. After the putty is dried (1-2 days), finish grinding is performed until the putty is completely cleaned.

During grinding, a huge amount of stone dust is released. Part of it is absorbed by the water used to cool the cutters, and part - rises into the air. To protect yourself from dust, wear a respirator and safety glasses when grinding. Glasses, in addition to fine dust, can prevent larger pieces of stone (up to 1-2 mm), which also often fly off during rough grinding, from getting into the eyes.
After grinding, the floor must be thoroughly washed and only then proceed to the next step - polishing.
Step # 3. Floor polishing
Polishing - grinding floors with abrasive wheels. During the polishing process even microscopic scratches are removed, the floor becomes absolutely smooth.
Construction companies use rotary machines for polishing (the same as for grinding), but for home use they are not worth buying. Therefore, let us dwell on a more affordable tool that polishes marble or granite to the state of “glass” no worse than specialized mechanisms. This is a grinder, the same one that home craftsmen use when grinding. The only thing that polishing is a more delicate process that does not require high power. Therefore, for its implementation, you can use angle grinder of lower power - from 800 watts.
For polishing, flexible circles with diamond spraying (“turtles”) are installed on the grinder. It requires several circles with different grain sizes, with numbers 50, 100, 200, 400, 600, 800 (when polishing granite, additional disks 1500, 3000 and Buff will be required). The coarsest "turtles" are numbered 50, with increasing numbers, grain size, on the contrary, decreases. The smallest circles are 3000 and Buff.
During the polishing process, the granularity of the used sandpaper is gradually reduced and with the help of this, the desired effect is achieved - the gloss on the surface of the stone.
Flexible "turtles" are not installed on the grinder themselves. First, a special rubber disc with Velcro (adhesive base) is screwed onto the angle grinder. And already on this base they stick a “turtle” with the desired grain size. If it is necessary to replace the abrasive wheel, the spent "turtle" is peeled off and glued to the next, smaller one.
They polish the stone floor by wetting the surface with water. Sometimes they perform dry processing, but it is considered less quality. Water saturation of the stone makes it more pliable, polishing is easier. In addition, water protects the tool from overheating, increasing its resource and productivity.
How is stone floor polished?
A Velcro disk is placed on the grinder, and a speed of 2000-3600 rpm is set.A “turtle” 50 is glued onto the sticky holder and polishing is started. Circle 50 - the largest, is used at the initial stage of polishing to eliminate large scratches left after grinding with a diamond cup. Polishing is performed slowly, moving from one part of the floor to another. Try to remove (or make less deep) all visible scratches. Processing circle 50 is considered preliminary, superficial.
When the entire floor is passed, the circle 50 is removed and fixed on the angle grinder circle 100. Slowly, the surface is treated again. At this point it will be seen that the stone begins to darken. This is normal. Polishing each subsequent, finer-grained “turtle” will make the stone even darker. Light colors are stripes that need to be removed when polishing.
The next circle - with grain 200. Processing them will make the stone surface even darker. Then the 200 circle is changed to 400. A noticeable shine appears. Then set the circle 800. Processing them is the final stage for the marble surface. When polishing in circles from 800 and above, it is recommended to set the grinder to lower revolutions - 1000-1500 rpm. After polishing in a circle of 800, marble begins to reflect surrounding objects. Granite acquires smoothness, but still does not shine.
If granite is polished, then stopping at circle 800 cannot be done. Granite is harder, for its brilliance 3 more abrasive replacements are carried out - on disks 1500, 3000 and Buff.
After each round, wipe the surface with a clean cloth. This will help to see the disadvantages of polishing, as well as remove the used abrasive.

Absolutely smooth, mirror texture can be obtained by polishing only the “turtles”. However, even professional stone workers do not always succeed. Then they finish the watering - with the help of finishing powders and pastes.
Step # 4. Finish polishing
For finishing polishing, special polishes (pastes, powders) are used. They are often applied manually, rubbing felt, felt, cotton or wool on the floor surface. You can achieve a faster result faster if you polish the surface with felt (felt) Velcro circles mounted on the grinder.
The main active ingredients in powders and pastes for finishing polishing are metal oxides. Widely applied:
- chromium oxide;
- alumina;
- tin oxide.
In addition to oxides, lapping agents may contain oxalic acid (or its salts) and fine diamond powder.
All of these components can be bought separately, mixed and used for polishing. For example, a composition consisting of a mixture of chromium oxide, oxalic acid and diamond powder in a ratio of 1: 1: 1 is effective.

Step # 5. Impregnation - application of protective equipment
To increase the durability of the stone floor and, if necessary, to enhance the shine, protective agents based on wax, paraffin or silicone are used. In addition to the additional effect of a “varnish” surface, these substances cover the stone with a microscopic film that protects the surface from water, grease, various liquids, and dust. Impregnation is an optional step, performed if desired.
The most popular among manufacturers of protective coatings for stone are Italian companies: Klindex, Tenax, Bellinzoni. For example, Klindex liquid wax is widely used. The mixture is applied to a previously washed and dried surface, allow it to absorb a little. Then, after 2-3 minutes, they begin to rub the wax - manually or using a grinder with a felt nozzle. When using the grinder, polishing is performed at low speeds (up to 2000 rpm).
A protective agent can also be made independently from wax, rosin and a solvent (for example, turpentine). The volume of solvent should be equal to the total volume of wax and rosin.
To prepare the mixture, hard wax is cut into thin chips, and rosin is ground into powder.Wax and turpentine are mixed in one dish and, with constant stirring, heated in a water bath. The mass should completely dissolve. After that, without stopping mixing, the solvent is poured into the hot mixture in a thin stream. After cooling, wax paste can be used for waxing. The technology of application is the same as for purchased mixtures.
 floor")
At the end of polishing, the surface of marble or granite should be mirrored, that is, it should reflect the surrounding objects and, in particular, light sources. To check the quality of polishing, you should light a regular lamp and look at its reflection on the floor. If the filament of a light bulb is clearly visible on it, congratulations! You managed to polish the stone surface with high quality.
In order to better understand the technology of grinding and polishing a stone floor, we suggest you familiarize yourself with the video: