Cracks in the wooden floor: repair work + review of the composition for the seal
An eco-friendly, warm floor made of pure wood was and always remains outside of any fashion or trends. Everything in it is good - and design, and comfort, and practicality. But there is one “but” - the gap. Their education is perhaps the most significant drawback of any wooden floor. First of all, the cracks in the floor bother many people because cold is going through them. This is inevitable if the foundation under the floor is ventilated through external air - it is through them that frosty air enters, which is simply drawn into the room. The cracks in the wooden floor are still bad because they clog everything that is possible - dirt, dust, organic matter. This not only gives the surface an unaesthetic appearance, but also turns out to be detrimental to the boards themselves - they can begin to rot.
But the problem is completely solvable - just choose the method or method that will be easier for you to apply.
Content
Find out the reasons and solve the problem
But first we look for the source of cracks, from which we will repel.
Reason number 1. Wood shrinkage
It is clear that any wooden boards dry out over time - and this is the first and most common cause of cracks. In this case, then it is better to purchase boards that are processed at the factory by the "vacuum drying" method, when intracellular moisture is completely removed, and then impregnation follows. With such material, there is no need to worry about shrinkage.
But an ordinary wooden floor dries from three to six years. And the pine tree is the most problematic in this respect - it is necessary to shift it three times in three years, and only after that you will get a normal floor that you can cycle. That is why, if the floorboard is still in good condition and, in fact, still dries, sort the floor. You will be surprised, but after shrinking you may suddenly have a few more additional boards!
Something similar happens when working with Euroboards. And this is when you preliminarily acclimatized the boards themselves, and there shouldn’t have been any problems, but equally, even with force pressing, up to 0.5 mm of slots remain between the boards. In this case, even before grinding, you need to putty such openings with a mixture of PVA glue, sawdust and paint, and rub it all with a rubber spatula, then sand it and remove the excess.
Reason number 2. Dry air
Put a bucket of water near the heating radiators, and monitor the behavior of the cracks throughout the day. If they become noticeably smaller - your house is just too dry air. And if you now sort through the entire floor and pull the boards as closely as possible, in the summer they will bend and go “waves”. Therefore, for greater certainty, purchase a hygrometer - a moisture meter, and check the air for this parameter.
In fairness, we note that overdried air is bad for health, and therefore you should think about sprayers and other devices that can solve this problem.
Reason number 3. Small rodents
If cracks have arisen due to the vigorous activity of mice, it’s not enough just to close them. After all, new ones will appear! Therefore, we first get rid of rodents or control their population as much as possible, and only then we work with cracks. How to get rid? Here are some ways:
- Get a good cat. It is a cat, cats, by their nature, are more lazy. And it will be enough that the mice learn the smell of a hunter - now they will not dare to bite their way to where there is such a danger, and peacefully remain under the floor. Ferrets are even more afraid, by the way.
- Arrange glue mousetraps - if there are too many mice and they are insolent, then this method is good as a mechanical reduction in the number of rodents.
- Sprinkle dry peppermint under the floor - animals do not like strong smells.
- Purchase a modern ultrasonic repeller. Only a good device, not a cheap Chinese fake, from which there will be no use.
- There is also such an effective way: filling the cracks with cement mixed with broken glass. Small intruders do not like it, believe me.
It is impossible to completely banish rodents from the house, like bacteria. But to make housing as clean and safe as possible.
Reason number 4. Installation Errors
Sometimes cracks arise from the fact that the boards "walk". And this is a direct result of improper installation. And, if the boards "walk", then even the best sealant will come off - it will simply remain on one side. Here it all depends on how immobilized the floor is. If the maximum - not a single putty in the cracks will crack, but if the boards bend at least a little - then be sure.
And so that the boards do not "walk", and the sealants in the cracks do not come off, nail them to the logs - with ordinary nails, but at an angle.
Reason number 5. Impaired ventilation
Cracks of this kind arise from the fact that the wood simply turns into dust. Be sure to fully inspect the wooden floor - in what condition is it? Perhaps the top is still solid, but from below all the boards have rotted. In this case - only a major overhaul with a complete overhaul, and nothing else.
If you can correct the situation, then proceed as follows:
If you have cold coming from under the floor, and even inconspicuous slots pass a draft, in this case it is better to close the vents themselves tightly (which is more and more often done recently), to draw a ventilation hole through the room itself (there are special grilles for this) , and leave the small distances between the boards alone until spring, when they themselves are pulled together.
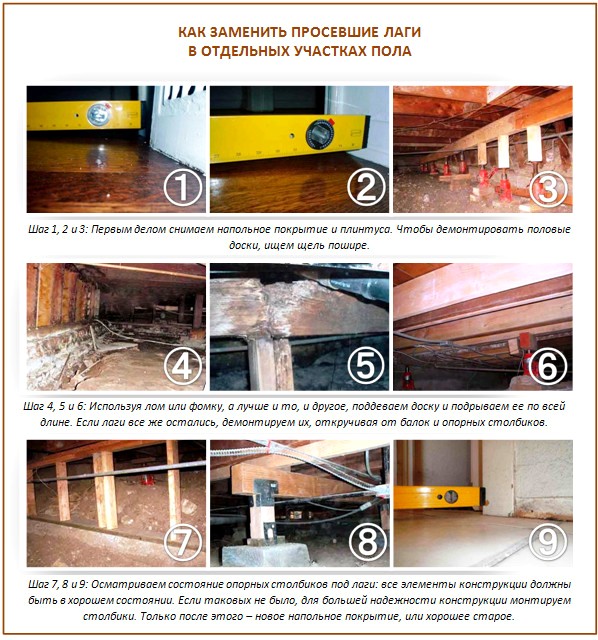
But, if the lags just sagged a bit, do this:
Pay attention also to such an important point. If you have the only ventilation of the underground - through the cracks in the floor, then closing them completely, you will make the boards rot. Just research first if you have ventilation or ventilation grills. Indeed, it often happens that townspeople buy a summer house with wooden floors in early spring, and by the summer they already bend when walking - the former owner simply closed the air vents for the winter, which is technologically correct, and in the spring no one opened them. And the boards, as they say, "suffocated." And damp basements also love earthen fleas, which easily jump out into the living room in winter.
If your underground is not ventilated through a foundation or a special air supply system, then make ventilation holes in the corners of the floor. Otherwise, damp and quickly decaying wood will be provided, because before that your floors had small or noticeable gaps between the boards, where the necessary air entered, and now you will block them. If the underground is too cold and you are worried about the floor insulation, supply ventilation instead of corners through the foundation.
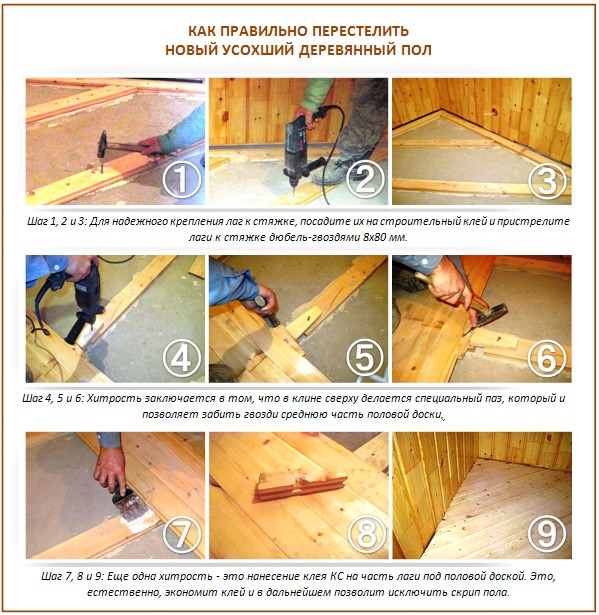
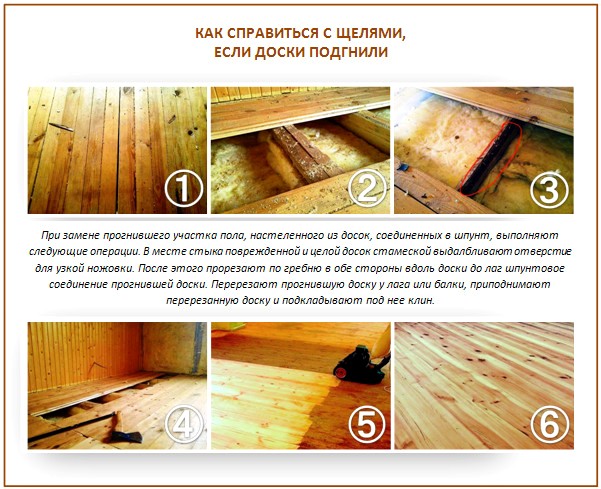
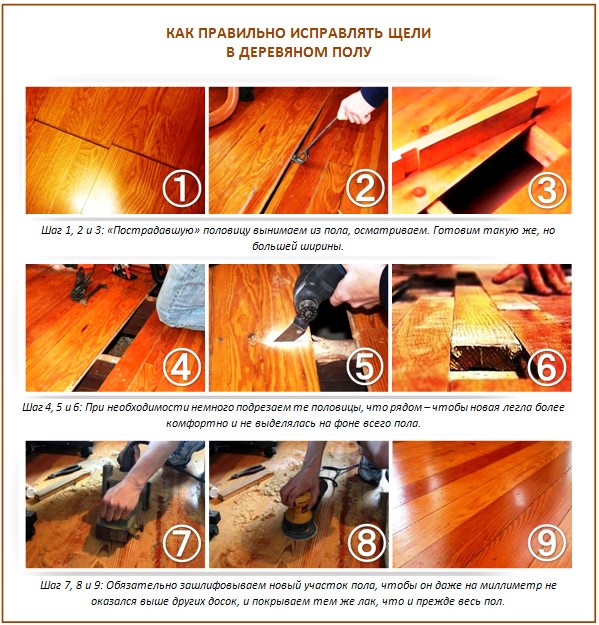
But sometimes, when the board managed to deteriorate and the cracks made themselves felt, it is necessary to replace a whole section of the floor:
We use modern tools
The choice of such tools today is huge!
Means number 1. Special fillings
Frankly: factory putty for crevices is not the best option. Firstly, they often crack, and secondly, the number of colors is limited, which makes the seams then stand out on the floor. Although some people are quite optimistic about this moment - after all, in this way a good imitation of the deck is obtained.
Means number 2. Silicone sealant
Wood is a living material, and therefore, fillers for the gap should also be elastic. Sealants for wood today are sold mainly of two types - acrylic and silicone.
Use silicone sealant to seal the cracks you need correctly:
- We thoroughly dry and then wet the surfaces.
- Dry the floor well.
- Fill all the gaps.
For the convenience of introducing sealant, use a mounting syringe - they not only save material, but also have the opportunity to get the most inaccessible places.
Means number 3. Acrylic Sealant
We buy a special sealant for wood. It is sold in all modern building stores, in special tubes and in a variety of colors. One of the best brands is Kimtec Laminat. This sealant tolerates changes in humidity and temperature, it is easy to grind and varnish. Good reviews also about Sikaflex-11FC sealant - even when expanding to 200% of the thickness of such a gap, there will be no cracks or tears.
Unlike silicone sealant, acrylic does not smell like vinegar, is absolutely transparent (it is water-based), and it is well washed with hands.
Means number 4. Foam gun
Put a thin tube from the cocktail on his nose, flatten it and put it into the slot. It is convenient to squeeze a tube with simple pliers. Adjust the gun for low feed. Work fast because the foam cures quickly, and it’s best to have a few tubes with you. If the gap is too narrow, and the flattened tube does not even go there, then just lean it against the hole. You need to press the foam with a flat object - a wet soapy bar. Do not worry about environmental friendliness: the dried polyurethane foam does not emit anything in air.
But in no case do not try to remove it with a spatula still raw - everything will be smeared around, and then it will be difficult to wash. Just after drying, carefully cut with a sharp knife. But even if it is dry, it is quite sticky and porous, all the dirt that is found will stretch towards it. In addition, the foam is destroyed by sunlight, and therefore be sure to paint over such cracks in several layers.
Foam as a material for sealing cracks is also good because it creates additional thermal insulation.
Means number 5. Reinforced adhesive tape
If the aesthetic moment is not important at all, or on the wooden floor - a carpet, then just cover the slots with gray reinforced tape, 5 cm wide. Fasten it around the edges with a stapler, and you can forget about drafts or smells.
We use proven "grandfather" methods
But there are older, but proven over the centuries methods. Each of them has its pros and cons, but sometimes such simple solutions turn out to be more effective than modern tools.
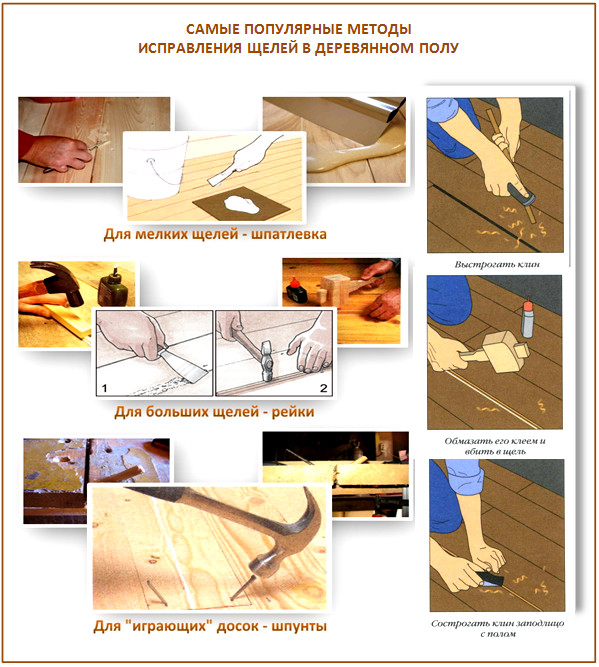
Method number 1. Rail
You can also close large gaps in the floor with the help of a rail:
- Step 1. Using a milling hand machine, cut the slots so that their edges become even.
- Step 2. Cut the slats that fit the desired size. As for the wood material, it will be most convenient for you to work with pine - it is quite malleable.
- Step 3. Glue and grease the edges of the slit and side of the rail. Use a sealant container for this.
- Step 4. We fix the rail in the cracks, and fill the voids that remain, sticky mixture with wood sawdust.
- Step 5. We grind the boards with an electric tape machine.Be sure to put on a respirator and glasses, close the respiratory system.
- Step 6. On the treated boards we glue the masking tape hiding the joint.
- Step 7. We select the paint or varnish of the desired tone and mask, thus, the entire restoration process.
Method number 2. Homemade putty
A good putty for cracks can be prepared independently. Get for this a composition based on a binder resin, and collect small sawdust. Mix it all up and close the gaps with the resulting component.
Osmo resin is also suitable for this purpose, but reviews about Borma are not the best - those who tried to close the cracks with such a binder complained of a strong unpleasant odor and a small amount in the package of the product itself.
Method number 3. Normal harness
Slots that do not exceed one centimeter can be easily repaired with a tourniquet. Next, fill it with the same red or varnish as the floor itself. Everything is simple.
Method number 4. Glue with sawdust
But the "old-fashioned" way to mix PVA with wood dust is bad because such putty darkens over time and looks messy.
Method number 5. Tow with paint
We take an ordinary tow for fixing plumbing pipe joints, mix with PVA glue, put into slots and cover with paint.
Method number 6. Oil with wax
Small cracks are covered with linseed oil and wax, always hot - this is how the wax flows into cracks. The only requirement is that the floor before such work must be perfectly clean, otherwise the dirt will clog along with the wax in the gap.
Method number 7. Plywood and chipboard boards, OBS
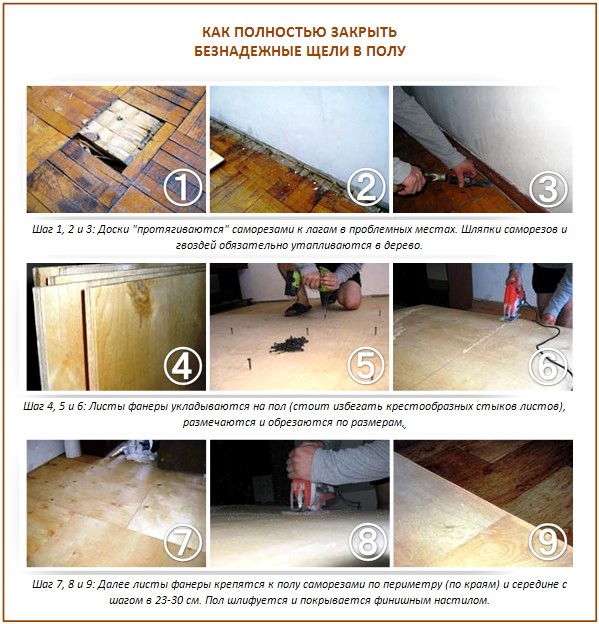
In very bad cases, when the gaps are huge, just clog them with wood plugs and lay a layer of wood-puff board or plywood on top. Only on top of all this will it be possible to lay the finish decorative coating.
A little more about the process itself. Fasten plywood with screws with plastic dowels. And so that the plywood does not deform in the places where the screws are attached, it is necessary to make holes in it and treat them with a large diameter drill. As an option - a countersink. This will allow you to fix the screws “flush”, flush with the surface.
Get 90 mm long self-tapping screws, and a pair of 120 mm pieces for fixing the lag to the flooring itself, and 36 mm long self-tapping screws for sheets. Fasten plywood to the logs can also be on "liquid nails", and fix with nails.
You can fill the sections of the crate with any heat-insulating material, except for mineral wool. Leave a gap - if the plywood sheets come into contact with each other, in the future you can’t avoid a squeak. Carefully screw in the screws as well - the “sunk” hats often end up breaking the screws themselves and slivers appear around the hats. See the process itself in more detail:
Method number 8. Bustilate with ropes
This method is well suited for the largest slots, which are difficult to fill even with sealant.
Method number 9. Wood dust
Another “grandfather method” is wood dust mixed with floor varnish. Collecting it is not easy, but the result will definitely please you.
Method number 10. Cord
This method is one of the fastest and most reliable:
- Step 1. Mix the epoxy mixture with the hardener in a ratio of 1: 1.
- Step 2. The resulting mixture is added to the cement mortar.
- Step 3. We fill the gap with the mixture as tightly as possible - so that then everything does not spoil the shrinkage.
- Step 4. Thread the rope into the wide slots.
- Step 5. Once the mixture has hardened, which will happen quickly enough, cover it with paint or varnish to match the floor.
If the floor slab is uneven, then under the lags it is necessary to put the bosses, and on them - pieces of linoleum or roofing material. Logs cannot be relied on only wooden supports - there must be compensators, because wood is subject to thermal expansion.
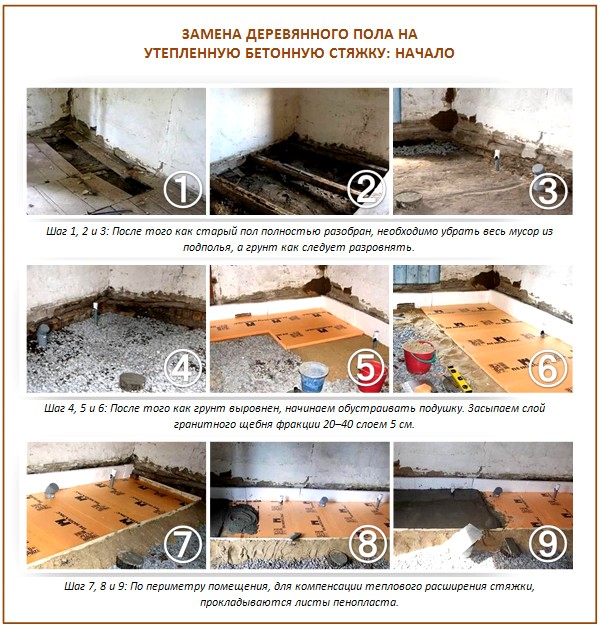
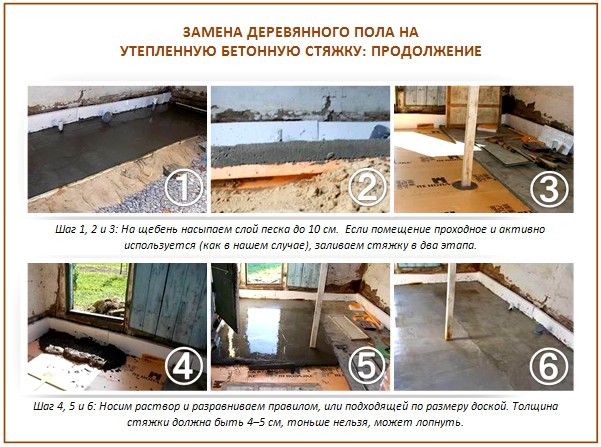
And sometimes, in a situation with a very old destroyed floor, it is easier to replace it with a good concrete screed:
That's the whole collection of methods - choose the one that seemed to you the most simple and rational.



5 comments