Floor on plywood lags: a step-by-step installation masterclass
Sooner or later, each of us has to carry out work that can be described with one single "sinister" word - repair. And if it is capital, then most likely it implies repair or a full replacement of the floors. If this event is supposed, for example, in an ordinary apartment, then there are two real options for creating the base of the floor: concrete screed and floor on the logs. Since it is often not possible to use concrete mortar to level the floor for a number of reasons, wooden floors on logs are the only and no alternative option. Is it good or bad? Let's try to figure it out together.
Important! It is only necessary to start installation of the floor at the end of work related to the repair of the ceiling and walls.
Pros of this coverage: The plywood flooring on the logs will always be warm and environmentally friendly compared to concrete or cement screed. In addition, the mounting locations of the slabs are not visually determined.
Minuses: the high complexity of all stages of installation, as well as the need for certain construction or carpentry knowledge.
Very important! Repair and laying of the floor must be carried out with strict observance of safety regulations. In particular, special attention should be paid to wiring, if possible, the room should be switched off for a while to avoid a short circuit.
What will be required to complete the work?
Will be needed: a hammer; drill; ax; nail clipper; jigsaw or conventional saw; screwdriver; keys set; hammer drill; level.

Expendable materials:
- logs (50 * 50 mm, 50 * 100 mm) with a standard length of 3 m;
- sheet plywood;
- insulation;
- substrate;
- nails (50, 70 mm);
- wood screws (35, 50, 75 mm) with countersunk head;
- anchor bolts (ɸ10 mm).

Step-by-step installation of a wooden floor on logs
Preparatory Activities
Despite the fact that the floor on the plywood logs refers to dry types of leveling, it still requires some preliminary preparation. This refers to the removal of all old coatings to a concrete base. In principle, the work is not very hard, but very dirty. The room must be completely freed from construction rubbish, and the base carefully sweep. Everything can now begin to install the lag.
Lag setting
As a log, as a rule, dry, even bars along the entire length are used, and they should not bend with a screw. Do not choose bars less than 2 meters long. Moreover, you need to buy them in advance - they must settle in the room for 10-14 days. It is during this period that the material must be periodically inspected - some instances may go screw. Naturally, their use as a lag for a wooden floor is unacceptable. Proceeding from this, take note of one more important tip: it is necessary to purchase building material for plywood flooring on logs with some margin.

Logs are laid horizontally with a step of 50-60 cm, and do not forget to use the level. Although this distance may increase or decrease depending on the thickness of the plywood sheet. The adjacent log should be separated from the wall at a distance of 30-40 mm. If significant deviations are found, then pieces of plywood or trim boards are placed under the lag.These pads should have approximately the following dimensions:
- Width - 100-150 mm.
- Length - 200-250 mm.
- Thickness - at least 25 mm.
Note! Logs should not rely solely on wood linings, which are sensitive to changes in temperature and humidity of the air. As "compensators" absorbing the emerging internal stress, it is worth using pieces of roofing material or linoleum.
Logs are laid perpendicular to the direction of window lighting, and if a certain direction of movement of people is known exactly, then perpendicular to it. And the plywood sheets, in turn, will be located along the direction of movement. To fix the lag in a concrete base, anchor bolts or dowels are used. If the base is wooden, then screw on with screws.

Waterproofing, soundproofing, insulation
Before proceeding with the installation of the lag on top of the concrete base, waterproofing material must be laid over its entire surface. This will protect the logs, which are treated with an antiseptic before installation, from pulling moisture from concrete slabs. In addition, it is recommended that activities to create sound insulation. Simply put: a layer of roofing material or a special substrate is laid over the entire surface.

In the intervals between the lags, insulation is laid: mineral wool, basalt wool, isover, polystyrene foam. In addition, you can apply backfill, for example, expanded clay.
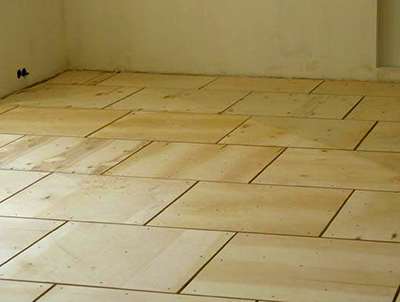
Plywood laying
Sheet plywood is laid very simply - even a person without building skills can do this task. However, so that everything goes perfectly better, before starting installation, make a drawing of the sheet flooring. Then, the sheets determine the places in which they will be attached to the lags. Then, holes are drilled at the marks (countersink), the diameter of which does not exceed the head of the self-tapping screw. Drilling holes is at a distance of 10-30 cm. The main thing is that plywood sheets must hold firmly. A plywood sheet prepared in this way is easily mounted and attached with self-tapping screws.
Important! Logs must be laid so that the joints of the sheets fall just in the middle of the log. Moreover, it is better if the joints are not located where people will most often walk.

Plywood flooring on the lag involves laying several layers of plywood. The sheets should not touch each other - in order to avoid squeaking in the future. The gap size is 0.2-0.4 mm. After laying the first layer, it is necessary to close the gaps. It is recommended to use elastic mastic for this purpose, which must be pressed into the seam, and then rubbed with a spatula. In addition, it is important to consider that plywood sheets in different layers should be offset relative to each other. Thus, it will be possible to avoid the moments when several seams intersect at one point at once.
Summary
It is from such events that the laying of plywood floors on the logs consists. Do not rush and do not worry, do everything with high quality - this will allow you to create beautiful, and most importantly similar floors in the house from natural materials.