Waterproofing the floor in the bathroom: all about insulation materials and device methods
Water is the basis of life and a tool of destruction that can gradually render steel, wood, and reinforced concrete unusable. Its presence gives civilized conditions to man and creates a favorable environment for the prosperity of microorganisms that turn building materials into crumbly. “Leaving the shores” of bathtubs and sinks with forgotten corks or clogged pipes, water spoils the decoration, property and relations with neighbors. But you cannot live without her. You just need to try to protect yourself from her negative surprises. For this, safety waterproofing of the floor in the bathroom is carried out, for the implementation of which there are many methods and materials.
Content
The best option for protecting the floor from water
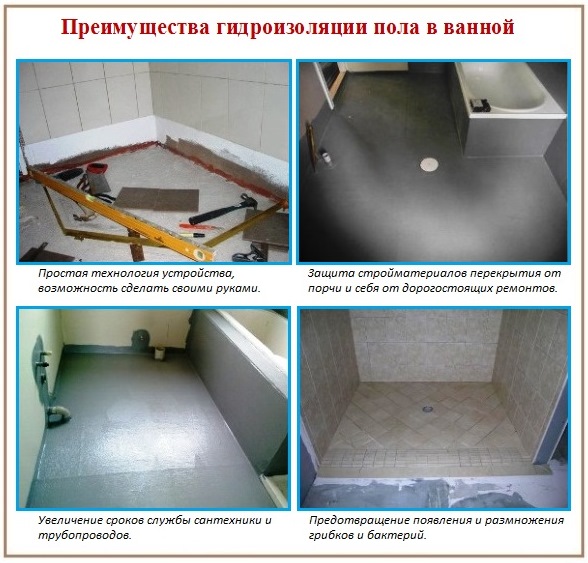
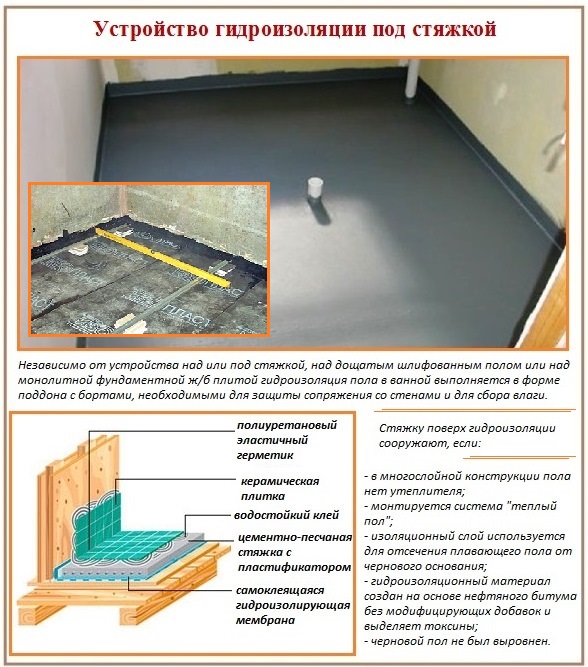
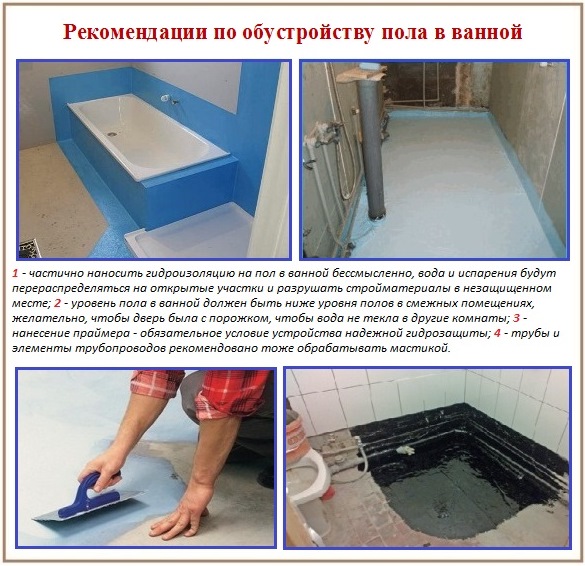
Numerous methods of waterproofing the floor have a single goal - the creation of a continuous coating that resembles a pallet with 10-20 cm sides on the walls. A kind of container made by this method will collect condensate flowing down the walls in jets of water, spilled and splashed water. A monolithic waterproofing layer will not allow moisture to enter the ceiling, and will prevent the destruction of the base. At the same time, it will save you from rot, the spread of fungi and harmful aromas secreted by these unpleasant representatives of the biosphere.
The goal is one, but there are really many ways to achieve it. In fact, to choose the best option, not knowing the specific technical conditions, is not realistic. The choice of the most suitable waterproofing, the type of which determines the technology of its device, depends on:
- from the state of the treated rough surface;
- from materials from which overlappings are made;
- from the terms allotted for the full arrangement of the floor;
- from the number of storeys;
- from the ability to reduce the height of the ceilings and even from a number of nuances that can only be detected while at the facility.
The choice may be the area of the room, the complexity of its configuration, the presence of a building hair dryer or burner and the ability to use them. Significant arguments such as the cost of the material and the complexity of the execution cannot be ignored.
It is highly doubtful that any technology would meet all the conditions presented, but after a careful assessment of the pros and cons, the optimal method can still be chosen.
Methods of waterproofing and materials for its implementation
You can protect floors from water and yourself from expensive repairs. pouring polymer floor, laying roofing material, backfilling a mixture of soil enriched with liquid glass and concrete. However, due to the high cost, toxic odor, or due to too much layer power, these methods are rarely used.
Waterproofing the floor in the bathroom is carried out mainly by two methods:
- by applying a water-repellent mixture forming an impermeable membrane;
- by gluing strips of web material to prevent the ingress of moisture.
In the first case, waterproofing is applied by coating, hence the name of the family of "coating" materials. The second, according to the corresponding technology, is called “okleechnye”.As a part of both varieties, bitumen necessarily appears, the toxic properties of which are minimized due to the introduction of polymers.
Features of coating materials
The ancestors of insulating coatings were oils and animal fat. Now materials for coating waterproofing are available in the format of dry compositions, mastics and pastes with a different set of components. The dry mixture before use in the case will need to be shut with water or a polymer emulsion, as indicated in the briefing on the package. The process of cooking will not bother buyers of pasty and liquid waterproofing of the floor in the bathroom, as the mixture is hermetically sealed in Euro banks and is completely prepared for application.
Paste or liquid mixture, depending on the consistency, is applied:
- with a wide fly brush on a stick or with a fowl, if the waterproofing material resembles ordinary paint;
- a spatula with teeth, if the water-repellent "coating" is similar to clay.
The consistency of the coating mixture is a characteristic that makes it possible to create a waterproofing of a certain thickness, which automatically delimits the scope of application:
- Liquid mastic compounds with a base of oxidized petroleum bitumen are applied at least twice in perpendicular continuous layers. The thickness of each of them is about 1.0-1.5 mm. Most often, a screed is poured on top of the mastic, because no one makes special requirements, except for cleanliness, dryness, lack of dirt and obvious damage to the rough base.
- Bitumen-containing pastes enriched with mineral or polymeric substances are laid with one or two seamless layers with a thickness of 3 mm or more. Pasty mixtures can perform two functions: insulation and screeds. Due to the sufficiently powerful thickness, this type of waterproofing is reinforced, by analogy with a screed, but PVC net is not used for reinforcement.
Note. To solidify the first layer, it is necessary to maintain the time interval indicated by the manufacturer. The second layer of liquid waterproofing is laid on a dry, hardened surface. It is possible to coat the floor for the third time on a “wet” surface, if permitted by the instructions.
Mastics and pastes cover the floor with a water-tight coating, subtracting a certain amount of mm or even cm from the height of the ceiling. But those who are extremely dear to mm can find impregnations in the line of liquid waterproofing materials, the principle of which is somewhat different from ordinary coatings.
It is possible to cover the penetrating insulation with a damp floor, some manufacturers strongly advise to pre-wet the treated surface. In wet concrete or cement-sandy environments, penetrating waterproofing forms needle-shaped crystals, deployed by the base to the intended flow of water. The "newly minted" structure freely passes evaporation and stably reflects water attacks, does not reduce the height of the ceilings. However, it costs a lot, because it is not too actively used.
The specifics of waterproofing waterproofing
Its predecessors were roofing felt and roofing material, not pleased with environmental priorities and ease of installation. Advanced representatives of roll materials are made on the basis of elastic polyester, easily spread fiberglass or flexible fiberglass. Bitumen is applied on the outside and inside of the material. Bottom is also an adhesive substance that provides adhesion to the subfloor, and a component on top that improves adhesion with the adhesive for the finish coating.
Note. To improve the adhesion properties with adhesive compositions, the surface of the waterproofing is sometimes sprinkled with medium-grained sand. Its excess is swept away after hardening of the insulating material.
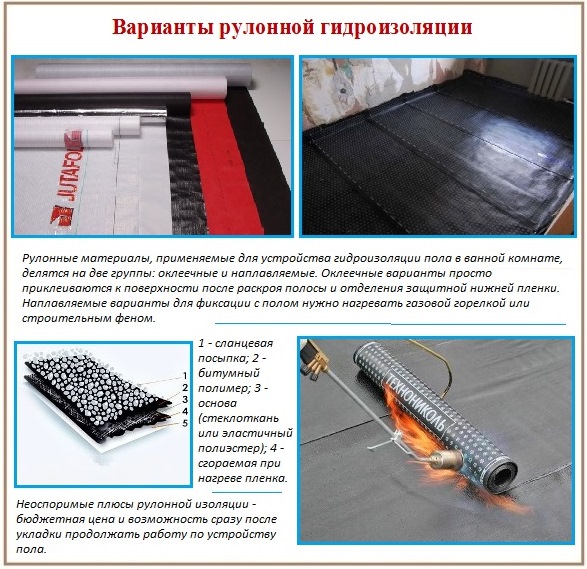
The family of gluing materials is divided into two subgroups, one of which must be fused with a gas burner or at least heated with a construction hairdryer.The second subgroup of water-repellent roll protection can be trivially glued, separating the protective film from the strip cut according to a pre-calculated size.
Gluing strips is easier, more convenient and safer, both for an inexperienced performer directly, and for material melting from the slightest overheating and tearing from careless movements. On the basis of which the deposition method is trusted by builders. Among them, too, there are not too many who want to work with toxic rolls in a small room. Therefore, for the adhesive type waterproofing device on the floor in the bathroom, self-adhesive options are often preferred.
Cons of adhesive waterproofing coatings:
- The material can only be glued on a previously dried, leveled, prepared surface with a height difference of max 2 mm. The differences are detected within a two-meter level gauge, mounted on the floor in different directions.
- It is better not to mess with deposited varieties not only because of their complex styling, but also because of the release of toxic volatile substances that continue to poison the air for a long time after completion of work. Due to toxicity, they are recommended to be placed under the screed.
- Laying requires special care, careful joining of joints, scrupulous alignment of corner joints.
In the list of reasonably recognized advantages of roll pasting are listed:
- reasonable price is the most convincing argument;
- durability of fastening to a rough basis;
- the ability to proceed with further work on arranging the floor without any technological interruptions.
In addition, it is by pasting that they waterproof the wooden floor in the city and suburban bathrooms. Elastic materials survive the agility of wood movements without problems, and, despite the constant stretching and compression, persistently retain solidity. They do not clog the pores of natural organics, do not interfere with aeration phenomena.
An integrated approach to the bathroom waterproofing device
Depending on the technical specifics of the premises, the owner can choose one of the above methods, but complex measures are considered the most effective. Their essence lies in the use of both types of waterproofing materials, so that double insurance is obtained. We will consider it.
Proper preparation is the key to success
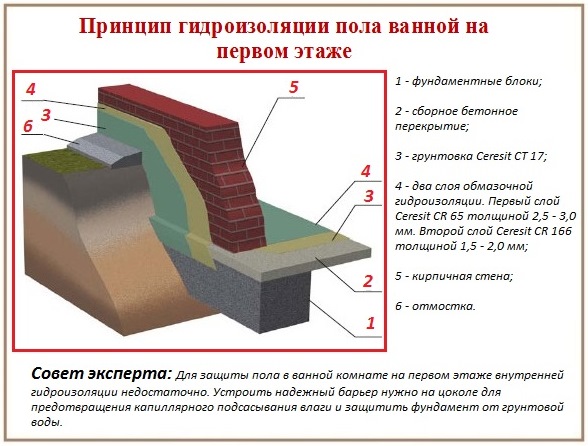
We assume that we had to remove the old screed after a worn floor covering from a concrete prefabricated floor or from a monolithic concrete slab. Using a spatula or large sandpaper, we remove the old oil coating or the upper layer of plaster from the lower edge of the walls to the height of the future "sides" of waterproofing. A priori, we accept the need to remove broken chips, dust, grease stains, oil paint residues, etc.
- Let's start with repairing cracks and sealing shells in the concrete body, for which we pre-embroider all the notches, and then fill them with a repair compound, for example, Isostop.
- Along the line of joining the walls with the floor, we make a groove with a width / depth of about 1 cm. We fill this groove with a bentonite cord, Penecrite or cement mortar prepared for repair. Strengthen the corners and mating zones is necessary, because these are the most vulnerable places for the destructive action of water.
Waterproof barrier device
After repair operations, we carefully treat the floor and the part of the walls prepared for insulation with soil (Ceresite, Concrete contact, etc.).
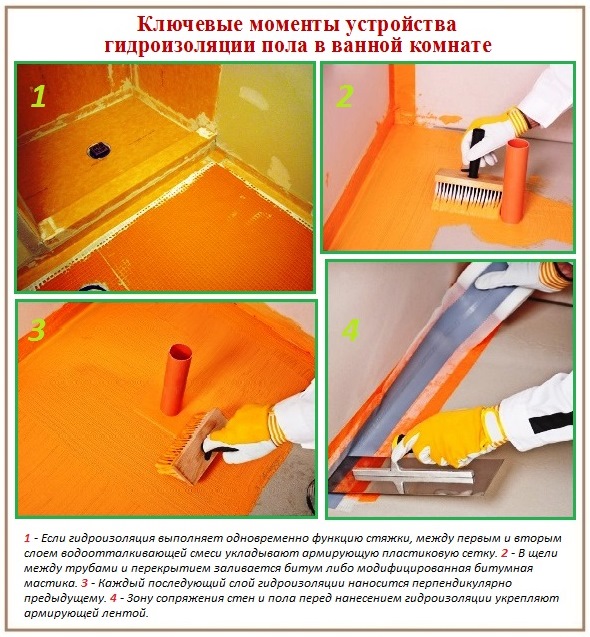
- We ground in two steps, rubbing the composition into the rough base. The second layer of soil is sent “to the cross” to the first, so that there are no accidentally missed holes.
- We pour liquid waterproofing at the intersection of the floors with risers and other elements of water communications.
- We process the cleaned sections of the walls and the adjacent floor along the perimeter with bituminous mastic. Until she grabbed, we reinforce the pairing of walls and floor with a mesh PVC tape.
- We apply mastic or paste (Technikol, Penetron, Elastomiks, Cerezit, Hyperdesmo, etc.) in the manner prescribed by the manufacturer the required number of times. We are waiting for it to harden. During the drying period of the paste or mastic, it is necessary to suppress any possibility of settling of dust and sand grains on the surface. In this case, lubricants play the role of leveling, additional insurance and glue, the properties of which will be deteriorated due to dusting.
- After the last of the layers of liquid or paste-like waterproofing has dried, according to the measured dimensions of the floor with added approaches to the walls, we cut off the strip of Isoplast, Aquaizol, Ecoflex or analog.
- From the top edge of the strip you need to retreat a distance equal to the height of the side of the safety pallet. We glue the part falling on the floor, we rub it with effort using a roller.
- Each subsequent strip is laid with an overlap of approximately 10 cm on the previous one, so that a continuous waterproof canvas is obtained. For reliable fixation on the laid coating, you need to walk with a heavy roller.
- Let's deal with the allowances on the walls. We heat the part of the wall treated with mastic with a hairdryer and fix on it the non-glued remains of the strips laid on the floor. The corners need to be pinched with a plaque, carefully recessed them in a heated mastic.
- At the end, around the pipes you need to perform bitumen treatment again.
All. You and the floor are protected from a long list of troubles caused by excessive humidity and water leaks. It remains to mask the waterproofing insurance with a decorative-protective floor covering.


3 comments