
How to clean the bulk floor: technology of capital and local options
Filling of polymer and cement-polymer bulk floors, we began to practice relatively recently. Thanks to their impressive service lives, few owners of innovatively finished spaces have experienced dismantling. There have not yet been any formal technological requirements for this. However, the masters from the repair sector have their own thoughts on how to remove the bulk floor, there are actually proven methods and developments.
Content
Methods for removing bulk floors
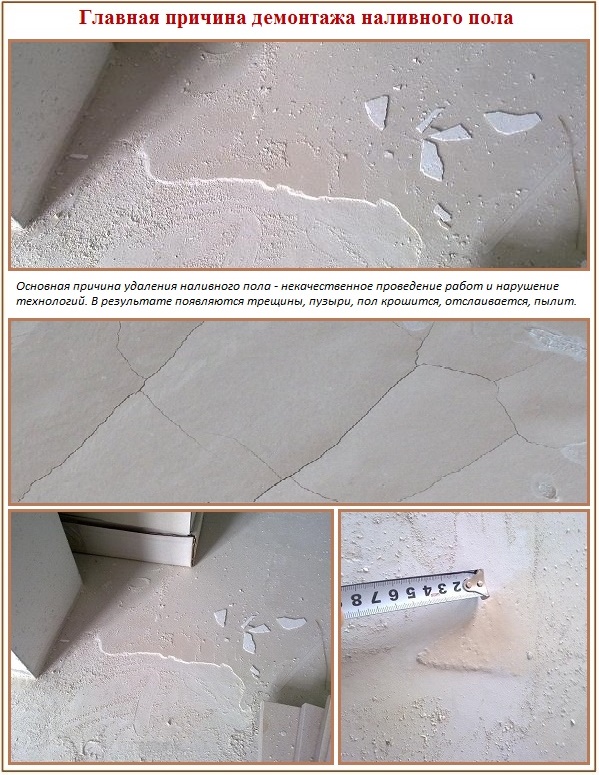
There are many reasons for dismantling the bulk floor. Among the standard prerequisites is poor-quality work, non-compliance with technologies, unauthorized changes in the composition of the mixture being poured.
A list of more impressive reasons is led by the owners ’desire to build a“ warm floor ”system in rooms with low ceiling heights and similar weighty pretexts for radical alterations.
The choice of method for removing the bulk floor is affected by:
- The composition used in the fill solution. Importantly, a polymer leveling mortar or a mixture of cement or gypsum was used.
- Fill purpose. Mixtures with a cement or gypsum base solve the problems of leveling and forming a base for the further laying of finishing materials. Polymer compositions serve as topcoats or substrates for the finishing decorative layer.
- Total thickness. Compositions with a cement or gypsum base are poured with a layer with a thickness of 1 cm to 8 cm. The optimal thickness of polymer floors is 2.5 mm. The maximum limit is 5 mm. The minimum thickness may be 0.3 mm of the polyurethane coating and 1.0 mm of the methyltetacrylate topcoat.
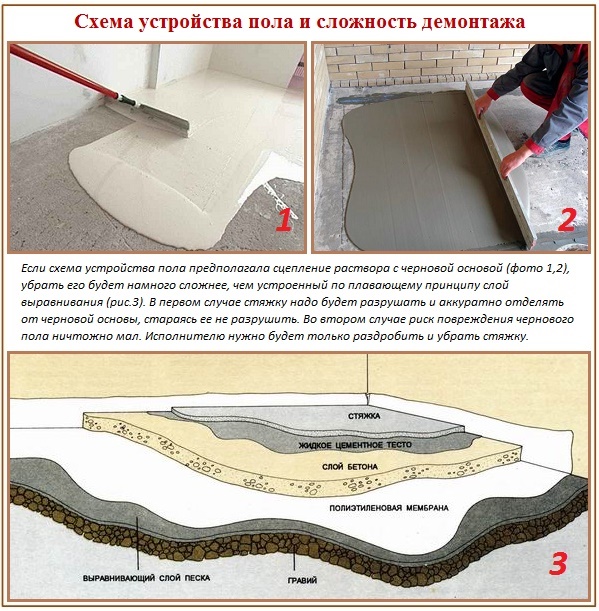
- Screed Option. More precisely, the screed is connected to the base or between it and the base there is an insulating layer. Insulation prevents diffusion of the bulk floor and reinforced concrete base. If it is not there, then the molecules of the solution to be poured partially penetrate the overlap, which substantially complicates its removal.
- Technical condition. It is necessary to find out the localization of damage and decide on the feasibility of completely expensive dismantling.
The technical condition of the floor does not matter if major alterations or redevelopment are carried out in the room. A completely different situation with the spread of defects in 10 - 20% of the total area.
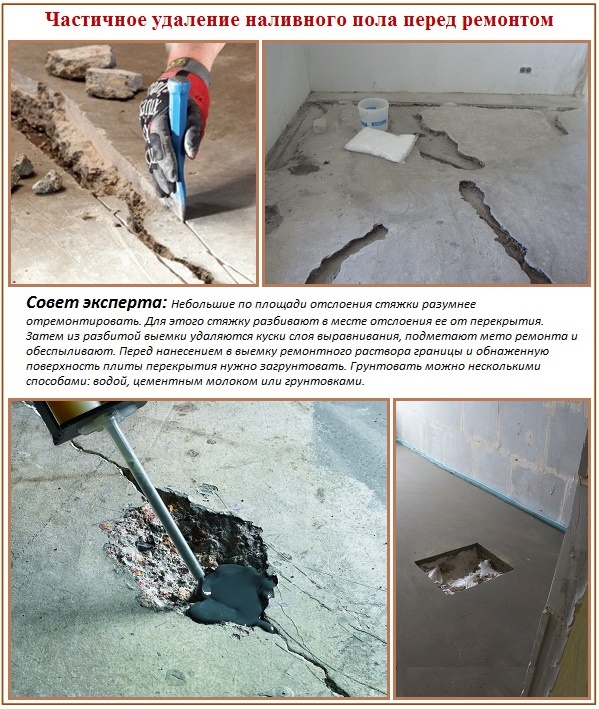
Do not remove the screed or decorative topcoat completely if it is possible to eliminate only swollen or cracked areas.
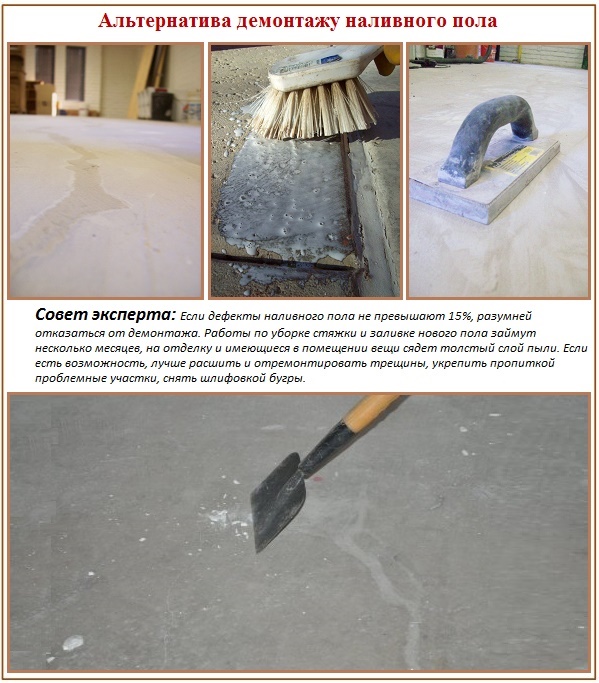
The methods used today to dismantle bulk floors require an impressive amount of labor, do not spare customers' wallets and floor materials. Costs can add up to a very substantial amount. Therefore, if it is possible not to resort to capital transformations, it is better to conduct a partial removal of the bulk floor or local repair.
Dismantling the bulk screed 3 - 8 cm
Work on the complete removal of the screed is often performed much easier and faster than cutting fragments or almost jewelry removal of convexity of the surface. However, it should be remembered that it is worth undertaking them, scrupulously weighing the costs and the expected result.
The operation to completely remove the screed is performed in the following cases:
- An increase in the height of ceilings in rooms with a multi-layer powerful screed.
- Preparation of the base for the installation of the "warm floor" system, if the ceiling height does not allow to reduce it by another 7 - 10 cm.
- Low adhesion of the screed to the base if strong adhesion over the entire area was assumed.
- Depreciation of the old leveling layer, requiring a major replacement.
- Cracking and dusting of the base floor, excluding the implementation of further arrangement of the premises and living in it.
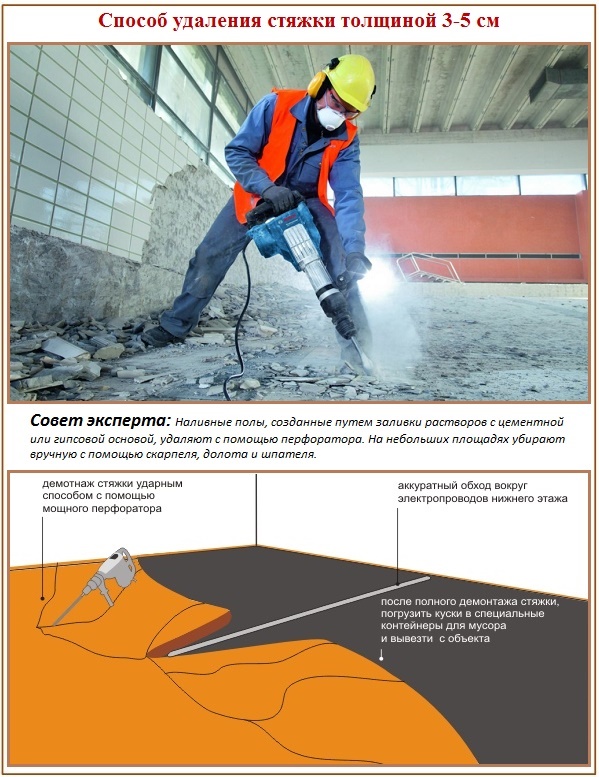
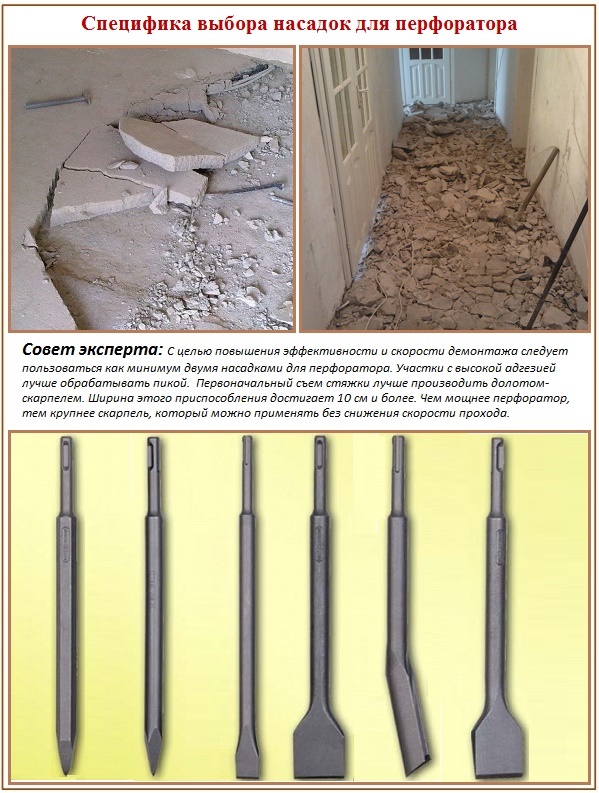
Dismantling is carried out by banal destruction of the screed with a perforator. In order to facilitate the solution of destructive tasks, it is preliminary recommended to cut the floor into segments with a grinder.
You need to use a diamond blade. It should be cut carefully, being careful not to hook the overlap or the bottom leveling layer. It is better not to go deep into the entire thickness, but leave about a centimeter of the uncut layer. Otherwise, serious repairs will be required.
After the grinder divides the floor into sections, a perforator enters the fight to destroy the screed. In working with it, two nozzles will be required:
- Chisel-scarpel. With its help, the main mass of the screed is crushed.
- Peak. With its help, work is carried out to separate the layer with high adhesion.
If the screed was arranged according to the “floating” principle, there is no need to apply peaks. The leveling layer is elementarily crushed into small pieces, collected in kraft bags and transported to the disposal site.
If the floor was poured onto a concrete base so that the adhesion was maximum, then you must first act with a scarp, then clean it with a lance. The width of the scarpel can be different: from 3 to 10 cm or more. If you need to remove the figuratively flooded floor, it is worth using several similar devices. Usually the largest scalpels are in the most powerful perforators.
It is not for nothing that we touched on the issue of the accurate dismantling work. If the underlying screed during the dismantling of the upper layer is substantially damaged, it will also have to be removed. Refusal of complete dismantling is possible only if the defects of the subfloor are not more than 20%, and it is also possible to repair the technical characteristics of the base with a repair.
Cleaning screeds made in a small area can be carried out without a perforator. But more time and energy will be spent than renting a drilling and drilling machine.
Screed removal up to 3 cm thick
Thin screeds created by pouring mortar with a gypsum or cement base are more difficult to remove than more powerful leveling layers. They are rarely satisfied with a “floating” scheme.
Basically, they are poured to eliminate the relief of the concrete subfloor, with which the leveling screed should adhere to the maximum.
The reasons for dismantling thin layers of alignment are much less, these are:
- Partial peeling from the concrete base. It manifests itself in the form of "coveting" of individual sections. It happens due to insufficiently dried before filling the subfloor, poor preparation for pouring or the presence of oil stains on it.
- Cracks appear on a large floor area. This occurs due to a violation of the proportions of the mortar or instruction of the manufacturer of the concrete mixture.
- The presence of bubbles and voids in the body of the fill and on the surface. The traditional result of non-compliance with the technology associated with a large number of air bubbles in the mixture being poured.
The removal of thin screed should be treated with increased attention. There are many actions to be carried out “on the machine”, but vigilance cannot be lost. Careless movement can very easily damage the rough foundation, for the repair of which it will be necessary to again fill the floor.
The priority is manual labor, from tools - a narrow and wide spatula. It is better not to cut the screed into segments if you do not know the grinder well enough.In the case of using a perforator, it is installed at an angle of 10 - 20º to the surface of the screed. Among the allowed nozzles there is only a peak, which, when crushing the floor, many masters slightly hold with their free hands.
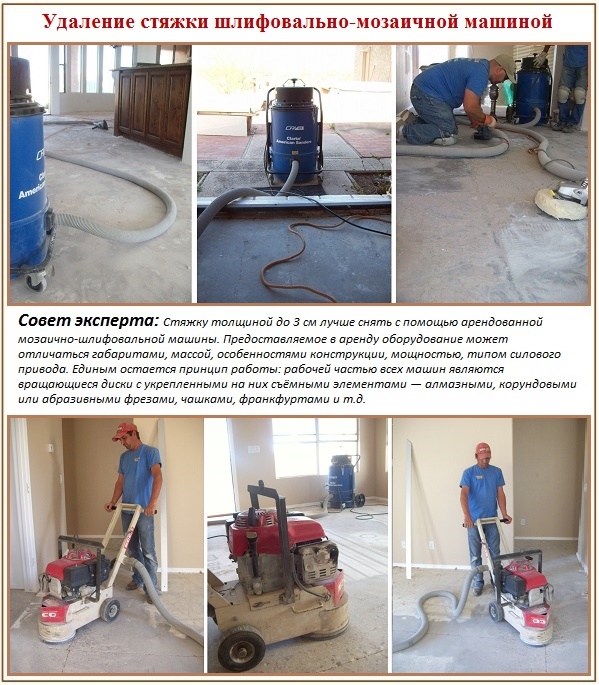
Leveling layers with a thickness of up to 1.0 cm are generally best removed with a mobile unit designed for grinding concrete. For a one-time work, it is more profitable to rent it.
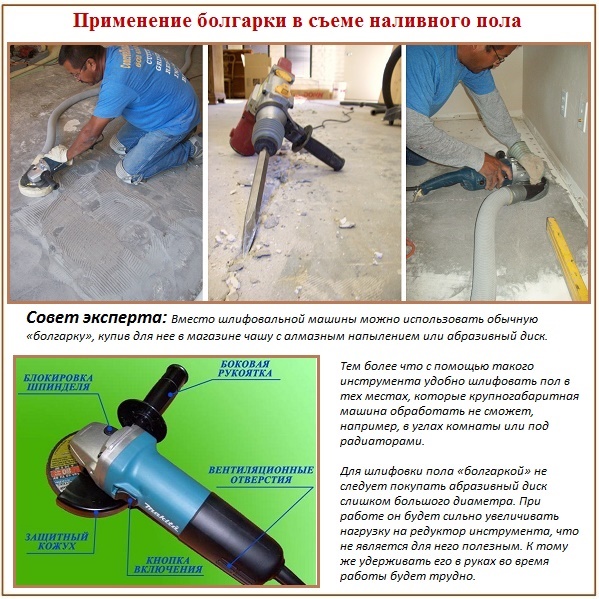
A vacuum cleaner is connected to industrial options, which collects and removes harmful dust during operation. A thin layer up to 0.5 cm can be cut off with a grinder, using it not as a cutter, but as intended as a manual grinding machine.
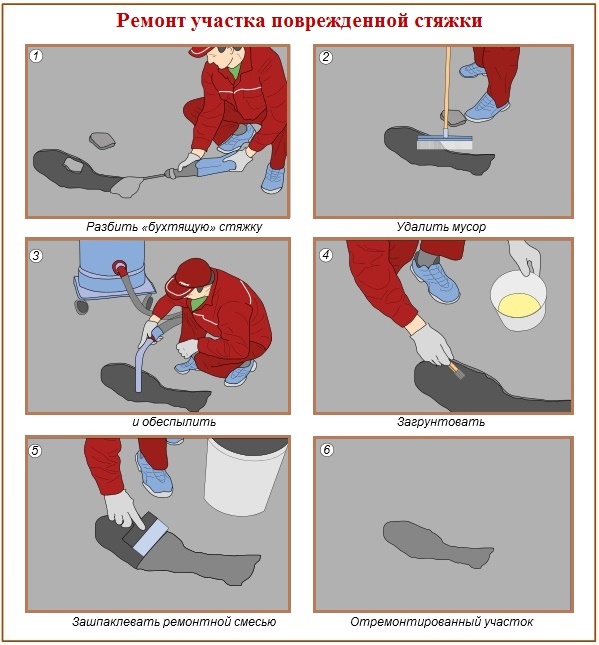
Local alignment layer removal
Dismantling of screed sections is carried out according to one of the above schemes, depending on the thickness of the layer and the technology for pouring it.
The cleaning of the bulk floor is carried out as follows:
- Marking the area with defects. It is carried out so that between the edge of the cracking zone and the line of future dismantling there should be at least 10 cm.
- Cutting a section of the floor with a grinder. It is carried out strictly along the planned lines.
- Grinding screed inside the cut area. It is made by a puncher with a lance or chisel and a spatula. Without fanaticism with the desire not to damage the rough foundation.
- Preparation of the base of the site for pouring a new mixture, which should be identical in composition to the previous one.
- Pouring mortar into the floor segment freed from screed, taking into account future shrinkage during the hardening period.
The amount of shrinkage is usually indicated by the manufacturer of the mixture. If the thickness of the screed is negligible, it can be neglected. If the leveling layer was 7 - 8 cm, the shrinkage should be calculated. Before pouring around the perimeter of the remote segment, you need to make a semblance of thin sheet plywood and fill the mixture with a layer that takes into account the shrinkage.
After waiting for the floor to completely harden within the repaired segment, the formwork must be removed. Put the twine in the seams, then seal them with a solution of the same composition.
Removal of polymer floors
Manufacturers of leveling mixtures based on acrylic and epoxy based enthusiastically assure that their products can hardly be removed. It is really impossible to remove the polymer floor if the thickness of the fill exceeds 5 mm and the floor was arranged without a decorative layer.
The advice not to arrange a polymer floor without thinking about the consequences is worth considering. Another question is that it is removed in extremely rare cases, because it is thin and even enough to serve as a solid rough foundation for laying the next coating.
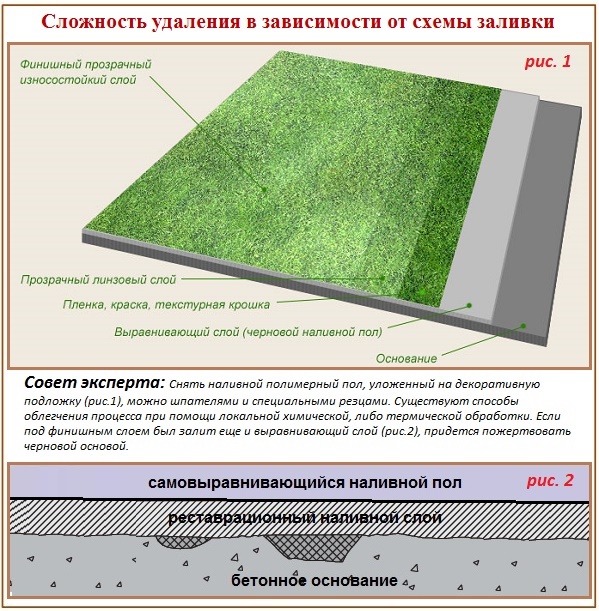
Suppose that there is an urgent need to cut and remove a polymer floor, arranged on top of a decorative print. For example, a draft base was prepared poorly, as a result of which tubercles and dents appeared on the surface, or the owners got tired of the drawing.
Although the thickness of the fill allows you to trivially level the floor or apply a new film with photo printing on it, there are ways to remove the polymer shell. To clean by hand, use spatulas or thin incisors. Depending on the composition of the polymer floor, it can be partially dissolved or heated to facilitate dismantling efforts.
Most of the self-leveling floors created with the 3D effect are arranged on top of a thin layer of cement or gypsum leveling. In such situations, it would be wiser to sacrifice the rough screed and remove the polymer floor along with the subfloor.
Dismantling methods are equivalent to methods of removing screeds, depending on the thickness of the layer and on the scheme of its device. True, the destruction of such a sex will require significantly more time and effort.
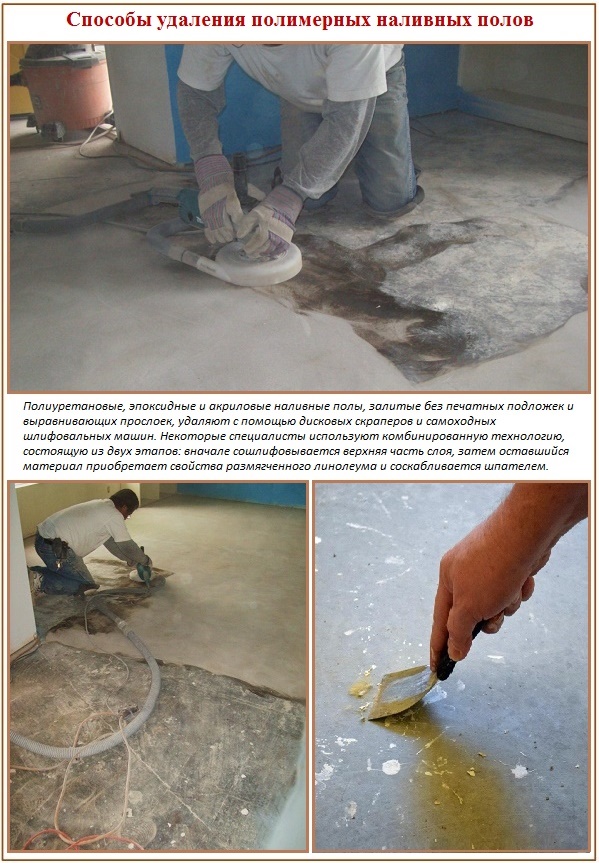
For cleaning polyurethane, acrylic and epoxy coatings, you can use rented means of mechanization - grinders with a disk working body. If the floor area is small, the usual grinder will do.
The upper part of the polymer coating is simply cut off, and then the lower part is scraped off with a spatula, resembling softened linoleum in structure and plasticity.
And yes, after dismantling the old screed, you will most likely have to make a new one.
Video examples of dismantling bulk floors
The opinion of experts on the advisability of removing bulk floors:
Briefly the essence and the process of removing the bulk screed:
How to better level the poorly flooded floor:
Methods for eliminating bulk floors are not too complicated. If a real need arose, you can deal with dismantling yourself.
It is important not to forget that when the hardened mixtures are destroyed, harmful dust is released, and when heated and chemicals are used, volatile toxins are released. Work should be in a protective mask, it is best to supplement it with glasses, it is necessary to act reasonably and accurately.

1 comment