Laminate stairs: technology for the restoration of concrete and wooden stairs
Laminate is a versatile floor material. It is suitable not only for laying on the floor, but also for sheathing stairs. This finishing option is especially suitable for concrete stairs, which themselves often look heavy and unaesthetic. Laminated finishes add charm to the wooden structure. You can also sheathe the laminate with an old wooden staircase, which has been worn out in order (but all its elements are still quite durable!) And need aesthetic restoration.
Content
Materials necessary for finishing the stairs
To finish the stairs you must purchase:
- laminate - commercial class, with a width corresponding to the size of the step;
- edge profile - metal, wooden, plastic sill or specialized laminated profile;
- adhesive for laminate - polyurethane, epoxy;
- self-tapping screws (screws, bolts).
Which laminate is suitable for finishing stairs?
The steps of the stairs during operation experience heavy loads. Therefore, household material with a thin protective layer for stairs is not used. The laminate classes recommended by specialists for sheathing stairs are 31,32,33, 34. These are commercial laminates designed for surfaces with heavy loads. The first digit in the marking (3) means that the laminate belongs to the commercial class. The second digit (1,2,3,4) determines the thickness of the protective top layer.
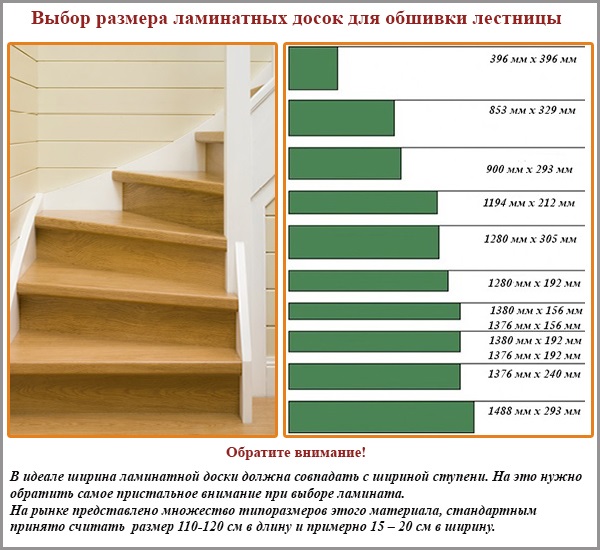
The second characteristic, important for finishing the stairs, is the width of the laminated lamellas. Ideally, one laminate board in width should cover the entire plane of the tread or riser. Otherwise, if the step is wider, for finishing you will have to use several lamellas and connect them with locks. The surface thus finished is less durable than completely monolithic. If marches (platforms) of castle connections are provided in the staircase, one cannot avoid. In these areas, the laminate is laid in the usual way, that is, the castle is locked.
Types of edge profile (molding)
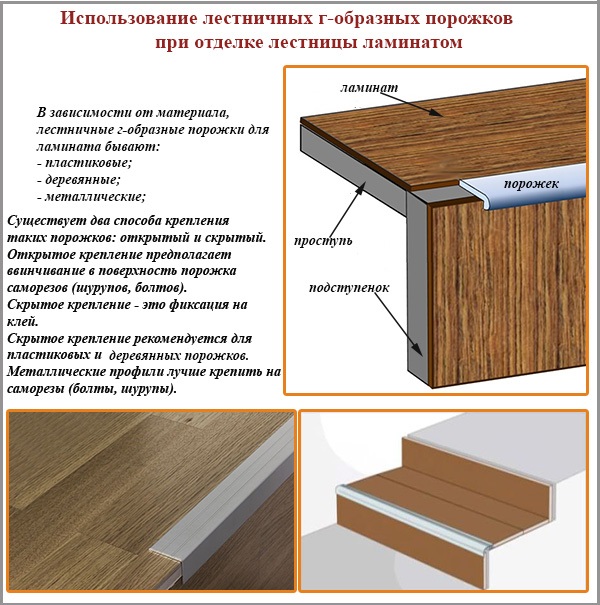
In addition to the laminate, the most important element of the staircase lining is the edge profile or molding. This is the name of the overhead convex bar, which decorates the edge angle of the step. What is the function of molding? Everything is very simple. When finishing the stairs, two laminate strips, laid on the tread and risers, are joined together. An unaesthetic angle is formed, exposing the cross-section of two lamellas. To cover this joint and at the same time strengthen the strength of the laminate, edge profiles are used. They are laid on top of the joint, fixed with glue or screws.
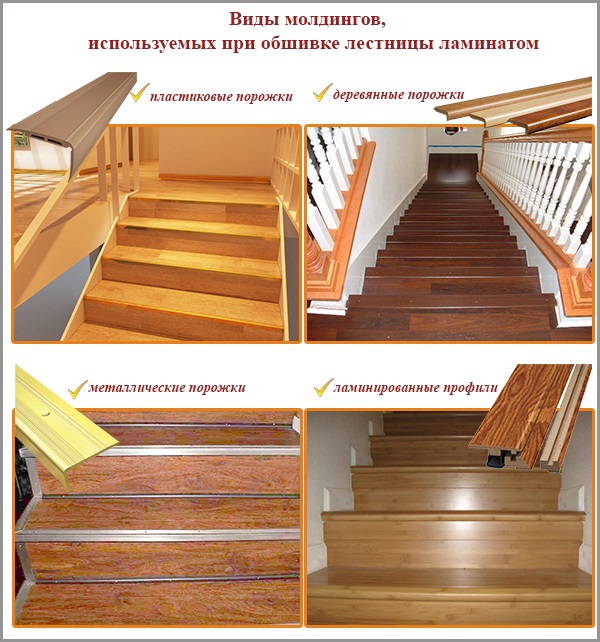
Conventional metal L-shaped sills made of metal are often used as an edge profile. They are also called stairwells. These sills can be made of aluminum, steel, brass. They are popular in gold, bronze, steel or wood.
Metal moldings have not only a decorative effect. They protect the edges of steps from wear. In addition, the surface of such a profile is often corrugated and this gives the surface of the steps an additional anti-slip effect.
Plastic sills - look like corners of different colors. You can easily choose the color for the existing laminate flooring. Plastic sills perfectly protect the edges of the steps, form an even angle, hide irregularities. They differ from other stairwells by a small price. They are mainly attached to glue, so special attention should be paid to the choice of high-quality durable glue when installing plastic sills.
Wooden sills are another option. These guns go well with laminate, have a long shelf life (in addition, they lend themselves to minor repairs - grinding, puttying, painting). The disadvantage of wooden moldings is the high price. Fastening is carried out either on glue or on self-tapping screws (bolts).
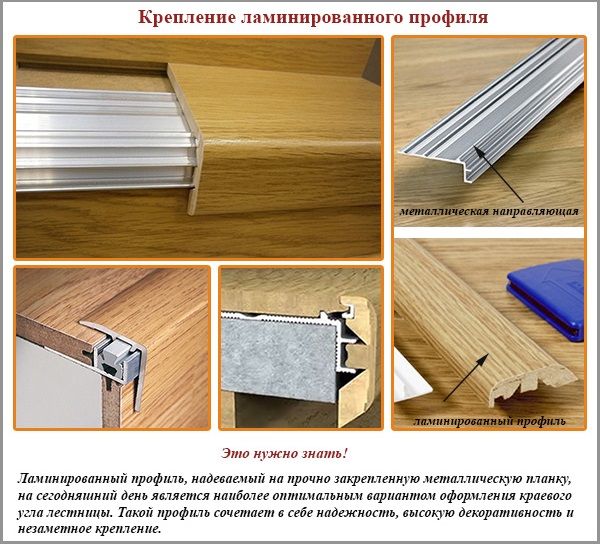
In addition to the usual corner sills, there are also special laminated profiles that are attached to the step with metal guides. For example, similar Incizo profiles from Quick Step (Belgium) are widely known. To install such a profile, a special l-shaped aluminum bar is used, available in several sizes (the height of the bar from Quick Step is 7, 8 and 9.5 cm).
To install the edge profile of this type, a metal guide bar is attached to the surface of the step with the help of screws. And then, in its grooves, a laminated profile (for glue) is inserted. Thus, the profile fixation is obtained as strong as possible, while managing to do without the metal fasteners visible on the surface.
Step-by-step briefing on the work
Consider the full technology of lining the stairs with a laminate, taking into account the installation of the edge profile.
Method # 1. Using a custom profile
1. If there is an old coating on the steps, it must be removed. Linoleum, carpet, old paint - everything is subject to liquidation. They also clean traces of glue and grease. Remove nails, staples, screws.
If the initial form of the step implies the presence of a protrusion (the tread hangs over the riser), then it can be cut with a jigsaw. Or close the space under the steps by fixing several bars on the vertical plane of the riser, and on top of them - a sheet of plywood.
The surface of the concrete staircase is evened if possible. Potholes, irregularities are filled with cement mortar (if the gaps are large - concrete). Then, after the solution has dried, the surface is ground with sanding paper. To remove cement dust, the steps are vacuum cleaned and then wiped with a damp cloth. For more tight adhesion of the glue, a primer layer is applied to the concrete surface with a roller or a wide brush (mclavice).
With a wooden staircase, which they plan to sheathe with a laminate, things are different. First, all supporting elements are checked for squeaks, loosening, sagging. If something from this list has a place to be, they sort through the structural details - remove them (in some cases, replace them with new ones) and fix it again, more tightly. Cracks, cracks, cavities are filled with putty on wood.
2. Measure the length and width of the step (tread and riser), transfer these sizes to the laminate board. Cut (grinder, jigsaw, etc.) blanks along the marked lines. All panels obtained are numbered so as not to confuse in the future, for which stage this or that workpiece is intended.
3. Begin fixing the laminate from the upper step. Thus, during the installation process, the worker will move down without stepping on the newly laid lamellas (respectively, without moving them until the glue completely dries).
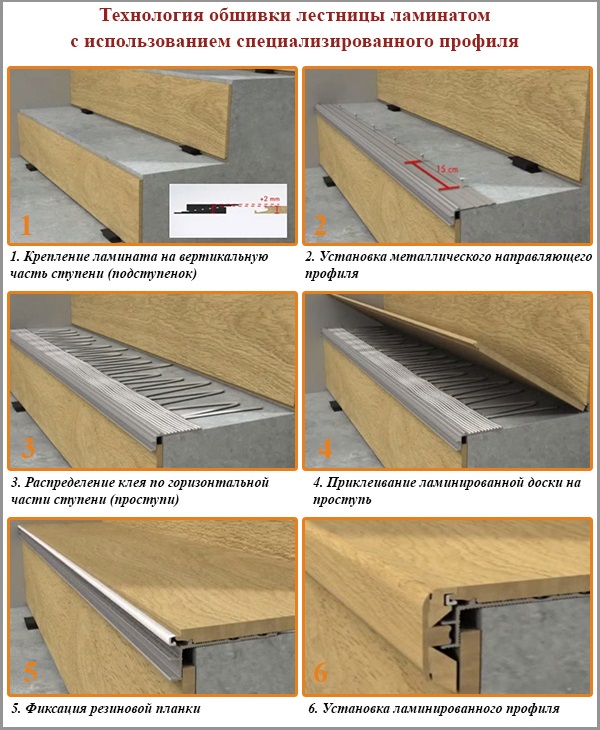
First, glue is applied to the riser (the vertical part of the step), a laminate board is placed on the surface, and it is pressed tightly to fix it. Between the surface of the next step and the attached riser board, a small distance should remain equal to the thickness of the laminate used.This gap is necessary so that it is possible to push the underlying tread board (horizontal part of the step) under the riser board. The clearance is arranged by installing support pads under the riser vertical board (for example, bars or special gaskets).
4. Adhesive is applied to the back of the metal guide profile. The profile is laid on top of the step, on its edge, and pressed to the surface. In this case, adhesive bonding is not enough. Therefore, the upper profile bar is additionally fixed on the tread with screws. They are screwed in every 15 cm.
5. Glue is applied to the tread, evenly distribute it on the surface with a notched trowel.
6. From above on a tread horizontally lay a laminate board. If this is the first tread flush with the floor, the lamella steps are connected to the rest of the laminated flooring traditionally - castle to castle. Subsequent tread boards are pushed under the overlying vertical risers.
7. A rubber insert is installed in the elements of the edge profile. The method of this installation will depend on the type of laminate profile selected. In some cases, a rubber insert is put on the spike of a tread board. In other cases, the rubber insert is installed in the groove of the laminated profile itself.
8. All grooves of the laminated edge profile are filled with glue. Put the profile on the metal guide and rubber insert. The part must firmly “fall into place” so that there are no gaps between it and the transition metal profile.
9. All stages of the finishing work are repeated for each subsequent step. That is, each step is sheathed sequentially, gradually moving towards the base of the stairs. The finishing sequence can be changed, performing each type of work in sequence. First, all risers are fixed, then all metal profiles, then tread boards and laminated edge profiles.
10. It is not recommended to walk on newly fixed lamellas for at least 24 hours, until the glue has completely dried. It should be remembered that the main fastening of the elements of the laminate flooring on the stairs is glue, requiring time to gain strength.
Method # 2. Using L-shaped sills
This option is simpler, although the result of the cladding may be slightly worse (in terms of decorative effect and strength).
1. Perform the preparation of the surfaces of the stairs (cleaning of the old coating, cleaning, dust removal, if necessary - leveling and hardening of the elements).
2. Measure the length and width of each step, transfer the dimensions to the laminate boards. Cut blanks and number them.
3. Apply glue to the riser, distribute it with a notched trowel. Glue the laminated board to the surface. The dimensions of the board should be such that the bottom edge does not reach the underlying step. That is, it is necessary to form a gap equal to the thickness of the laminate used.
4. Apply glue to the horizontal plane of the tread, evenly distribute it with a notched trowel to a thin film. Press the prepared lamella to the step.
5. At the edge of the step, the selected nut is fixed. The metal nut is fixed with screws that are screwed into special mounting holes. Plastic sills are fixed using adhesive bonding (Liquid Nails glue is especially popular). Wooden moldings - universal mounts, can be mounted in any way.
6. The same work is performed for all underlying steps.
7. After finishing the lining, you can walk up the stairs only after 24 hours. If the edge profiles are held exclusively on the adhesive joint, it is advisable to increase the exposure time to two days. In this case, you can be sure that the cladding elements are qualitatively fixed.
Method # 3. Quick Step + Incizo
The technology of lining the stairs with a laminate, using the Quick Step material and Incizo profile as an example, is presented in the video:

4 comments