
Aligning the floor of a balcony: an overview of the best methods for creating a flat surface
The floor on the balcony (loggia) in most city apartments is a concrete slab without decoration. This means that during the improvement of the balcony a considerable part of the costs and time will have to be devoted to leveling the floor and preparing it for laying the finish coating. Let's figure out how to do it yourself.
Content
What materials can be used?
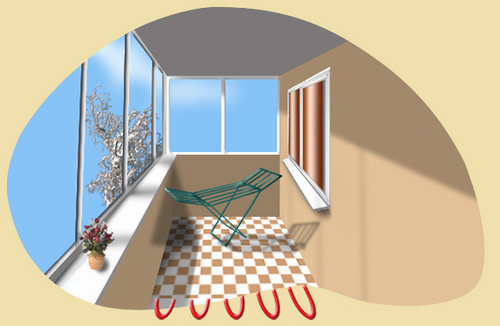
If the balcony is qualitatively glazed, insulated and heated by radiators or using the underfloor heating system, then any materials for leveling and surface finishing can be chosen. The same as in the living rooms.
A glazed balcony without heating is also protected from precipitation, but is subject to temperature changes, which can affect the appearance of condensation. Therefore, it is recommended to use moisture resistant materials for such rooms. For leveling the floor, plywood, GVL, moisture-proof drywall, DSP, OSB, screeds are suitable. Linoleum, tile, carpet, and moisture-resistant laminate (class 33-34) are used as finishing.

The most difficult case is an open balcony, on the floor of which rain and snow fall, and in winter subzero temperatures reign. You can level these floors with screeds, DSP sheets, OSB. Finishing coatings: ceramic tiles, porcelain tiles, decking.

It is very important to remember that a balcony is a stove, the three sides of which are suspended. It is undesirable to overload it. Therefore, the floor structure on the balcony should be as light as possible. If leveling requires raising the floor by 20 cm, do not use a heavy cement screed for this. Give preference to the floors on the logs, which practically do not load the stove. Cement screeds are good if the floor needs to be leveled by 3-5 cm and no more.
How to determine the level of clean floor?
When they decided on the material, another question arises: to what level should the floor be leveled? You can use the water level (spirit level). To do this, put the risk in an arbitrary place on the wall of the balcony, using the spirit level make marks at the same level on other walls. On the received points draw a line (horizon). In the highest places of the floor (determined visually) measure the distance to the horizon. The thickness of the floor structure is subtracted from the smallest measurement and the obtained distance from the horizon to the floor is set aside. Guided by this point, using the water level, note the level of "clean floor".

Easier to use laser level. It is enough to install it in the highest corner of the balcony, turn it on and he himself, using laser dots or lines, will indicate an even horizontal. On it, and you need to equal when installing the floor.
Home masters often use the usual bubble level to create a horizontal line. You need to act like this: by eye determine the highest angle of the room, put a mark on the floor. From the obtained mark up, measure the height of the floor structure. Using a level, draw a straight line around the mark, extending it around the perimeter of the balcony. However, this method has too much error, therefore it is not used for high-quality alignment.
For open balconies, it is recommended to perform floors with a slope towards the street (from the wall of the house) to ensure the flow of atmospheric moisture. Enough 1 cm slope per 1 m of the width of the balcony.
Cement screed leveling
This is one of the most reliable ways to obtain a flat and durable surface. It is used if the height of the necessary alignment is 3-5 cm. The screed less than 3 cm is unstable and, with a high probability, will quickly crack. At the same time, a screed thicker than 5 cm will unnecessarily overload the balcony floor.
Materials and tools necessary for work:
- waterproofing primer for concrete;
- cement, sand or ready-mixes (cement mortar or sand concrete);
- beacons, formwork boards - if necessary;
- building level;
- metal rule;
- trowel (for laying out or kneading the solution);
- mixer;
- brush or roller (for primer).
The technology of work is as follows. They remove garbage, clean the surface of dust, oil stains, breakaway parts of concrete. All cracks are closed with cement or gypsum mortar. Then a primer is applied to the surface, which will enhance the adhesion of the screed to the concrete slab and additionally play the role of a waterproofing agent.
If the balcony is open, with a lattice fence, then, to prevent the screed from spreading, temporary formwork is installed along the edge of the slab. Most often, its role is played by thin boards or plywood. The balcony with a monolithic fence does not need formwork.
Then set the lighthouses. They are long metal guides with a reinforced profile. They are cut into pieces equal to the length of the balcony, and installed every 50-60 cm. The top of the lighthouses should coincide with the upper level of the planned screed. For standard narrow balconies, it is enough to use 2 beacons.
Lighthouses are fixed on a cement or gypsum mortar, carefully checking their horizontal level. After 2-3 hours, after the mortar hardens, the beacons will be ready for pouring screed.
When screeding on a small balcony, formwork boards can play the role of guides, the top of which is trimmed to the desired level.
Then the cement mortar is mixed for the screed. The optimum ratio of cement to sand is 1: 3. So much water is needed to make the solution look like thick sour cream, on average, 2 l of water is required for 10 kg of dry mix. The components are mixed either manually (using a trowel) or with a mixer. Of course, it is more convenient to use the finished mixture - you do not need to calibrate the components, just mix the mixture with water and mix.
Now pour the solution onto the floor. The metal rule equalizes the solution, pulling it along the beacons. In hot and dry weather, a wet screed is covered with foil or burlap. This will prevent quick drying of the solution and the appearance of cracks.

After 1-2 days, the formwork is removed. If necessary, take out the beacons (you can leave them in the screed). Paths from lighthouses and gaps remaining from the formwork along the edges of the screed are covered with a thick cement mortar. The surface is leveled with a grater (foam or wooden). After 1-3 weeks, the final coating is laid on the finished screed: linoleum, laminate, tile, decking, etc.
Leveling the floor with self-leveling mortar
If the existing bumps on the concrete floor are less than 3 cm, then a conventional cement screed is not advisable. Most likely it is cracking. There is a more reliable way to make a thin, absolutely even and smooth surface - use self-leveling solutions. The thickness of such screeds can vary from 3 mm to 3 cm.
For the device of a self-leveling screed, you need: a primer, a self-leveling mixture, a spatula, a brush or a roller (for priming), a needle roller (for deaerating the screed) and a mixer.

Alignment occurs as follows:
- The floor is cleaned of chips, paint, greasy and oil stains. Cracks in the floor, between the slab and the walls close up.Dust the surface with a vacuum cleaner - construction or household.
- The cleaned floor is primed with a brush or roller. According to the instructions, the primer gains strength for 4-6 hours. It is advisable to withstand this interval before moving on to the next stage of work. Despite the fact that the primer dries much faster - in the summer in 1-2 hours.
- Close the leveling mixture with water, mix with a mixer until a liquid, flowing state.
- Pour the mixture onto the floor, try to distribute it evenly. Level the screed with a metal spatula.
- Rolled on a liquid surface with a needle roller to remove air bubbles from the mixture.
- Such a screed freezes for 1-2 days, after which you can walk on it. Finishing is performed only after 1-2 weeks, according to the recommendations of manufacturers of specific mixtures.
How to level the floor using this technology, see the video:
Dry screed
A dry screed on the balcony will help you out if you need to not only level, but also insulate the floor. At the same time, there is no desire to interrupt the technological process while the cement mortar is setting. Dry screed is ready for further decoration immediately after its creation. Another advantage is the installation speed. On the balcony, dry screeding will take only a few hours.
To install a dry screed, you will need to purchase: bulk thermal insulation material - expanded clay (or coarse sand, slag), floor base elements (GSP, GVL, TsSP, OSB), plastic film (waterproofing), self-tapping screws, edging tape (made of foamed polyethylene), adhesive tape or masking tape, U-shaped profiles as beacons, grater and rule.

Technology for creating dry screed:
- Perform floor preparation. They clean it from debris and dust. Cracks close up with cement mortar. The cracks between the slab and the walls are filled with foam.
- Along the perimeter of the walls, an edge (damper) tape is laid, performing the role of soundproofing material. If you skip this installation step, then the floor base slabs will make quite noisy sounds in contact with the walls.
- Proceed to waterproofing. For this, a plastic film is laid on a concrete slab, winding it over the walls 6-10 cm above the level of the future floor. The edges of the film are fixed with tape.
- Install beacons - thick-walled U-shaped profiles that will help more accurately level the expanded clay layer. They are laid on the floor along long walls without fastening, with the wide (supporting) side down, the horizontal is checked by the rule. The level of the upper edges of the profiles should coincide with the planned level of expanded clay layer.
- Expanded clay is poured between the profiles with a layer of 3-7 cm. Stretching the rule along the beacons, the resulting surface is leveled. The remaining irregularities are smoothed with a grater. To move along the expanded clay layer, “pedestrian paths” are used from square sheets of plywood or gypsum fiber laid in the form of paths.
- Lay the coating slabs. To be able to connect them together (they will not be attached to the floor!), Use slabs with grooves. They are laid, as tightly pressing against the wall. Then the design will be able to withstand any load no worse than a concrete screed. Joints in grooves are glued with construction glue and fastened with self-tapping screws in increments of 5-10 cm.
- The parts of the edge tape and plastic film rising above the floor are cut off according to the level of the coating plates.
This technology is step-by-step reproduced in the video plot:
Leveling the floor with a lag
This method will help to level, raise and warm the floor. And at the same time practically do not load the concrete base of the balcony. According to technology, a battens lath is made on the floor, which is sewn on top with boards or plate material. Inside this floor, you can lay any communications, waterproofing and insulation.
Necessary materials: timber, insulation (mineral wool, polystyrene foam, expanded clay), waterproofing film (optional), self-tapping screws, dowels, lag sheathing material (boards, plywood, OSB, GVL, GSP).

Alignment is performed according to the following plan:
- Remove debris and dust from the concrete surface using a broom and vacuum cleaner (building or household).
- If there is an open space or an unglazed neighbor's balcony under the concrete slab of the balcony, it is necessary to waterproof the floor. To do this, lay a plastic film on the floor, the edges lead to the walls. Instead of a film, you can use combined materials that simultaneously play the role of hydro and thermal insulators. A known similar material is penofol.
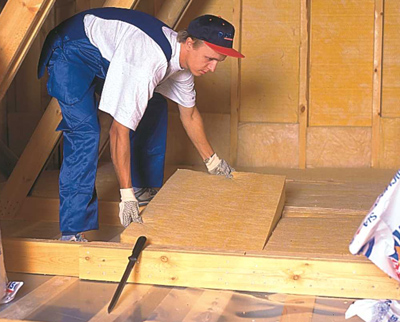
- On top of the waterproofing, logs are fixed - wooden bars. Usually using bars with a cross section of 50x50 mm, but this size can be adjusted depending on the height of the planned floor structure. If it is necessary to increase it, it is allowed to stack the bars in several tiers in height, fixing them together with self-tapping screws. Logs are fixed to the floor with dowels in increments of 40-50 cm. The distance from the extreme bars to the walls can withstand about 5-10 cm.
- Between the bars lay insulation. If the balcony is open, then in this quality it is better to use polystyrene or expanded clay. On the glazed balcony, you can use all modern insulation: glass wool, basalt cotton wool, EPSS, etc. When laying the insulation, you should leave as few cracks as possible, which will lead to the appearance of cold bridges.
- On top of the logs are sewn up with finishing material: dowel boards, plywood, DSP, GVL, GSP, OSB.
How to make a floor on the lags will tell and show the master:
After leveling is completed, the finishing finish can be laid on the rough floor: carpet, laminate, linoleum, tile, terrace board.

4 comments