Arrangement of a ground floor with underground: we make a technical room under the house
To obtain additional usable area in a country house (in the country), underground is often equipped under a traditional wooden floor. This is the name of the free closed space located between the foundation, soil and the rough floor of the room. The depth of the underground rarely exceeds 1 m (usually 50-60 cm), this differs from the larger cellars.
Underground floors with underground make it possible to solve many important problems that make life in the house more comfortable.
Content
The functions of such an underground
A properly equipped underground can be used for:
- laying communication pipes - as a technical room;
- storage of vegetables, preservation, household equipment, etc .;
- simplification of construction during the construction of houses in areas with a slope, with a high level of groundwater, with a high probability of flooding.
Types of underground rooms
The underground can be warm and cold. For cottages and houses that are not heated in the winter, a cold underground with an insulated floor overlap is preferable. The temperature of such a subfloor does not depend on the temperature in the room (above the floor) and, to a greater extent, is determined by outdoor climatic conditions. There is no air exchange with the room and the underground. Ventilation is carried out due to the ventilation in the base.

Underfloor heating is arranged in heated houses. Its temperature is directly related to the temperature in the room, thanks to the ventilation holes in the floor. To limit heat loss, the inner side of the cap is insulated.
In unheated rooms in the winter, it is unreasonable to make a warm underground. In winter, the soil will begin to freeze, causing floor deformations. The depth of the warm subfloor is usually 15-25 cm. With a greater depth, heat loss increases, with a smaller depth, ventilation worsens.

Consider the process of arranging the floor with the underground, paying attention to the differences between the cold and warm options.
Technology of work
The underground is usually arranged under the floor of a corridor, kitchen or veranda.
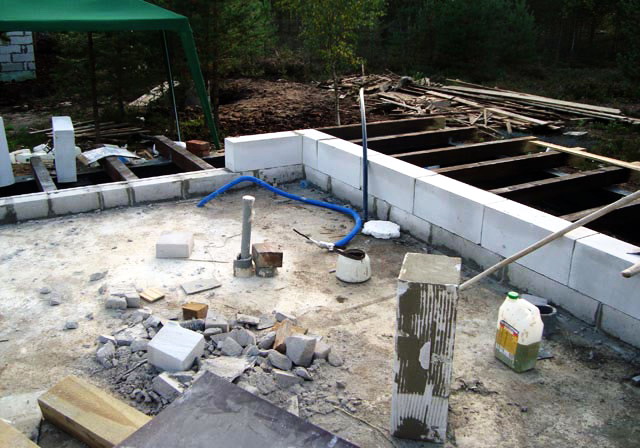
Step 1. Excavation
First, cut off the vegetative layer of soil, dig a pit of the required depth (20-30 cm more than the planned depth of the underground). The ground surface is rammed.
Step # 2. Waterproofing
On moist soils, waterproofing underground. To do this, put waterproofing material in 2 layers on compacted soil. Roofing material is most preferred; a dense plastic film, hydroisol, etc. are also suitable. Instead of rolled waterproofing, oily clay can be used. It is poured onto the ground and rammed, creating a kind of "castle" to protect against penetration of moisture into the underground space.
Step # 3. Foundation preparation
The waterproofing is covered with a layer of dry sand, 5-10 cm thick. Tamping is carried out. A layer of crushed stone, 10-15 cm thick, is poured over the sand and also tamped.
In this case, the crushed stone pillow will serve as the basis of the underground. But, when using the underground as a storehouse for vegetables, preservation or other things, a screed made of lean concrete is a more suitable base. It is poured over the rubble, leveled with a level.
Step # 4. Installation of columns
On the crushed stone or concrete layer, columns are set up on which logs will be laid in the future. Columns 25x25 cm in size are laid out of clay bricks, using cement mortar of grade M10 or more for masonry. Other practical options: columns cast from M75 concrete, or prefabricated metal supports. Less durable and practical columns can be made of wooden logs d = 200-300mm. Before installation, they are impregnated with antiseptics or burned.
The columns are set in several rows (at least 2 rows) with a step along the axes of 70-90 cm. The distance between the rows is 100-120 cm.
So that the log wood in the place of contact with the supports does not decay, a two-layer waterproofing of roofing material or roofing material is arranged on the upper platform of each column. On top of the laying pad, a board pre-treated with an antiseptic. The edges of the roofing material should protrude 30-40 mm from under the plank.
Step # 5. Lag mount
As a log, bars are used with a thickness of 4-7 cm, a height of 10-20 cm. They are put up with an edge on the supporting boards, horizontal level is controlled. To fix the lag on the columns, it is most convenient to use metal corners and dowels. Mounting is performed as follows: the corner is attached to the lag with one edge, and to the support with the other edge. On each column 2 corners are fixed.

Step # 6. Plank flooring
Overlapping boards are laid across fixed lags. You can use both a regular, edged board and grooved.
Flooring from edged boards is as follows:
- The first board is placed at a distance of 1 cm from the wall on the logs. At the intersection of each log with the board, 2 nails are hammered or screws are screwed in. Hats completely "sink".
- The second board is applied to the first, rallied with brackets or a jack. Then fasten with nails or self-tapping screws. If the subfloor flooring is performed, then there is no need to unite the boards at all, moreover, it is allowed to leave 1-2 mm gaps between them. Such a rough floor is subsequently blocked by dowel boards, plywood, etc.
- The rest of the boards are laid in a similar way, the last of which is laid at a distance of 1 cm from the wall.
Dowel boards are laid like this:
- The first board is applied with a comb to the wall, leaving a deformation gap of 10 cm. Fix it to the logs with screws (nails), screwing them vertically through the front side of the board.
- The second board is combined with the first, by installing the comb in the groove. Collect in the same way several boards (4-5), without fastening.
- On the fifth board, rallying is done using brackets or a jack. A screw lying on each lag is screwed into a ridge at an angle of 45 °. The board is fixed on the lag. Such fastening of only 4-5 boards is temporary and is carried out until the groove of the grooved floor is fully acclimatized. After six months (approximately), such a floor is ceased anew, fixing and rallying each board.
- The last board must be fixed with self-tapping screws (nails) in the same way as the first.
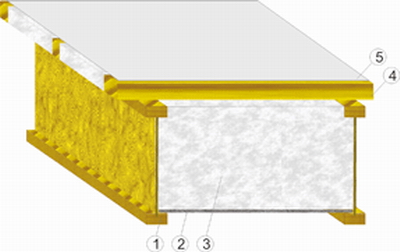
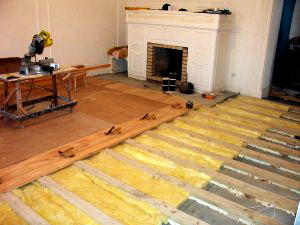
When installing a cold underground, the floor structure is insulated. To do this, between any rough and fair flooring lay any of modern insulation: polystyrene foam, glass wool, stone wool, etc.

Step # 7. Hatch device
To provide access to the underground space, the floor structure is complemented by a hatch with a cover.
On the board flooring, the contours of the hatch are outlined. The usual sizes are 50x60 cm, but, if desired, they can be adjusted in different directions. The underground entrance should be located between the lags. To cut the hatch, a hole of about 10 mm is drilled in the corner of the outlined rectangle. This is necessary to install the jigsaw file and perform the planned cut. Having cut out the boards, support bars are stuffed on the sides of the hatch.
The manhole cover is usually made of the same cut boards stuffed on a frame of bars.Mounting is performed on metal hinges.

Step # 8 Ventilation equipment
Underground ventilation equipment avoids dampness, which is a breeding ground for various fungal formations, including mold and house fungus.
For a warm underground, the ventilation problem is solved simply: in the floor, at diametrically opposite corners of the room, two ventilation holes are cut out and closed with grilles. Dimensions - 10x10 cm. The holes are cut out at the junction of two boards so that the size of the recesses is approximately the same. Then the strength of the wood flooring will not be affected.
Ventilation openings should allow free air circulation. Therefore, the places of their tie-in cannot be blocked by furniture and other objects.
It is also possible to ventilate using conventional skirting boards mounted on the wall just above floor level. A gap of 1-2 mm along the entire length of the floor will provide air circulation between the underground and the room. However, this option is not too common. This is due to the fact that the underground in this case is partially open. Dust from concrete and soil settling underground will fall into the living room. And this is not too hygienic.
Ventilation through skirting boards is possible through cut-out window openings covered with metal plates with holes. On the back side of the plinth, along its entire length, a longitudinal groove 1 mm deep, 4-6 cm wide is provided. Windows 4-5 cm long are cut through this groove. It is enough to make two windows on two opposite skirting boards to provide ventilation in the underground with an area of 15-20 m2. The windows are covered with trellised plates of their copper or bronze. They are fixed to the skirting boards with the help of metal screws.
In a room with central heating, vents in the skirting boards can be effectively located under the existing batteries (radiators) and on the wall opposite to them. Air from the underground rises through the window in the baseboard, reaches the battery, heats up, rises up and moves to the opposite wall. Then the air stream cools and falls to the floor, again returning underground through the skirting window.
Ventilation of the cold underground is arranged differently. To do this, provide holes in the base, made every 2-3 m of the wall. In order to prevent mice from entering the underground, the products are blocked with gratings with cells of no more than 5-8 mm. The grids are fastened with dowels and screws.
In winter cold, it is recommended to close the vents with wooden corks or insulation (for example, mineral wool). However, it is not worth it to close the holes tightly, air should continue to circulate a little bit underground.
Sometimes, even the presence of products, does not give the desired results and moisture accumulates in the underground. Fungi appear that destroy the wooden floor. There is also dampness in the room, which negatively affects the microclimate. In this case, the air circulation through the vents must be strengthened. For a single case of moisture entering the underground, a temporary method is suitable that quickly dries the surface. If humidity comes from the soil, it is necessary to strengthen the ventilation draft using constantly acting methods.

The temporary express method consists in securing the “window” fans to the products. They can also be used for the duration of the stay in the house in order to dismantle in the winter.
A permanent solution may mean installing several ventilation ducts on the windy sides of the house. Such boxes are made of tin or plastic pipes. Moreover, the higher the box, the stronger the draft pumped by it and the more efficient air circulation.
Remember that high-quality ventilation of the underground space increases the durability of the basement and, consequently, the whole house.Repairing the design of the plank floor, basement or flange is a difficult and time-consuming task. So that you do not have to resort to this, regularly monitor the state of the underground, do not allow condensation of moisture, the destruction of support pillars.