Dust removal and hardening of concrete floors: topping and impregnation technologies
A significant drawback of the untreated concrete floor is its tendency to increased dust formation. Its surface layer does not have high strength and begins to crumble with minimal mechanical stress, humidity and temperature. This leads to the formation of cement dust, which settles on the surfaces of the room, furniture and, worst of all, in the human body. In addition, endless dusting is the gradual destruction of the concrete floor, reducing its useful life.
To strengthen the surface layer of concrete and eliminate dust formation, dust removal methods are used. Their main goal is not to eliminate existing dust, but to eliminate the causes of erosion in concrete.
Two basic technologies can be used to harden concrete surfaces: topping (applying dry hardening mixtures to fresh concrete) and impregnation with reinforcing compounds.
Both of these methods are effective against cracking, dusting, weathering and emergence of efflorescences on a concrete surface.
Content
Topping - dust removal by dry mixes
The topping technology is very similar to the “ironing” known to every builder - rubbing dry cement into concrete that has not yet hardened. The essence of topping is almost the same, only instead of cement a multicomponent mixture-hardener is used. In addition to high-quality Portland cement, it includes fine-grained fillers and chemical additives that make the surface layer of concrete less porous and more durable.
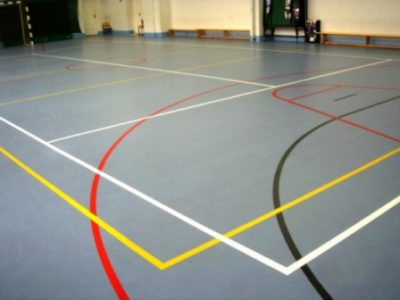
Fine-grained fillers, which are part of the topping mixtures, can paint the floor surface in different colors: gray, green, yellow, blue, red, brown, black.

Types of topping mixes
Depending on the nature of the fillers, topping mixtures are combined into several groups:
- quartz;
- corundum;
- metallized.
Quartz hardeners are the most popular and inexpensive. The filler in these compositions is quartz sand, specially purified and, if necessary, decorative effect, painted with colored pigments.
The use of quartz topping can increase the surface strength of concrete by 1.5 times. This is sufficient for the subsequent long-term operation of concrete floors experiencing moderate stress.
Quartz topping is considered universal in most cases. It is used everywhere in workshops, warehouses, shopping centers, educational institutions, hotel halls, etc. In residential construction, quartz topping is used in rooms with high humidity or heavy load on the floors. For example, in gyms, baths, pools, etc.
Corundum hardeners are more effective, capable of increasing the floor resistance to mechanical loads by 1.6-1.8 times, and to abrasion - up to 2 times. They use high-strength corundum crumb (filler), resistant to abrasion and abrasion.It gives the concrete surface a matte, elegant sheen.
Corundum topping is used for concrete surfaces that are subjected to heavy loads. This happens in rooms with massive equipment installed, where vehicles move or there is a large crowd of people. For example, in warehouses, gas stations, car parks, in gyms or social facilities.
Metallic hardeners - topping with metal chips. These mixtures are the strongest, they increase the strength of the concrete surface by 2 times.
Metal topping has found its application in rooms where floors experience strong mechanical or vibration loads, where massive traffic is possible or heavy equipment is installed. For example, in production halls, warehouses. In residential and social premises, metal topping is not used, due to possible corrosion processes on hardened concrete surface.
Topping Technology: Strengthening Mix Application Scheme
Topping is a rather complicated technology that requires experience and the use of special equipment. At the slightest error, the following strains can be observed: cracking, peeling of the topping crust, abrasion of the upper layer. Therefore, it is better to entrust this work to professionals.

Topping can be used only on a high-quality reinforced concrete poured with high-quality concrete (not lower than M300). The hardener is applied to fresh concrete that has not had time to harden, but has already set. Typically, work begins 5-8 hours after installation. At this time, you can already walk on the floor, but fingerprints remain on it. Their depth should be no more than 3-5 mm.
Creating a reinforced concrete layer using topping:
- A hardener is scattered on the concrete surface - approximately 65% of the total volume. The distribution is carried out manually or using a loose trolley.
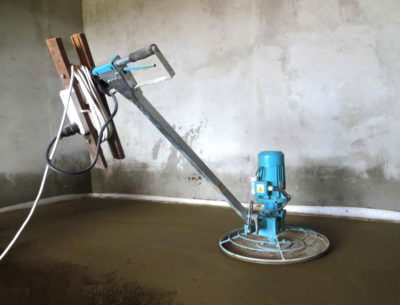
- When the mixture is saturated with moisture and darkens, the concrete surface is smoothed with one-rotor or two-rotor trowels (“helicopters”). Machine disks rub the mixture into the concrete structure until completely absorbed.
- Without a technological break, the remainder of the topping is applied to the surface (35%). This must be done immediately so that moisture remains on the concrete surface.
- Wipe the surface again.
- After 2 hours, the concrete surface is grinded with the same trowels, installing grinding blades instead of trowels. After that, the surface of the concrete floor acquires a soft matte sheen.
- A special impregnation (curing) is applied to the surface.
- To prevent the concrete surface from cracking during the drying process, it is covered with plastic wrap.
- After 1-2 days, when the concrete finally hardens, compensation (shrink) seams are cut out on its surface with a seam cutter or grinder (with a diamond disk). Usually they are cut into 6x6 m squares, 1/3 of the depth of the plate thickness, 10-15 mm wide.
- After 14-28 days, the joints are filled with polyurethane sealant.
Here's how it looks in the pictures:

You can also watch a video in which the main technological moments are described:
Impregnation - quick dedusting compounds
If it is recommended to give topping to work by professional builders, then everyone can soak a ready-made frozen concrete floor with special reinforcing impregnations.

Surface preparation for impregnation
To begin with, it should be understood that applying any impregnation requires preliminary preparation of the concrete base. Otherwise, the composition will not be able to penetrate to the required depth in the structure of concrete.
Concrete floor preparation is simple, but painstaking and time-consuming. It consists of several operations following each other:
- All floor coverings are removed from concrete floors.If these were materials tightly adhering to the floor (linoleum, carpet, relin, laminate), then the next step of preparation can be started immediately after their removal. After dismantling the coating that is not directly adjacent to the concrete (plank floor, parquet), you will need to wait about a day until the raised dust settles. If the concrete has just been laid, then only acrylic impregnation is allowed on it. Other types of impregnation require exposure to the concrete coating for at least 14 days. Colored floors will require even more time - 28 days. After this time, the next stage of preparation begins.
- Vacuum thoroughly the entire surface twice. It is advisable to use not an ordinary vacuum cleaner, but a special construction one - more powerful.
- The floor is washed with plain water using a rag or squeezed squeegee. To begin with, they wash the entire surface, removing particles of cement and dust. Then, after drying, the floor is wiped again.
- Perform final dry cleaning with a vacuum cleaner. Thoroughly vacuum the washed and dried base twice.
Thus, before applying the impregnation, the concrete surface needs high-quality cleaning. If necessary, add to the process sanding the floor.
What are the impregnations?
Dust removal impregnations are divided into inorganic and organic. Inorganic means one type of impregnation - based on fluorosilicates (fluates). Organic compounds are more diverse. This group includes acrylic, polyurethane and epoxy impregnations.
Inorganic impregnations (fluates) enter into a chemical reaction with the components of concrete, namely with lime (which is perceived as dust) and turn it into strong calcium fluoride. That is, fluates change the chemical formula of the surface of concrete, converting soluble compounds to insoluble. The impregnated concrete layer becomes more durable and water resistant.
Organic impregnations act differently. They fill micropores and cracks in concrete or form a strong film on the surface. The structure of concrete becomes denser and stronger, the surface becomes waterproof.
Concrete floatation
Fluate impregnation (fluating) is used if the concrete surface is subsequently painted. Fluates act on soluble calcareous compounds of concrete and turn them into insoluble inert compounds of increased strength. At the same time, the fluates do not seal the surface, it remains vapor-permeable, concrete continues to “breathe”.
Changes in the surface layer of concrete during processing with fluates:
- strength increases;
- dust formation decreases;
- abrasion decreases;
- resistance to aggressive chemicals increases;
- absorbency is reduced;
- frost resistance increases.
It is worth emphasizing that fluating significantly reduces dust formation, but does not completely eliminate it. In order to dedust the surface as much as possible, it is recommended in addition to cover the flated layer with polymer impregnations.

Concrete Fluating Technology:
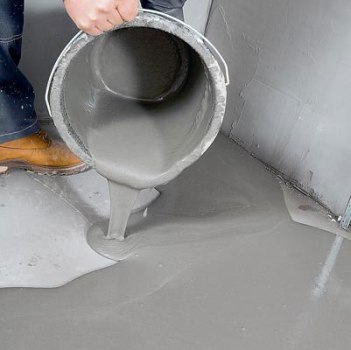
The flotating composition is diluted with water, according to the instructions. In advance, you need to calculate the amount of the finished solution, which will be necessary for the work. On average, this is 150-200 ml per 1m2 surface. The resulting solution is poured onto the floor and evenly distributed over the surface with brushes, rubber mops, rubber scrapers. Rub in the fluid until the concrete surface is completely saturated.
If the work is carried out in dry and hot conditions, the fluated surface is covered with a film. This is done so that the composition does not dry too quickly, otherwise its positive properties will be reduced. On average, surface fluids dry for 1.5-2 hours. After a day, a second layer of fluate is applied.
After the second layer has dried, that is, after another day, it is possible to begin operation of the base.But laying tiles or other finishing coat is allowed to be done only after 7 days.
Acrylic Impregnation
Acrylic impregnations are water, deeply penetrating compounds that form a film on the surface of concrete. This prevents efflorescence, reduces water absorption, provides reliable dust removal.
Acrylic impregnations are considered the weakest. They can only be used if the concrete floors are subject to light loads.
Properties of acrylic impregnation:
- give extra strength to the concrete floor;
- dedusting;
- increase the chemical resistance of concrete;
- reduce water absorption;
- simplify surface care.
The scheme for applying acrylic impregnation on a concrete base is very simple. First, the impregnation is applied to the surface with a roller, brush or spray gun. After 30-60 minutes, apply a second layer and wait for drying. At room temperature, the complete drying of the impregnation lasts 3-5 hours.

Polyurethane impregnation
The effect of polyurethane impregnation is based on the ability of its particles to penetrate deeply into the concrete structure, block capillaries and fill microcracks. Upon hardening, the polyurethane mixture remains in the pores of the concrete, takes their shape, without changing its volume.
Polyurethane impregnation is a one-component composition, sold ready to use. Its great advantage lies in the possibility of application at sub-zero temperatures (up to -30 ° C).

After processing with polyurethane impregnation, the top layer of concrete becomes polymer concrete and acquires the following characteristics:
- absolute dust removal;
- wear resistance - increases up to 10 times;
- tightness of the upper layer;
- impact resistance - increases by 2 times;
- rough, non-slippery surface;
- high decorative effect (effect of varnished or "wet" concrete);
- ease of cleaning.
The method of processing concrete with polyurethane impregnation:
- The impregnation is applied with a polyamide roller, densely wetting the surface. Consumption is 150-250 g / m2.
- After drying, the impregnation, which lasts 3-6 hours, is applied another 1-2 layers (with drying after each layer!).
- The finished polymer concrete layer should look like a wet floor. Such a decorative effect means complete saturation with the solution.
Epoxy impregnation
Epoxy impregnation refers to polymers, as well as polyurethane compounds. Therefore, their principle of action is the same. Unlike polyurethane compounds, epoxy impregnations can only be used at positive temperatures.
Epoxy impregnation - two-component, consisting of epoxy resin and hardener. These components are delivered in separate containers. Mix them only before starting work.

After impregnation with an epoxy compound, the concrete base becomes:
- solid and durable;
- dust free;
- frost resistant;
- resistant to abrasion;
- not subject to corrosion and chemicals;
- decorative (with glossy shine);
- easy to clean.
Technology for applying epoxy impregnation:
- The components of epoxy impregnation are mixed - hardener and resin. They are poured into one container and mixed for 5 minutes using a low-speed drill.
- Brush, roller or spray impregnation is applied to the concrete surface. Consumption - 150-200 g / m2.
- After 15 minutes, apply a second layer of impregnation and wait for drying.
Complete drying of the impregnation occurs after 4-6 hours. During this period, the treated surface should be protected from water, otherwise the epoxy layer may become whitish and sticky. It may also interfere with hardening. In these cases, it is recommended to remove the epoxy layer and replace it with a new one.
Safety First
The substances that make up the impregnation are quite aggressive. Therefore, when working with them, it is necessary to use rubber gloves, protective shoes and clothing. For dilution of impregnations, plastic containers are used.
When working with topping mixes, it is also necessary to observe safety measures and use respirators to protect respiratory organs.