
Layout diagrams of pipes for a water heated floor and the connection of an electric floor
The reasons why an increasing number of people refuse the standard heating scheme and prefer a warm floor can be discussed for a long time. This is a more comfortable distribution of heat: the floor is warmer and cooler at the level of the respiratory tract. And the lack of convective flows saturating the air with dust. In addition, the radiator, even of the newest generation, spoils the appearance of the room. Quite rarely, designers manage to create an interior into which the battery fits perfectly. Today, there are two types of underfloor heating: water and electric. Which one you would not choose, it is very important to draw up a diagram of the connection of a warm floor - it is a guarantee of uniform heating of the room to the desired temperature.
Layout options for water floor pipes
Underfloor heating is called a pipe system, hidden under the floor covering. Liquid coolant circulates through the pipes, which heats the room. The main advantage of such a warm floor over an electric counterpart is, of course, profitability.
With this system you can use a natural gas boiler, which is the most economical, a solid fuel boiler, which is very convenient in populated areas that are not connected to the gas pipeline, and even a heat pump is a device that allows you to extract heat from the environment. Moreover, the use of heat pumps with classic heating systems is very problematic.
When choosing a pipe laying scheme, it is important to ensure uniform heating of the entire surface. And for this you need to consider that as you move through the pipes, the coolant gradually cools.
The most common are the following styling methods.
Scheme # 1 - "Snail"
Using this method involves laying pipes in a spiral in two rows. From the entrance to the room, the pipe spirals to the center of the room, and then also returns. In this case, the turns of the return pipe are located between the turns of the direct one.
As a result, we get an alternation of hot and cooled pipes, where the hottest section is adjacent to the coldest. This alternation and allows for uniform heating of the room.

Scheme # 2 - The Snake
As can be seen in the photo, when using this method of laying pipes, the coolant moves in a spiral. Moreover, the farther the floor is from the pipe inlet, the colder it is. You can use this styling scheme only in small rooms (bathroom, toilet, small corridor).

Scheme # 3 - “Meander” or “Double Snake”
This method is a kind of mixture of the first and second. Here the pipe is laid by a snake with a large distance between the turns. Then the return pipe does not return back in a straight line, but is laid with the same snake parallel to the supply pipe.

Whatever layout of pipes you choose, effective operation of the system is possible only in a circuit in which the pipe length does not exceed 100 m.
It should be noted that the water heated floor is suitable only for private houses, or apartments in "new buildings", where its use is provided for by the project of communal utilities. In apartment buildings with a standard heating system, such "alterations" can lead to unpleasant consequences. Passing through a long system of pipes, the coolant cools down significantly, which means that the heating of the next apartment in the riser will noticeably worsen.

Features of connecting an electrical system
Electric underfloor heating is more often used as an off-season heating and is used when central heating is not yet turned on. Its main advantages include:
- Simplicity and speed of installation;
- No need for "wet" processes;
- Relatively low cost;
- Slight rise in floor level.
Unfortunately, there are also disadvantages:
- Electromagnetic radiation - according to manufacturers, it is within normal limits, but additional shielding will not hurt;
- High cost of operation - electricity is much more expensive than other types of fuel;
- The load on the house wiring.
What cables can i use?
The main heating element of such a system is a special cable, which is laid on the floor with a snake and attached to the mounting tape. The connection diagram depends on which cable you choose:
- Single core resistive - the cheapest and easiest type of cable in design. It is a heating core through which current flows. In this case, most of the electricity is converted into heat. The main feature of this type of cable is the need to connect both ends to the mains, which is not always convenient.
- Self-adjusting cable - not conductive conductors are heated here, but special polymer couplings. This cable can rightly be called the most convenient to use, but also the most expensive.
- Two-wire resistive - In addition to the heating core, this cable also contains a conductive one. This will allow you to connect it to the network with only one end, and somewhat reduces the level of the magnetic field.
Note that it is strictly forbidden to lay the resistive cable on the sections of the floor that will be covered with furniture. This will inevitably lead to overheating of the system and its failure.

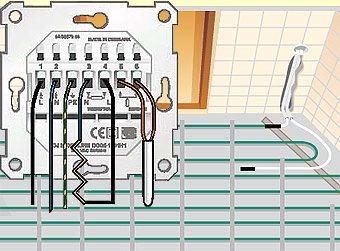
Connecting sensors and thermostats
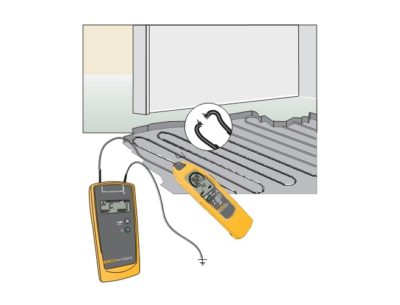
The distance between the turns is determined based on the required specific heating power and cable power. After laying the cable, we install the floor temperature sensor, after protecting it with a corrugated tube.

The sensor is installed in the middle between the turns of the cable at a distance of 0.5 m to a meter from the wall. A vertical piece of wire connecting the sensor to the thermostat is laid in a shtroba.
The first voltage supply to the underfloor heating cables should be done only after the concrete has completely dried - not earlier than after 28 days.

We hope that with the help of this material you figured out how to properly connect everything yourself. If you still have any questions, we suggest you look in our other articles, or if you do not want to do everything yourself, turn to highly qualified specialists for help.

3 comments