
Panel parquet: an overview of the characteristics of the coating and its laying technology
Panel (modular) parquet is an alternative to ordinary piece parquet, used if you want to reduce the time of installation of flooring and save considerable money. In this case, instead of individual wooden planks of piece parquet, boards (modules) are used, on the surface of which a pattern of several wooden staves has already been “typed”. As a result of the installation of such panels, a high-quality wooden floor is obtained that does not differ in performance from piece parquet.
Content
Parquet boards: types and characteristics
So, the shield parquet consists of parquet boards laid on the floor. Each such shield is a multilayer wooden structure having a foundation foundation and a front surface. The basis can be plywood, wooden slats (from coniferous, inexpensive species), chipboard, chipboard. The front surface is formed by parquet planks, rivets made of natural veneer or facing plywood.
Conditionally, depending on the basis, parquet boards are divided into the following types:
- ПЩ 1 - the base is a wooden frame made of bars (the joints in the corners are made on the spikes and glue), inside which the filling rails are fixed on the spikes.
- ПЩ 2 - rack base with double-sided facing from peeled veneer. Veneer is necessary to prevent possible deformation of the shield.
- PShch 3 - a basis from a chipboard (P-3 brand) with bilateral veneer lining or a basis from TsSP. When using DSP veneer lining is not applied.
- PS 4 - a two-layer glued base of wooden battens, arranged so that the fibers of one layer are perpendicular to the other layer.
According to the type of facial rivets, there is such a classification of parquet boards:
- П - panel parquet covered with wooden parquet planks.
- Щ - front cover made of strips of peeled or planed veneer.
- F - front cover from the planks of the plywood facing plate.
As a rule, the front surface of the shields is lined with planks of natural wood (veneer) made of hardwood: oak, ash, walnut, chestnut, hornbeam, elm, elm, beech, larch, elm, and maple. Bars and slats of the base are made of pine, aspen, alder, birch.
The front layer usually has a thickness of 4-8 mm. The total thickness of the shields can be 22, 25, 28, 30, 32, 40 mm. The shape of the shields is square, the dimensions of the sides are 400-800 mm.

On each of the four ends of the shield there is an end-to-end groove necessary for connecting to the adjacent shield. Assembly is carried out using dowels cut from wood (birch or coniferous species) or plywood. Each shield has four slots through which it connects to four adjacent shields using four keys.
Some modern collections of parquet boards have a different type of connection, characteristic of piece parquet or laminate. This is a thorn-groove connection, which allows the panels to snap into the lock, without additional connecting elements.
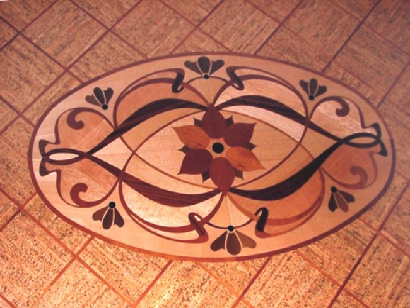
There are a huge number of collections of panel parquet with a variety of drawings of parquet planks. The drawing can be simple when the strips of the same size and shape are used for the shield. Or difficult - when in one shield there are strips of different shapes, sizes and colors glued at various angles to each other. Parquet, folded from billboards with a complex pattern, is called art panel parquet.

Features of laying parquet boards
Shield parquet is easier to lay than its piece counterpart. Firstly, several planks are assembled in one shield, and they are stacked as one element. That is, installation is faster. Secondly, the shield parquet does not require careful preparation of the base, the mandatory use of self-leveling solutions, etc.
Laying of shield parquet is carried out on logs or a solid foundation (open concrete screed or screed, lined with squares made of fiberboard or plywood). The choice of basis depends on the thickness of the shields used and their ability to absorb the load. Thin panels with a thickness of 22-25 mm are laid exclusively on a solid base. On the lags, such shields will not be able to withstand the load, as a result of which they will deform and break.
More dense boards with a thickness of 28-40 mm in the installation are universal. They can be laid on a solid base, and on wooden logs. However, this rule does not apply to panels manufactured by extrusion pressing. These shields, despite their thickness, are deformed by bending. Therefore, they are laid only on a solid foundation.
Installation on a solid base is carried out by gluing boards on parquet glue or mastic. Shields are nailed to lags or fastened with self-tapping screws. The fastening elements are fixed at the base of the shield groove.
Installation of shield parquet on logs
1. Preparation of the base (concrete screed)
Before starting work on installing the log, the concrete screed is leveled, all cracks and chips are filled with putty or cement mortar. Clean the base of the screed from debris and dust.
2. Setting the lag
As a log, use flat wooden bars made of soft hardwood or coniferous species, the optimal section is 50x50 mm. It is allowed to use wood of 2-3 classes.
Before starting work, the lags are coated with an antiseptic and dried. Permissible humidity lag - 18%.
On the wall mark the level of a clean floor. This is the level at which, after laying, the surface of parquet boards will be. The level of a clean floor is at a height that corresponds to the total thickness of the logs, gaskets for logs and parquet boards.
The layout of the lag in the room is performed along a long wall. The distance between the lags (between the central axes) should be equal to the width of the parquet boards. Suppose, if the dimensions of the panels are 300x300 mm, then the installation step of the log should also be 300 mm. The exception is shields 800x800 mm. When laying them, the step of the lag should be 400 mm, that is, one such shield rests on three lags. Observe the distance between the lags (ends, side parts) and the walls of 10-15 mm.
Under each lag, several gaskets from fiberboard are laid in increments of 60-80 cm. The lag is fixed to the floor using anchors or dowels and screws in the places where the gaskets are laid.

3. Sorting parquet boards
Shields are sorted, selecting specimens according to drawing, color, size (there are full-sized and additional shields that are placed in the extreme rows). Sorted boards are stacked and stacked near the front door of the room.
4. Mounting the lighthouse rows
Installation begins with the formation of lighthouse rows, which serve as a guide for the rest of the parquet boards. Lighthouse rows are placed along two adjacent walls of the room in the form of the letter "G".
To begin with, pull two mooring (lighthouse) cords. One of them is along the longer wall of the room, the other is along the joined short wall. The cords should cross at right angles.They are pulled along the walls at a calculated distance equal to the width of the shield + 10-15 cm. For example, if the width of the shield is 400 mm, then this distance will be 410-415 mm.
In the corner of the room, where two cords are joined, lay the first shield. After checking the correctness of its location along the cords and level, the shield is nailed to the logs with nails, driving them into the lower part of the groove along two edges - in the corners and in the middle. Using the damper, the nail caps are recessed into the shield so that they do not interfere with the installation of the connecting keys. Instead of nails, you can use self-tapping screws.
From the corner shield on both sides (along the cords), two lighthouse rows in the shape of the letter “G” are fixed.
Often there is a slightly different way of basting and layout of lighthouse rows. Initially, they lay the shield in the corner of the room farthest from the entrance. The correctness of its installation is controlled by the level. After the shield is fixed, two mooring (lighthouse) cords are pulled along its lateral edges at right angles to each other. Between the cords and the walls, two lighthouse rows are fixed in the same way as in the first case.

5. Laying the rest of the parquet boards
Next, along the lighthouse rows, the remaining cover panels are laid. The shields are placed close to each other so that their ends are connected along the axes of the lag. The walls leave a deformation gap with a width of 10-15 mm.
The rallying of the shields among themselves is carried out using the keys. To do this, a key is inserted into the groove of the shield already fixed on the lags, the next shield is mounted on it. They are rallied with a few strokes of the parquet hammer to prevent gaps between the edges and gaps between the parquet front surfaces. If the “tongue-and-groove” lock is supposed for parquet boards, the fastening is even simpler. It is enough to lay the first shield, bring the second shield to it at an angle and put a groove on the comb, thus locking the lock.
When laying the last shield in a row, expansion wedges (at least two) are inserted (hammered) into the expansion joint between it and the wall.
Partial shields, that is, segments, are usually laid in the extreme rows. A cut line is drawn on the shields, and then sawed with an electric saw or circular saw. When laying, the shield is turned with the cut part to the wall in order to be able to hide this defect with a plinth in the future. Incomplete shields are fixed on the logs with nails (self-tapping screws), driving (screwing) them into the front side near the edge so that it is possible to hide these fasteners with skirting boards.

Installation of panel parquet on a solid base
Installation of parquet on a solid base is carried out with some distinctive nuances.
1. Foundation preparation
An open concrete screed or screed covered with sheets of plywood or fiberboard can serve as a solid base for shields.
If the boards are supposed to be laid on an open concrete screed, then it is necessary to level it. Roughness of the surface is checked by a two-meter rule. Clearance under the rule leaning against the screed should not exceed 2 mm. If irregularities are found that exceed the permissible values, it is necessary to finish the surface with a self-leveling or regular cement screed.
After the screed has dried (5-7 days), the concrete base is treated with a waterproofing primer, which prevents moisture from entering the wooden parquet boards. When the primer dries (after 12-24 hours), you can begin the installation of panels.
Another option for a solid base is plywood or fiberboard. The sheet material is laid on a cement screed treated with a waterproofing primer. In this case, small errors of the concrete screed will hide under plywood or fiberboard, therefore, increased requirements for preliminary leveling of the concrete surface are not imposed.
The sheet material is cut into squares with dimensions of 400x400 mm or 500x500 mm.Lay out these squares on the surface, first “dry”, to determine the location of each and, if necessary, to trim. The layout is carried out taking into account that between the sheets there is a distance of 8-10 mm, between the walls and sheets - 10-15 mm.
With a notched trowel, glue is applied to the screed, with a thickness of not more than 2 mm. Squares of plywood are laid on glue and pressed on top to remove air bubbles and fix more firmly on the base. The final fixation is carried out using dowels and screws, screwed around the perimeter of the sheet in increments of 150-200 mm.

2. Mounting the lighthouse rows
Shields are laid out "dry", starting from the walls. This must be done in order to determine the most optimal location of parquet floors.
Then they lay the lighthouse rows with the help of mooring cords in the shape of the letter “G” (as when laying the shields on the logs).
3. Laying the rest of the parquet boards
Focusing on the location of the lighthouse rows, lay the remaining shields.
For gluing parquet boards use special parquet glue or mastic. The adhesive is applied to the base, the mastic with a layer of no more than 1-1.5 mm, the adhesive with a layer of no more than 2 mm. The adhesive is leveled with a notched trowel.
Shields are laid on glue, pressed. Keep a distance between walls and adjacent shields of 10-15 mm. Pairing adjacent shields is done using dowels or ridges and grooves. For better fixing of connecting elements (dowels, ridges), it is recommended to cover them with a PVA layer during installation. After rallying the boards, they are tapped along the edges with a parquet hammer to avoid cracks. The glue that came out when rallying at the joints is removed with a dry cloth.
Wedges are inserted between the end shields and walls to fix the position of the parquet elements. They are removed only after the glue has dried. Finishing work on scouring, grinding and varnishing of the shield parquet can be done after 3-5 days.

You can learn how to lay a panel board (modular flooring) on a solid plywood base by watching the video:
Finishing work
Parquet boards, as a rule, are completely ready for installation and additional measures for their decoration are not required. However, unprocessed panels are also produced, which after installation must be leveled or varnished.
Removing the protruding parts of the parquet can be done using grinders or a plane (if bumps are observed only in single joints). Then, with a wide brush or roller, varnish is applied on the parquet in at least 3-4 layers. If you want to give the parquet an unusual shade for it, a layer of stain is applied under the varnish.
3 comments