How to make a laser level with your own hands from a laser pointer and a building level
Laser level - a useful invention that makes the process of level beating fast and convenient. To use it, you do not need to have special knowledge, just install it on the floor (some models on the wall) and turn it on. The built-in laser emitter will begin to operate and at the moment will project strictly horizontal or vertical lines on the surface of the room. The mentioned advantages were appreciated in practice by many construction crews, but among the home masters the convenient device did not find wide application. A high-quality laser level (with a small measurement error!) Is expensive, so buying it for one-time work and then throwing it on the mezzanine is not reasonable. For these purposes, you can make a laser level with your own hands from inexpensive and affordable parts.
Components of the construction
The main element of the industrial laser level is a special laser emitter. In a home-made level, his role will be successfully played by a penny laser pointer, which can be bought in any stationery department. This is only the main detail, but not the only one, the whole list of necessary is as follows:
- laser pointer;
- construction level (bubble);
- a peg with a square or round diameter (d = 5-6cm) 1-1.3m long (you can use a shovel holder);
- thick plywood or board;
- a piece of porous rubber.
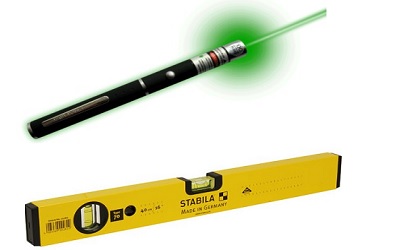
Stages of creating homemade
1. Laser pointer conversion
First of all, it is necessary to make an emitter from the pointer, which will project a clear point on the wall (unfortunately, he will not be able to "draw" a continuous line on the plane, like expensive purchased tools, special lenses are needed). To do this, take the simplest nozzle, without a pattern, glue it with cardboard and pierce a small hole in the center. Now, when we wind the nozzle over the pointer and turn it on, a bright, clear point appears on the plane.
2. Laser fixing at the construction level
We fix the laser pointer at the construction level with clamps. Between the pointer and the level we lay a piece of rubber. The cushioning material is necessary so that in the future it is possible to adjust the angle of the laser.
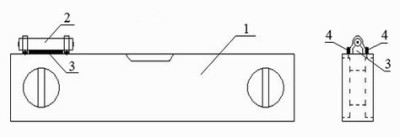
3. Making a tripod stand
At one end, the stake should be pointed, at the other - aligned horizontally to make a small area. We fix a board (plywood) with a nail or a screw to this site so that it can be rotated in a circle during the measurement process. It turns out a very convenient rotating stand.
4. Assembly of laser level elements
We hammer the stake with the pointed end into the ground (naturally this is possible only on the street, in the room it makes sense to replace the stake with a tripod). At the same time, we align the wooden stand horizontally, using the building level for control. We set the level on the site and turn on the laser.
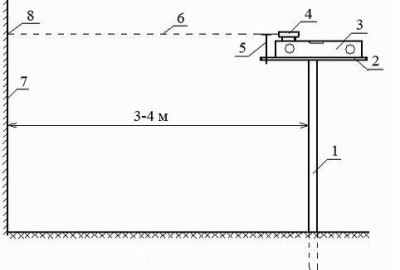
After turning on the device, at the point where the laser beam meets the wall, a dot will be visible. At this point, make a mark.Now we turn the rotating stand and mark the next point on the same wall. After connecting these two points, we get an absolutely flat horizontal line. In the same way, horizontals are drawn on all other surfaces of interest to us.
Laser Level Adjustment
The principle of operation of the laser level is clear. However, it is possible to proceed to the direct drawing of horizontal lines only after adjusting (checking) the tool. This event should be held every time after installing the stand with the level in a new place and before starting work. Adjustment can be done like this:
1. Screw a screw (l = 100-120 mm) into the stand board in such a way that its head coincides with the laser line. Point the laser level at the wall and turn on the beam. At the point received on the wall, make a mark and screw another screw there.
2. Between the screws we lay a thin rail, for example, a metal profile for drywall. We put a homemade level on it and try to set the level bubble horizontally (in the center of the window). To do this, raise or lower the end of the profile that is closer to the wall. As soon as the level bubble indicates a horizontal position, on the wall according to the new position of the profile, make a new mark. Now, if we connect the head of a screw screwed into a wooden stand with a new point on the wall, we get a perfectly horizontal line.
3. Install the homemade laser level on the stand. In order for the device to work correctly, we need to combine the point projected by the beam with the new point that we obtained using the profile. To do this, we adjust the position of the laser pointer with mounting clamps. As soon as the beam points to the mark obtained earlier, you can start working - the level is set correctly.
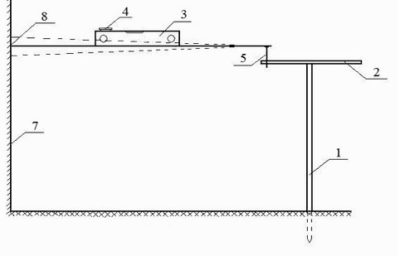
Such a home-made laser level in appearance and convenience, of course, is inferior to the analog of industrial manufacturing. And on the other hand, its price is mere pennies. In addition, the most important thing: with the accurate assembly of all parts, the resulting lines will match the horizontal just as accurately as when using a modern expensive level.



5 comments