
Quartz vinyl floor tiles: styling features of “vinyl quartz”
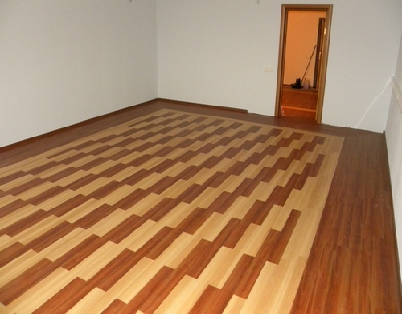
Quartz vinyl floor tiles belong to advanced PVC coatings, which, in addition to polyvinyl chloride, include quartz sand. The last component is not so small - as much as 60-80%, while PVC and various additives - only 20%. In a word, quartz vinyl tile is closer in origin to the quartz mineral than to PVC. This gives the tile extraordinary strength, almost zero abrasion, fire safety, moisture resistance. The presence of polyvinyl chloride in the composition allows you to simulate any materials, as well as their texture. Quartz vinyl tile can be a double of wood, granite, marble, slate, ceramics - anything. Thanks to this, you can embody any design fantasies without significant financial investment.
The structure of quartz vinyl tiles: what's inside?
Quartz vinyl tile is layered, its design is as follows:
- 1st layer (top) - transparent polyurethane. If we recall that the main component of bulk floors is also polyurethane, it becomes clear that this layer protects the tile from scratches, deformations, abrasion;
- 2nd layer - decorative film. She is responsible for the coloring and pattern of the flooring;
- 3rd layer - the main quartz vinyl. Gives the tile basic properties: strength, soundproof, moisture resistant;
- 4th layer - fiberglass reinforcing. Fastens the structure, makes the tile unaffected by deformation;
- 5th layer (lower) - vinyl, balance sheet.
If you decide that your floor should be quartz vinyl, do not rush to call specialist finishers. Below we will provide detailed instructions for laying it, which will allow you to cope with this matter yourself.

Materials and tools for styling
When laying quartz vinyl tiles, the following materials and tools are used:
- leveling compounds (cement mortars, putties, etc.), primers - to prepare the floor surface;
- tape measure, square, coated cord, pencil or chalk - for marking;
- notched trowel, acrylic glue - for gluing tiles (if the material is used without a lock connection);
- roller - for leveling glued elements.
Laying Quartz Vinyl Tiles
1. Leveling and surface preparation
To the surface on which the quartz vinyl tile is laid, special requirements are imposed. The floor must be thoroughly cleaned and leveled, all defects are leveled.
For concrete floor recommended:
- remove garbage, remove traces of grease, paints, polishes, remove dust;
- level the surface with leveling mixtures or cement screed;
- repair cracks, chips, potholes with putty;
- apply a primer;
- check humidity - it should not exceed 5%.
For plywood, OSB or GVL sheets (a wooden base is covered with these materials):
- grind differences between sheets to level the surface;
- remove garbage, remove dust;
- in the presence of defects (cracks, cracks) - putty;
- check humidity (up to 5% permissible).

2. Floor marking
On the floor surface, axes are broken down. To do this, find the centers of two opposite walls and use a coated cord to connect them in a line. The center is marked on this axis and a second line is drawn through it, at right angles.As a result of the markup, 4 identical rectangles are obtained, with respect to which the tile will be laid.

3. Tile mounting
Quartz vinyl tile can be mounted by means of glue and glueless joints. In the first case, the adhesion of the tile to the floor is provided by dispersion or contact adhesive. This installation model is by far the most common.
Another case is a glueless joint, it is possible only with the latest series of PVC tiles with Click lock joints. Thanks to the "tongue-and-groove" system, quartz vinyl tiles with a lock connection during installation are connected only to each other, bypassing the need for adhesion to the floor. To do this, just insert the groove of one tile into the longitudinal recess of the other and snap them into place. In other words, the laying of such a quartz vinyl tile is performed in the same way as a laminate.

When using ordinary adhesive tiles, first of all, glue is applied to the prepared surface with fan-shaped movements. Start from the sector farthest from the doorway. After laying the elements, the next sector is smeared, then the next, etc. Glue for mounting quartz vinyl tiles must be applied evenly with a spatula with rates A1-A2. In this case, its consumption will be optimal and will be 0.25-0.35 kg / m2. It is impossible to glue the tile directly on fresh glue, since it has not yet gained the necessary adhesive properties. Only after 8-10 minutes, when it dries a little, you can begin installation.

Quartz vinyl floor tiles are available in the form of tiles and trims. Planks should begin to be laid along the center of the axis and lead away from you, in one of the sides, moving along previously laid planks. Laying of square tiles starts from the corner where the marking axes intersect, strictly inside the sector farthest from the entrance. Installation of tiles should also be done on my own. Other laying patterns are possible, all of them are depicted in the instructions for quartz vinyl tiles. After gluing, each element is rolled with a roller from the center to the edges for better adhesion to the floor.

Tiles and strips of quartz vinyl should be laid tightly to each other, without gaps. Expansion joints between walls, pipes and other stationary objects are optional.
If necessary, pruning is done on the front quartz vinyl, along the line of which undercut is approximately half the thickness. Next, the tile is bent and a final cut is made.

5. Preparation for operation
As soon as the quartz vinyl tile is laid, it is necessary to remove any glue that could remain on the surface and squeeze out of the seams. The glue is easily rubbed with a soft cloth dipped in ethyl alcohol.
You can walk on quartz vinyl tiles immediately after laying. It is allowed to load with furniture after 24 hours, when the glue is completely dry. Washing floors, final cleaning should be done only 5 days after installation.
Layout video
In order to better understand the technology of laying quartz vinyl tiles, watch a short video clip:
4 comments