Design ideas: making joints on the floor professionally
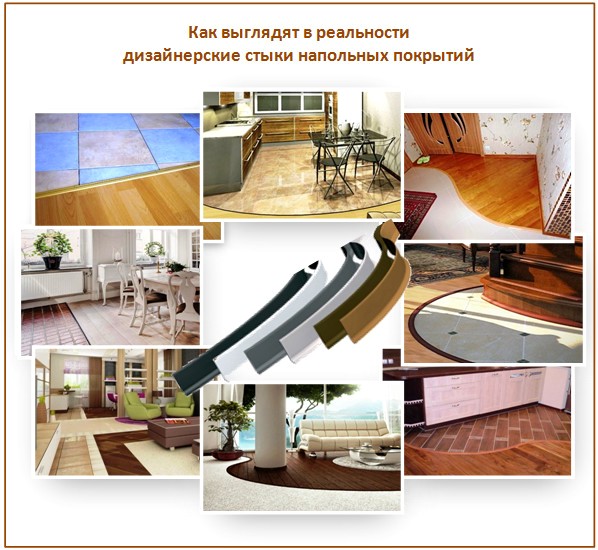
It is difficult to imagine a modern studio apartment, a spacious living room, a workshop or a fitness center at home without curved designer joints. After all, it is important not only to visually separate the necessary zones, but also to protect a more fragile coating from high traffic. For example, the same parquet from the bar counter, or the same massive board from the front doors. And straight lines are also always appropriate and look beautiful (not to mention the fact that there’s an order of magnitude less concern with them), but it’s not always possible to do just them.
This fashionable phenomenon in interior design is called "flowing space." This is when there are no walls and no partitions, and the whole room seems huge and incredibly stylish.
Moreover, many new fashion zones take up very little space to somehow separate them with shelves or plasterboard: galleries, mini-gardens, workshops, home theater, bars and SPA corners. Such open and half-open spaces with professionally designed curved joints of flooring are the real future that has already arrived.
Content
Hypercreative designers or chic fashion?
However, the fashion for curved joints of different floor coverings at the time introduced a whirlwind of new ideas for creative designers, and many quarreled with those contractors. Which is quite clear: simply joining a tile with linoleum in a straight line is one thing, and not at all difficult, but realizing a crazy fantasy in the form of almost a pattern on the floor of flexible profiles is another. Here you need to sit for hours and cut the necessary bend on the tile (with a laminate, everything is easier, you see). And only the one who at least once tried to do this knows what is at stake. Therefore, even the renowned repair gurus annoyedly talk about such ideas of designers:
“The designer went into the 3D interior program, drew a kitchen with a hallway, installed ceramic tiles as a floor covering, drew a large oval in it and“ poured ”it with a laminate. With one click of the mouse. Then the enthusiastic customer brought this "creation" to the foreman, and he asked the designer: and how to do it? The designer answered: well, you draw an oval and fill it with laminate. The foreman dresses and leaves. "
Perhaps now we have a lot of fun. And indeed, who wants to sit in someone else's apartment and cut out the same tile for days and hours when the fee will be paid for the completed tasks on the estimate, and not the time spent. It is much easier to inform a little-informed customer that the designer is an eccentric with the letter m, and this curved joint of the flooring looks beautiful only on the monitor screen, and in life it looks like a torn brick in the home decor. And that then you won’t have problems with such a joint, it looks silly and an honest straightforward connection is much better. And that drywall is also bending - this is the last thing and generally funny. In general, such designers only - in the clinic. And even on construction sites, all this creative needs to be displayed only with a large red cross-out cross - supposedly, that's how you just do not have to.
But while masterful gurus try to stop the rapid development of interior design with all their might, contractors make all these designer joints and bends simpler and easier - it just takes time. Moreover, the result is paid - and everything else already depends on skill. And in fact, such joints look neat and beautiful - if they were made by a professional. And if in advance they were really thought out - the viewing angle, for example, changes a lot. And today, even in Europe, the joint of the coatings from the hallway in the room is not done linearly in the form of a simple threshold, but in a semicircle, and it looks amazing.
And then these joints do not create any problems: with proper installation, the same care is required for them as for the entire floor.
How can two different coatings be combined?
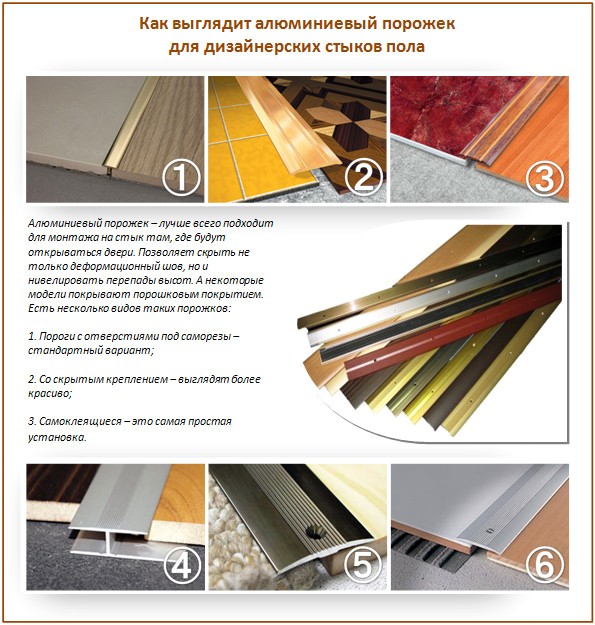
For linear joints of different floor coverings, sills are used today: metal, wood and flexible. These are not exactly the thresholds that we sometimes fasten at the doors - these are much more complex and functional. And the simplest thing is to join the ceramic tiles of the kitchen and the laminate of the corridor by inserting just one aluminum sill and fixing it with self-tapping screws. But beautiful designer joints are already more difficult to organize. After all, aesthetics is one thing, but it is necessary that such a bend does not break then, does not become dirty and no one trips over it.
A high-quality profile for joints should have the following advantages:
- Water resistant. This is an important parameter because the profile covers unprotected joints of coatings.
- Color fastness. The profile should not fade in the sun.
- Invisible and fast installation system.
- Compliance for slicing into smaller pieces.
- Possibility of laying on uneven floors.
- The ability to adapt to coatings that differ in height by only a couple of millimeters.
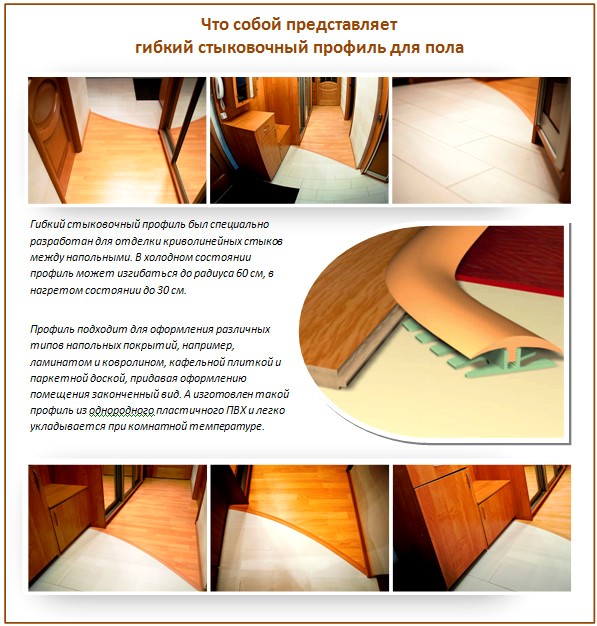
- Bending radius up to 30 cm when heated and up to 60 cm when cold.
- Wear resistance. The profile should have a quality appearance as much time as the coatings themselves.
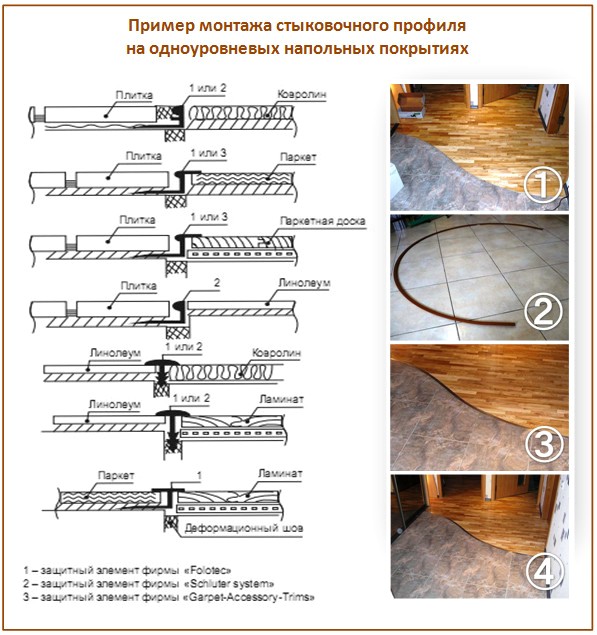
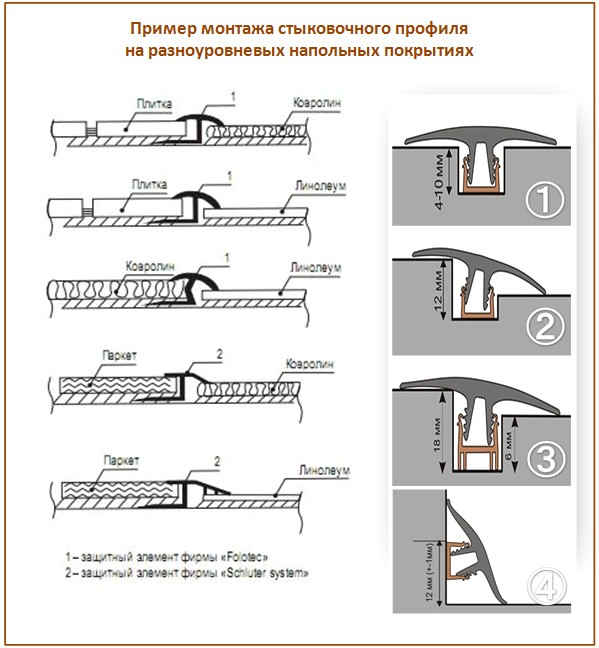
If the coatings are of the same height, they are joined in this way:
If - mixed, then like this:
Types of modern profiles and sills
Such profiles on the modern market are also presented in a wide variety: cheap and expensive, moisture resistant, durable, multi-functional and for different tasks:
Aesthetics, i.e. maximum performance of the most important tasks:
- Make the transition between coatings soft and invisible.
- Suitable for finishing complex elements such as columns.
- Possibility of installation already on the laid floor coverings.
Also, the sills are divided into types:
- Direct. These are used to close the linear joint between different types of flooring. But they can be used only when both coatings are the same in height.
- Leveling.These profiles are used to dock coverings of different levels. Their main task is to make the transition softer and more accurate.
- The final ones.This type of profile is needed in cases where some kind of flooring ends and its border needs to be covered.
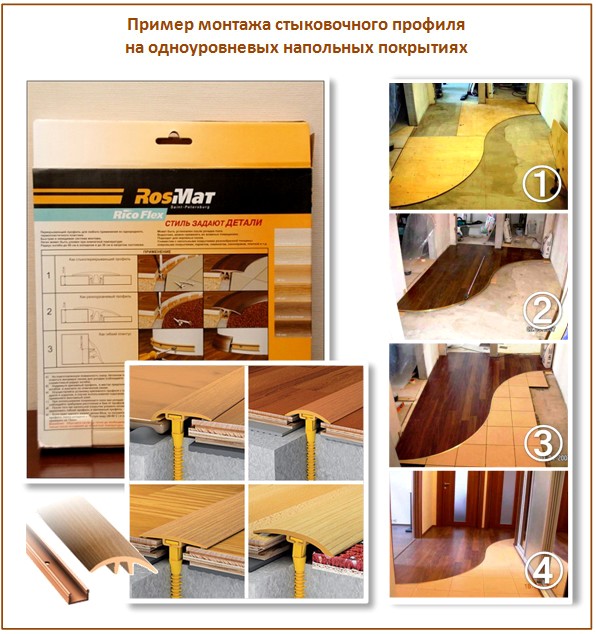
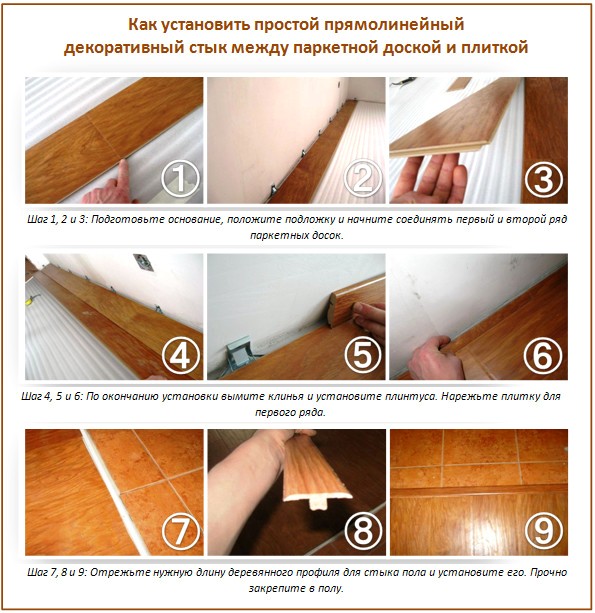
Here is an example of mounting a direct profile:
Metal profiles are made in silver, bronze or gold, so that they harmonize with decorative door handles and other interior details. Especially good for offices.
For high wear resistance, a powder coating is applied to the metal profile at the factory. And to Each profile usually comes with a mounting rail, which is screwed directly to the floor with screws. On her already - the profile itself.
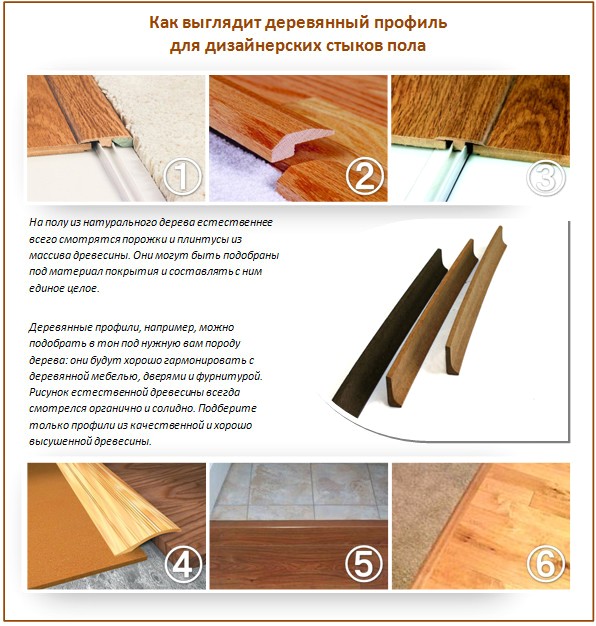
Aluminum profiles are also available, coated with a laminate in wood color. Such are more resistant to mechanical stress.
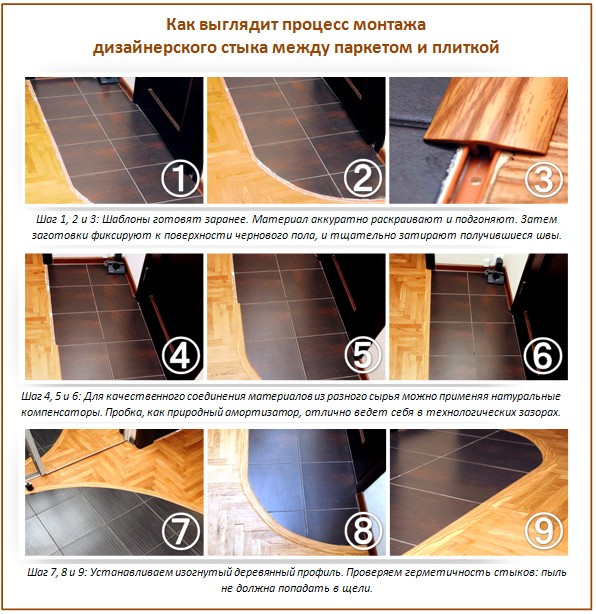
But the T-shaped profile from the array is the most expensive for design joints. Usually it is taken for a straight line transition of the parquet to the tile, and installed on glue.
But take special care in connecting profiles made of natural wood: in winter, when the humidity due to the heating season in the air decreases markedly, the wooden planks dry and noticeably decrease in size. But by the spring - they again pick up moisture and increase. Such fluctuations significantly reduce the service life of wood profiles, but if you hang a hygrometer on the wall and monitor the air humidity using various tricky and simple devices, then such problems will not arise. In addition, a normal level of humidity will refuse a beneficial effect on your health.
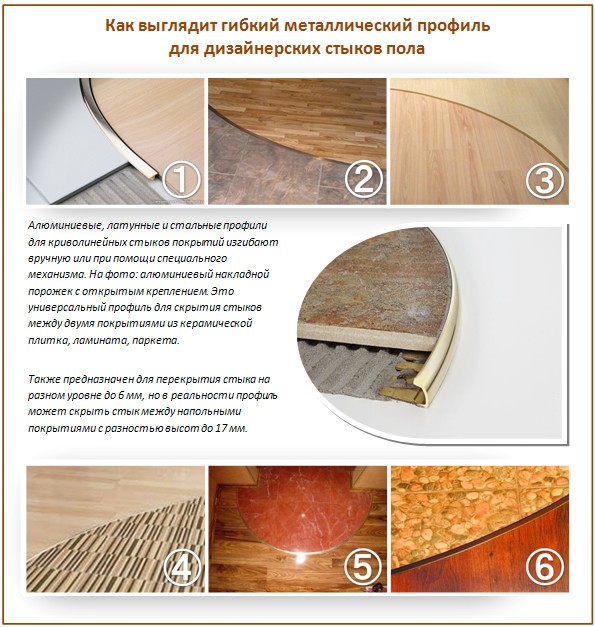
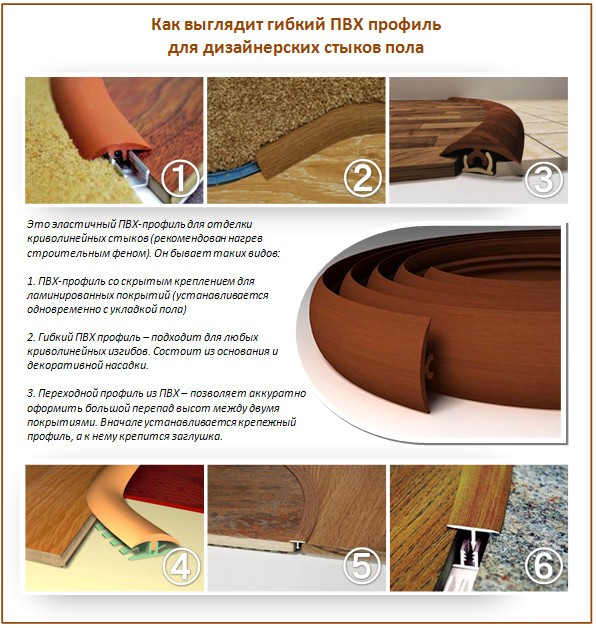
Flexible PVC profile must be softened before installation. To do this, heat the water to 50-70 degrees and leave the profile there for 20 minutes. After that, it will be easy to bend and install it in the right place. So, even in the factory conditions, notches are applied to the flexible PVC profile, along which it is convenient to bend it with your hands in almost any radius. But the direct profile is not used notches.
The most functional are cork profiles, which consist of a layer of cork between thin strips. For example, the same parquet often “plays”, and the cork profile will absorb like a spring. But such a profile cannot be fixed at the junction with carpet or linoleum - it will not cover the raw edge.
It cannot be said that one of the types of profiles is worse than the other - each has its own purpose. And with examples, everything will be clear to us now.
How is profile installation
Fastening profiles is also closed and open:
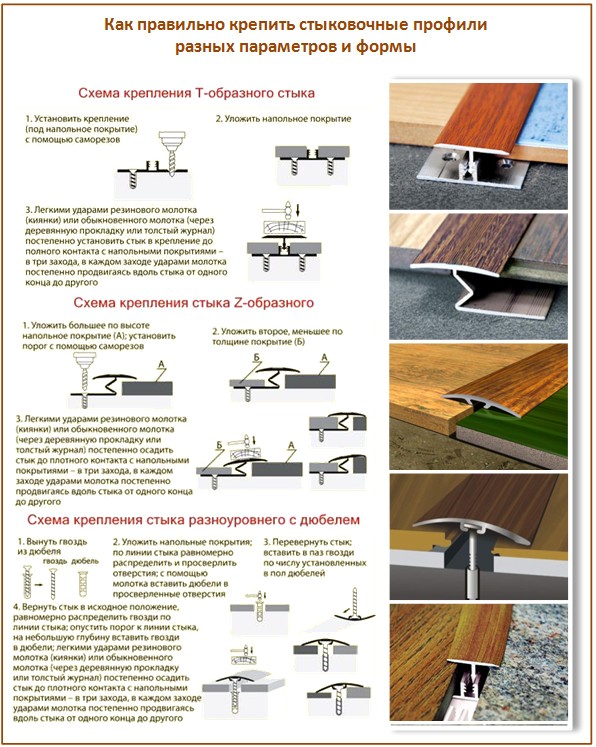
- Open way: openings for fasteners have already been made in the nut, and the screws are also painted in the same color. At the installation site, we drill holes, hammer dowels and fasten the metal bar. Those. mounts, if carefully examined, are visible.
- Closed way: in this method, the screws hold the lower profile - the mounting rail, and the faceplate is latched on or glued to it. Those. the mounting system itself will not be visible.
Both that and that way are good in their own way: one is maintainability, the second - more aesthetics.
Different profiles and in their form:
The lane with holes should be installed as follows:
- Trim the profile as you need.
- Mark up where you will later drill.
- Drill holes and fasten the sills to the screws. It will be convenient for you to do this with a screwdriver or a special screwdriver. Just act carefully so that the nut does not bend.
And here the sills with hidden fastenings are fixed:
- Mark up on the ground.
- On the wrong side of the nut groove, insert a self-tapping screw with a dowel.
- Drill holes in the floor.
- Insert the nut with dowels into the holes and hammer to the end. Just hammer through the bar so as not to damage.
And, finally, the easiest installation for a nut on a self-adhesive basis:
- Mark the future contour and glue the sills exactly in the center of the joint.
- Remove the protective film from the base and firmly press the profile - it will stick itself.
The profile on the zigzag leg decorates the joint of different floor coverings best of all. It needs to be planted on special glue, and after laying all materials with force, squeeze to the desired level.
Each profile has its own device for attaching to the floor. If the profile has two tabs for fastening, then mount it simultaneously with the same tile. She will press one of the legs with her weight and glue, and the other will fall under the laminate substrate. The installation of the profile itself is extremely simple - just arm yourself with a screwdriver and an electric drill. But, if you use an aluminum profile and do not want to insert a cork compensator - then take such a nut that comes with a special rubber insert, as here:
Tile and wood: contact established!
The most difficult thing is to correctly dock the tiles and floor of wood or wood shavings.
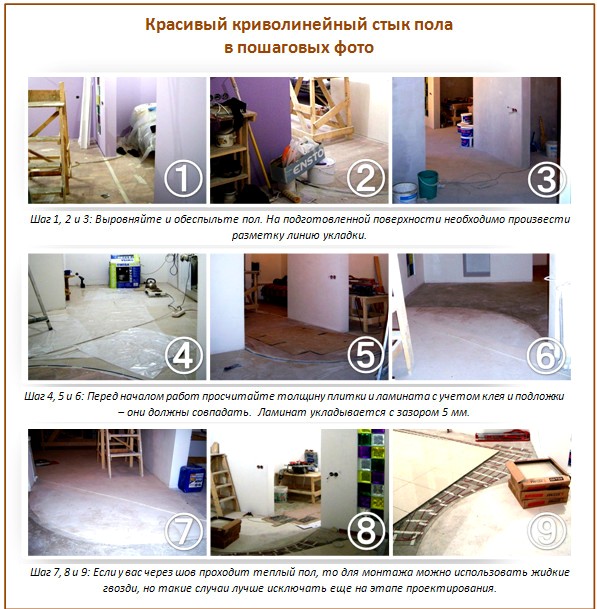
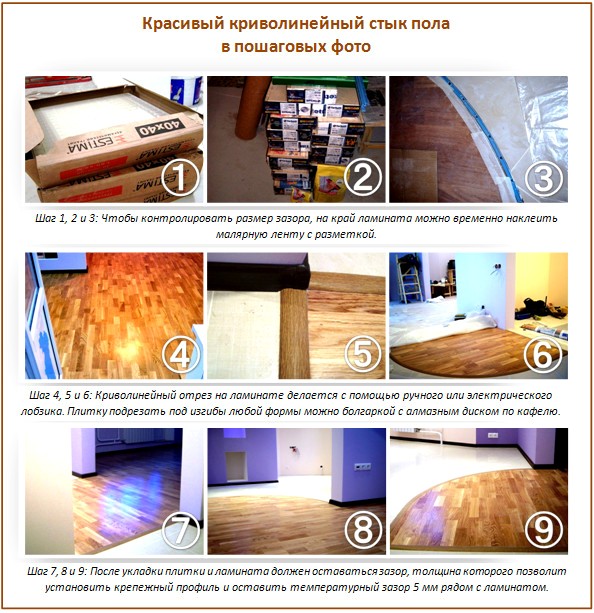
So, for cutting crooked joints of coatings, use cardboard templates - it is easy to make markings on them. It is also good to use a cork compensator for such coatings: a strip 10 mm wide will quietly shrink to 5 mm. Be sure to use it if you join the floor in a room where temperature and humidity changes are quite frequent. It is next to the conservatory, pool and sauna, for example.
In addition, when laying a wooden profile, be sure to leave compensation clearances. Indeed, it often happens that a plank tightly fastened the joint of tiles and parquet, and in the winter you can observe a terrible picture: the plank jumps out and deforms, the parquet “gets” to the tile and even breaks off its edge under pressure! This is where the stories about how bad and unreliable to make different design joints of the floor come from. Just leave a gap - it will not be visible under the profile, and all problems have been resolved!
And keep in mind that the floors on the "floating" technology move even faster than the coating that is firmly glued to the floor. Therefore, we leave a compensation gap for parquet of 10-15 mm, but for “floating” floors - all 20 mm. Remember, we leave the same gaps on the walls - just cover them with skirting boards. Like in this example:
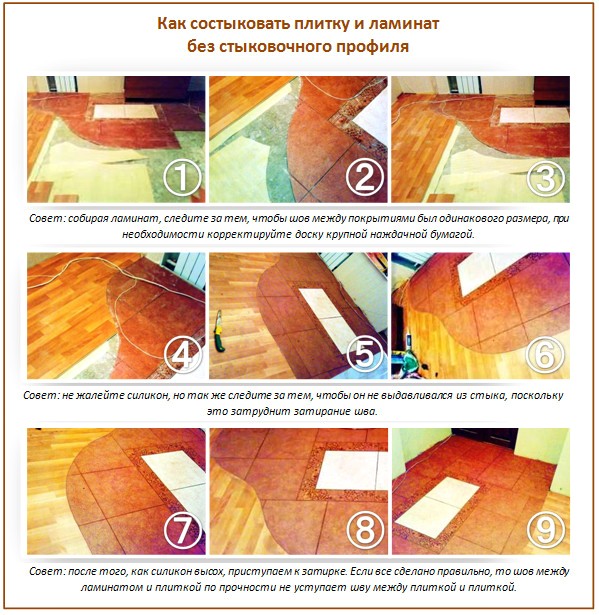
An example of joining a laminate and tile:
Joint of two types of carpet: not everything is so simple!
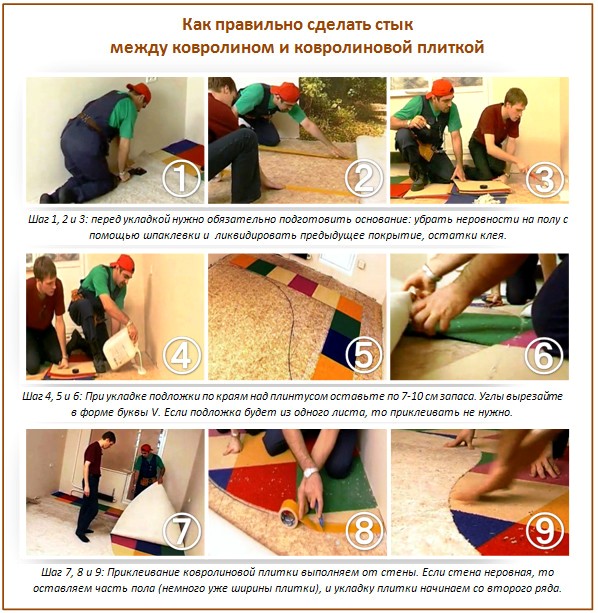
The design joint of two types of carpet is also in fashion. It is only important to know exactly how to do this - nothing complicated, believe me! Just remember a few rules:
- If you join two or more types of carpet, then lay them so that the fibers are directed the same way. This will greatly facilitate your subsequent cleaning.
- If you make a joint at a small width, up to 15 cm, then simply glue together these two pieces using ordinary PVA and put the load on for several hours.
- At the junction of the carpet more than 15 cm wide, you do not need to press anything - just skirting along the perimeter.
- If after the joint of the carpet you will carry out some more work, then cover the entire floor with clean paper. But only not with a film - it will retain moisture, and the glue will bubble.
- If your carpet also has holes for pipes, then fix them with colorless tape. Otherwise, over time, the carpet in those places will peel off.
- After gluing the joints, try not to walk on the carpet for 24 hours.
If you have chosen the right profile to connect the designer joint of the floor, then no one will trip over it and cleaning will also not be difficult. In addition, a tastefully selected profile also often serves as a vivid visual accent of interior design.
A joint without profiles is possible!
You can join two different flooring and without a profile. For this, a cork compensator is used.
Experiment and boldly design the future!

3 comments